Showing posts with label chocolate baroque; stamping. Show all posts

Saturday, 15 July 2017

Quick and Easy Mackintosh Love card created for Chocolate Baroque


Materials:
 
*I used StazOn to stamp the sentiment on my coated card as I wasn’t sure if Versafine would dry on the slightly shiny surface. If you are using an ‘inkable’ type of card/paper the Versafine will be fine for this.
 
How to make it:
  1. Stamp the heart and flowers onto stamping card and heat emboss with clear powder. Cut out elements and colour with inks and sparkle pen.
  2. Stick the ribbon to card front with double sided tape. Stamp the sentiment. Glue down the stamped embellishments with 3D glue or foam pads for added dimension.

Tuesday, 27 June 2017

Butterfly Fold Back card created for Chocolate Baroque

Good morning. Here is one of my samples for the butterfly stamp set shows featured on Hochanda recently with Chocolate Baroque.


Note: I recently got the Tim Holtz stamping platform from Tonic Studios and I found it perfect for this project. Building the frame with the swirly stamp was so easy. Simply stamped, turned the card 90 degrees and stamped again. However, it is not essential for this project. Using an acrylic block with grid markings will help you to align the stamp with the card edge when building the frame with the swirl stamp.

Materials:
How to make it:
  1. Make a vertical score line half way across the card front and fold back.
  2. Open the card out flat and stamp the swirls around the edges with Versamark ink to frame. Use a gridded acrylic block to help align the stamp with the card edges. Also stamp the verse and small butterfly. Heat emboss with the pearl blue powder. Colour the butterfly with sparkle pen and add glitter glue dots for added sparkle.
  3. Stamp the large butterfly onto white card with Versafine. Using watercolour pens directly onto the stamp, colour the lightly spritz with water and overstamp onto the black image. This will give a watercolour effect. Add more colour with the sparkle pens. Cut out and glue to the edge of the card fold back. To make it neater you could paint the back of the white card with black acrylic.
  4. Finish with more stickles and add some Glossy Accents to some areas of the butterfly detail.

Wednesday, 24 May 2017

Fairyland card created for the Chocolate Baroque Colour Challenge 35

Good morning. Today I am sharing one of my samples for the recent shows on Hochanda. I had so much fun with these stamps. I hope that you like my fantasy scene. This one also perfectly fits the Chocolate Baroque Colour Challenge this month too.


Materials:
  • Spring Fairy Collection , Fantasy Castles, and Magical Landscapes
  • 8 inch square card blank, white stamping card and purple iridescent paper
  • Scrap copy paper to create masks
  • Large decorative circle mat cut from purple card and circle die to cut out image
  • Versafine Inkpad (Onyx Black), StazOn (Jet Black)
  • Water based inks (purples)
  • Watercolour pencils (black, purples and greens)
  • Clear sparkle pen
  • Fine tipped marker pen (black) and alcohol marker (purple)
  • Stickles glitter glue (Star Dust)
How to make it:
  1. Stamp the fairies with Versafine, cut out and colour with pencils and a damp brush.
  2. Stamp the wings with StazOn onto the iridescent paper, cut out and decoupage over the stamped fairies.
  3. Stamp the castles and buildings onto copy paper and cut out. Arrange the elements to plan the scene, i.e. it needs to fit into the circle topper which will fit onto the large decorative mat. Stamp the foreground image with Versafine and cover it with your paper mask before stamping the next image behind. Continue covering the foreground images and working towards the background elements. When complete remove the masks and use a fine tipped marker to join up or draw extra elements where needed.
  4. Colour with watercolour pencils and a damp brush. Overlay some areas with clear sparkle pen. I added extra intense colour with water based inks into the background to make the buildings ‘pop’.
  5. Edge the card blank with alcohol marker to frame. Layer and glue down all elements. I used 3D foam and glue gel for added depth.
  6. Finish with touches of glitter glue for added sparkle.

Monday, 15 May 2017

Quick and Easy Gold Bird card created for Chocolate Baroque

Good morning. This is another quick and easy make using the Spring Fairies stamp collection recently featured on Hochanda. Great for batch making.


.
I used a ready made gold aperture card. I stamped the bird and sentiment using Versamark and heat embossed in gold onto black card. I added a little colour with opaque gouache paint.
 
Materials:

Tuesday, 15 November 2016

Quick and Easy Tangled Christmas Tree cards created for Chocolate Baroque


Good morning. I hope that you like my quick and easy Christmas cards using the new Christmas Tree Tangle stamp. I split my stamp into 2 to give more versatility, and so that I could use them individually or change the arrangement of the sets of trees. I stamped them onto black card and heat embossed with glitter powder for sparkle. I used a water soluble semitransparent white pastel to add a bit of colour and an opaque white spritzer to create a snowy night scene. I also added a bit of clear mica spritz for added sheen. I finished with a metallic silver marker pen and peel off sentiment. Really quick and easy and great for batch making. Vary by using different colours of embossing powder and background card. I think that Kraft card and pale blue would look good – will have to try that.

Materials:
  • Christmas Tree Tangle single stamp
  • A6 white card blank and A6 black card
  • Versamark Inkpad
  • Glitter heat embossing powders (I used blue & silver)
  • Metallic silver fine tipped marker pen
  • Christmas sentiment peel off stickers (silver)
  • Glitter gel pens (optional)
  • Spritzer sprays (opaque white, clear mica)
  • Alcohol marker (black)
  • Watercolour brush
  • Heat gun
How to make it:
  1. Stamp with Versamark and heat emboss the image with glitter powder.
  2. Dissolve some of the pastel pigment into water and paint over the scene with a brush. Add a little colour onto the trees with glitter pens if desired.
  3. Spritz with opaque white spray to create the snow effect. Add some mica spray for extra shimmer.
  4. Add peel off and trim the topper slightly to leave a border on the card front.
  5. Quickly draw a border to frame using the metallic pen.
  6. Glue to card front and add a border around the card blank with black pen.

Saturday, 15 October 2016

Quick and Easy Butterfly Cards created for Chocolate Baroque


Good morning – I love stamping directly onto pretty background papers to produce quick and easy cards – great if you need to put something together in a hurry. I have created 2 variations using the Patchwork Butterfly stamp from Chocolate Baroque with one of the pretty background papers from Crafty Individuals (Book 5 – Travels in Italy). I stamped the butterflies and heat embossed them with pink sparkly embossing powder, then quickly coloured with watercolour and glitter pens. To give them a bit more depth I added a quick drop shadow around them using pencil. To finish I added a few highlights with white gel pen and a little glitter glue for added sparkle.

Materials:
  • Patchwork Butterfly stamp set
  • 6 X 6 inch white card blank
  • 6 X 6 inch backing paper from Crafty Individuals (Book 5 – Travels in Italy)
  • Versamark Inkpad
  • WOW embossing powder (Florida Sunset – pink with gold glitter)
  • Alcohol markers (dark green, dark red)
  • Watercolour and glitter pens (green and yellow, purple and pink)
  • Opaque gel pen (white)
  • Pencil (grey)
  • Clear glitter glue and PVA pearls
How to make it:
  1. Trim the paper slightly to fit the card and edge with alcohol pen to frame.
  2. Stamp the butterfly with Versamark ink and heat emboss with glitter powder.
  3. Quickly colour with watercolour and glitter pens – the embossed areas resist the pens so colouring is really quick and easy. Add some highlights with white pen.
  4. Outline with pencil to add a drop shadow and make the butterflies stand out from the background.
  5. Glue to the card front and add glitter glue and PVA pearls to finish.

Friday, 30 September 2016

Floribunda quick and easy card created for Chocolate Baroque

Good morning. Here is a quick and easy project using the lovely Floribunda Net stamp from Chocolate Baroque. Check out the Design Team Blog for more quick projects from my Teamies.


Materials:
How to make it:
  1. Stamp the image and sentiment with Distress Ink. Brush over the image with a damp paint brush to add shading and colouring.
  2. Glue and layer onto the blue card and card front. Touch up with glitter glue on the rose petal tips.

Sunday, 18 September 2016

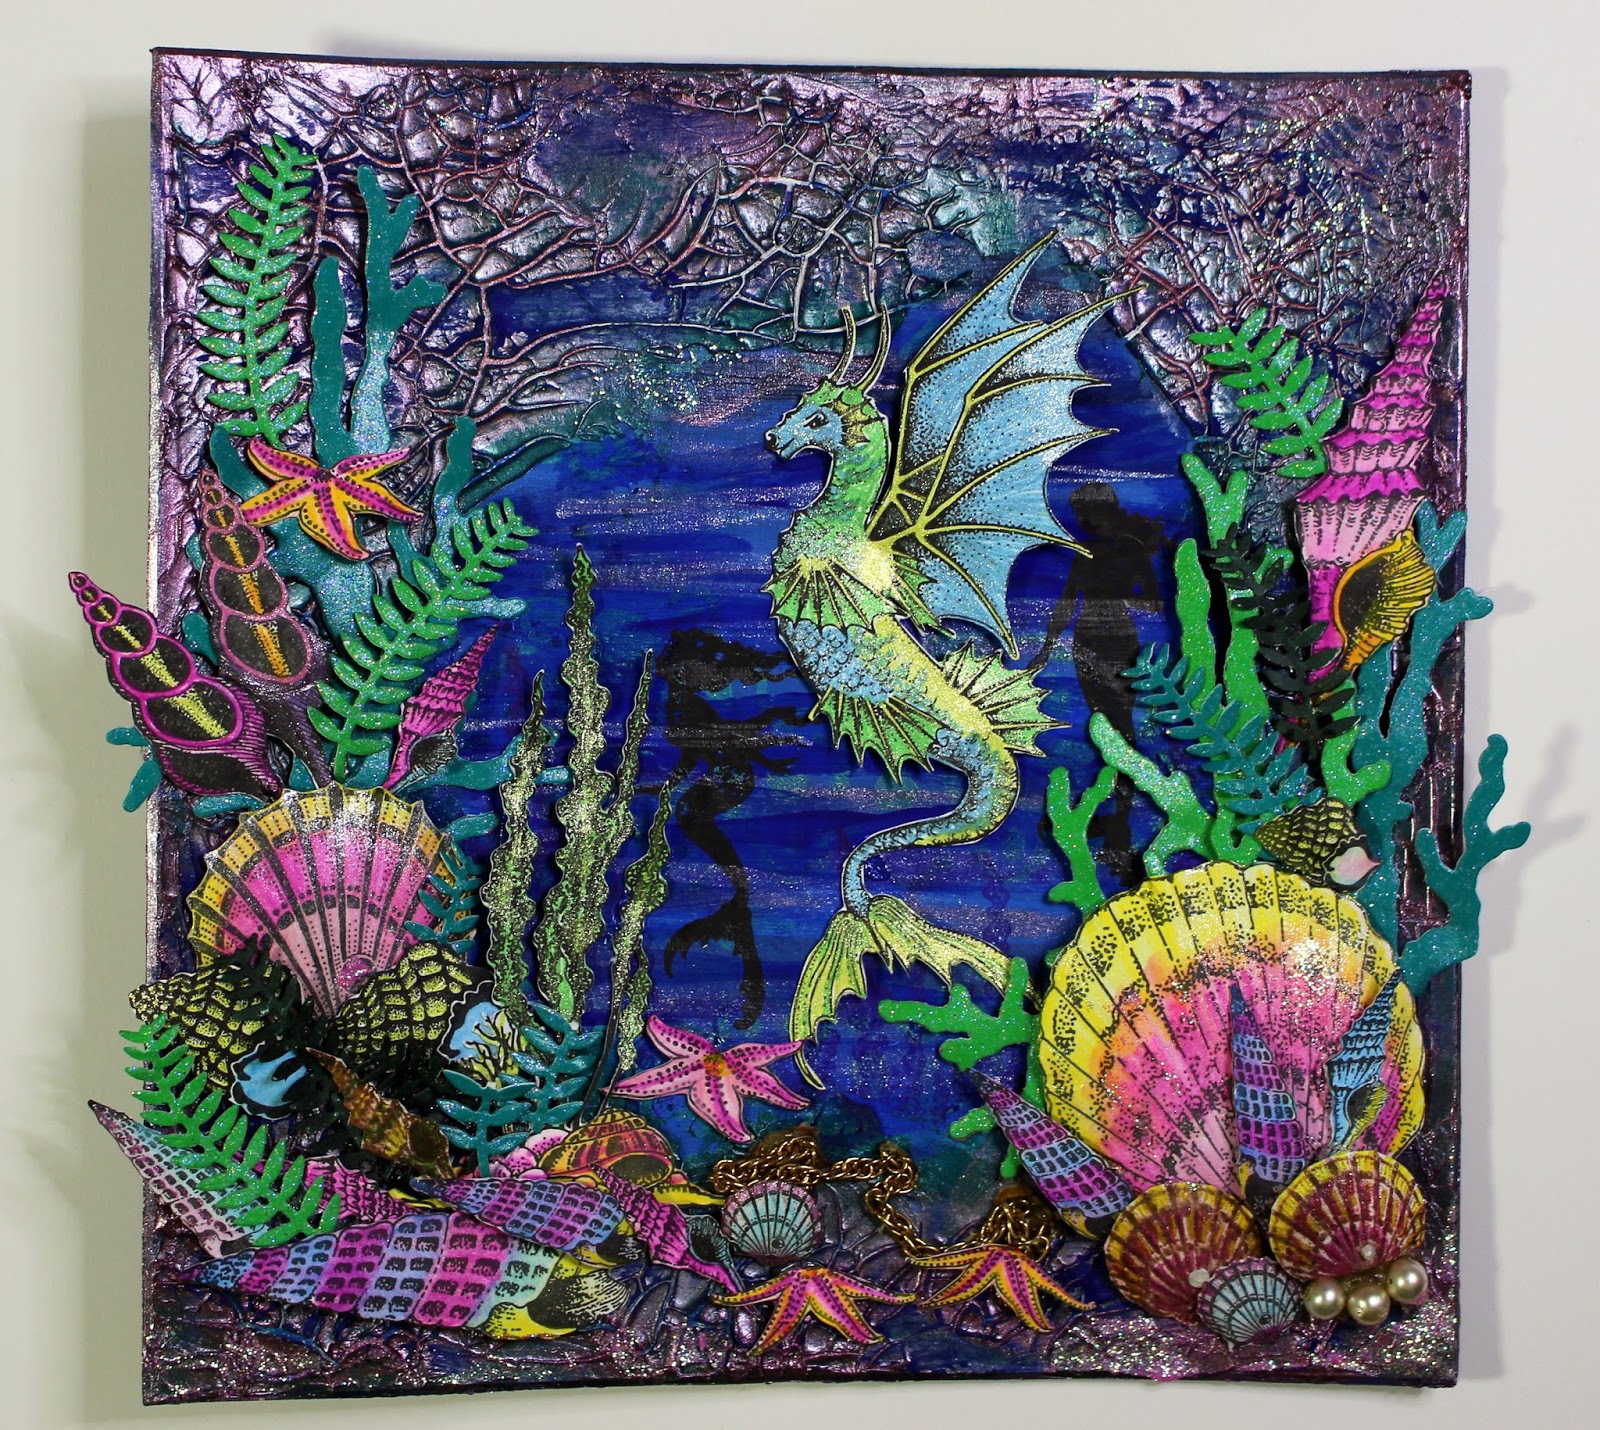
Sea Dragon Canvas TV show sample created for Chocolate Baroque

Sea Dragon Canvas - TV show sample created for Chocolate Baroque on The Craft Channel this week.

Materials:
  • Seadragon, Mermaid Queen, Underwater Kingdom, Underwater and Seashell Collage stamp sets
  • White stamping card, teal green glitter card
  • 20cm square canvas board
  • White Gesso
  • Acrylic paints (blues, greens and teal metallic)
  • Viva Décor Croco Crackling Colour (green shimmer -501)
  • Viva Décor Precious Metal Colour (pink)
  • Alcohol pens – for colouring die cuts (greens)
  • Watercolour pencils (pinks, purples, blues, greens, yellow, orange)
  • Versamark Inkpads (Vintage Sepia and Onyx Black)
  • Archival inkpad (dark blue)
  • Watercolour or acrylic transparent shimmer paints (blue, green – for dragon)
  • Recycled jewellery pieces (chains, pearls etc.)
  • PVA pearls
  • Iridescent glitter glue (pink)
  • 3D glue gel
  • Dies to cut seaweed - mixed branches (Heartfelt Creations) and leaves (Couture)
  • Stencils with swirls or water patterns (optional)
How to make it:
  1. Add a coat of white gesso to the canvas. Note: The canvas was already primed but I find that the gesso adds a bit more of a key for adhering acrylic gels etc.
  2. Paint the background with streaks of blue and green acrylics. Add some texture with stencils (if you like).
  3. Stamp some of the weeds etc. with dark blue ink. Stamp the mermaid silhouettes in black ink.
  4. Apply the crackle paste all around the edges using a palette knife and leave to dry overnight. Rub over the crackle texture with some pink metallic paint. Add some sparkly streaks into the water. Rub a little teal metallic in some areas.
  5. Die cut a range of seaweed shapes using dies from plain card (colour with pens) and teal glitter card.
  6. Stamp the dragon, seaweed, shells and starfish onto white stamping card using black ink, and brown ink for some of the shells. Colour with watercolour pencils and a damp brush. Add some shimmer paint to the dragon. Cut out and shape slightly to give them dimension.
  7. Glue on the die cuts and stamped images using 3D glue gel. Add some ‘treasure’ – chain, pearls etc. Add PVA pearls to some of the shells, and extra sparkle with glitter glue.
Finishing your artwork: Optional: Spray the canvas with acrylic varnish. This will protect the canvas, particularly the watercoloured images. I used a Tim Holtz BigZ Easel die to cut a stand from mount board (attached to the back). Alternatively punch some holes and hang with cords.

Sea Dragon card TV show sample created for Chocolate Baroque

Sea Dragon card - TV show sample created for Chocolate Baroque on The Craft Channel this week.
Materials:
  • Seadragon (sea dragon, mermaid, sentiment), Underwater Kingdom (mermaid), Underwater (starfish), Seashell Collage (Wheel and Anchor) stamp sets
  • 6 X 6 inch scalloped card blank, white stamping card
  • Versafine Inkpad (Onyx Black), archival dye ink (blue)
  • Brusho’s (Turquoise, Ultramarine)
  • Metallic paint (silver gold) *
  • Pebeo Drawing Gum
  • Watercolour pencils (yellow, golds, oranges) and brush
  • Alcohol ink marker (black)
  • Decorative Lattice Swirl Die (Heartfelt Creations). If you don’t have these dies, swirly or seaweed like foliage dies would produce a similar result.
* I used Starlight paint (Imagination Crafts) but the Aztec Paints featured in the shows this weekend would be perfect.
How to make it:
  1. Stamp the Sea Dragon with Versafine and mask with the Drawing Gum. Trim to approx. 10 X 14cm and edge with black pen.
  2. Drop Brusho crystals onto the card and spritz with water.
  3. Colour extra card with Brusho’s for die cuts. Cut out the swirly trellis with dies.
  4. Stamp the anchor, starfish and wheel with Versafine onto spare card and cut out. Stamp the sentiment with blue ink, cut out and edge with black marker.
  5. Stamp the silhouette mermaids with blue ink. Remove the masking from the dragon, colour the dragon and starfish with watercolour pencils. Add some shimmer paint to the dragon.
  6. Layer elements and glue to card front.

Sunday, 28 August 2016

Quick and Easy Floral card created for Chocolate Baroque

Good morning. Today I have a quick and easy card to share – made in under 15 minutes. I had to make a couple of samples in a last minute hurry for Lesley Wharton’s recent TV shows on the Craft Channel. I hope that you like it.

On the Chocolate Baroque DT Blog are more quick makes from my Teamies today.

Materials: How to make it:
  1. Colour the stamping card quickly with aquatints (or use Brusho’s, watercolours or spritzer inks) dropping colours on ‘wet in wet’. Blot off excess with kitchen towel and dry with a heat gun.
  2. Dust the surface with talc, antistatic powder or corn flour. This stops the embossing powder sticking where you don’t want it. Stamp the image with Versamark. Heat emboss with the black sparkle powder.
  3. Colour parts of the image quickly with the glitter pens and add highlights with the white pen (just ‘scribble’ quickly around the flower petal edges).
  4. Outline the card with black marker, glue and mount to the card front.

Saturday, 16 April 2016

Quick and Easy Scene Cards and Tag created for Chocolate Baroque


The gorgeous stamps from Chocolate Baroque are so versatile and can be used in so many different ways, from complex mixed media pieces to really quick and simple cards. This month we have been asked to create some quick projects which take under 15 minutes to make.

Here are some quick scene projects for you using the Tall Trees stamp set. This set is on a special offer at the moment.

Do have a look at the Chocolate Baroque Blog to see some more quick and easy projects from my lovely Teamies this week.


Materials:

  • A6 white card blank (suitable for stamping) and tag cut from watercolour card
  • A6 purple card blank, white stamping card, pale turquoise card (for layering)
  • Inkpads: Distress Inks (Seedless Preserves, Peacock Feathers) and dye ink (purple)
  • Alcohol ink pen (dark purple)
  • Glitter glues (turquoise and purple) and PVA pearls (turquoise)
  • Watercolour brush and spritzer bottle


The cards and tag were stamped using Distress Inks. To create the quick scene on the white card I stamped the tree three times without re-inking the stamp. On the purple card and tag I lightly spritzed the paper with water and used a brush to drag out and spread the ink and gift a softer diffuse effect. I used the purple marker to outline the card, tag and topper – just to give it a frame. They were finished with the stamped sentiment, glitter glues and PVA pearls. Really quick and easy.

Monday, 28 March 2016

Card created for Chocolate Baroque using Babushka stamps


I have been playing with the new Babushka stamp set. This set is so much fun and really different. I also love the Russian buildings that are included too – great for scene building.


Materials:


How it was done:

  1. I created masks for the buildings by stamping onto copy paper and cutting them out. The buildings were stamped with Versafine, covered with the masks and I then stamped with the background silhouette buildings with Distress Ink.
  2. The images were coloured with watercolour pens. Some colour was applied directly, and some by picking up colour from a pallet using a damp brush. I then finished with touches of sparkle pen and glitter glue.

Wednesday, 2 March 2016

MDF Bookstand decorated for Chocolate Baroque Challenge 20

I had so much fun using this month’s hot colours to decorate this book stand for my desk. The colours just said ‘Indian Theme’ to me. I used acrylic paints and mixed and matched stamps from several different stamp sets. The design could easily be adapted to create a wall hanging or small canvas.


Good luck everyone with the Challenge – some wonderful projects on there already this month.

Anne xxx.

Materials:


·         MDF book stand (Creative Expressions Kit)

·         White gesso and acrylic paints (pink, pearl pink, dark red, orange and yellow)

·         StazOn Inkpad (Jet Black)

·         Zig 2 Way Glue Pen

·         Fine tipped alcohol markers (black, pink, dark red and orange)

·         Polychromos pencils (pink, dark red, orange and yellow)

·         Cut-N-Dry Foam

·         Gold gilding wax (Pebeo Renaissance Gold)

·         Iridescent spray varnish (Crafters Companion Pearl Diamond)

·         Scrap paper for planning and masking plus dye based black inkpad


Step By Step:

I first sealed and primed the MDF stand with white gesso. Tip: When painting MDF items it is often best to paint them after constructing as the MDF can expand slightly making it difficult to fit the joints together afterwards.

The sides were painted with pink acrylic. The back and front panels were painted using orange and yellow acrylics. I painted from the outside edges working inward and blending the orange into the yellow in the centre.

The sides were randomly stamped with the paisley motif (Indian Elephant set) using StazOn. A bit of colouring was added using pencils.

I cut a piece of scrap paper the same size as the front panel in order to plan out the stamping. I have included a picture of my sketchbook page. I then worked out the order of stamping and which images needed masking. You will need to protect (mask) the foreground stamped images while building up the scene.
 

I stamped the lettering, elephants and border (Exquisite Edges set) with dye ink onto copy paper and cut around them to create masks. I added a few dots of Zig 2 Way Glue to the back and left to fully dry. This then acts as a temporary tacky adhesive to hold the masks in place while stamping.

It is tricky to stamp some areas on a ready-made item. The stamps need to be positioned on the stamping block to enable stamping into corners etc. It is also easy to slip when you are stamping at an angle on a 3D item. Tip: You could paint a piece of card to fit the area, stamp onto that instead, and then glue this onto your project afterwards.

I first stamped the sentiment, elephants and lower border with StazOn Ink. I then covered with the masks as shown in the picture.
 

Next I stamped the background arches (Gothic Fragments set) with a mix of pearl pink and red acrylic paints using Cut-N-Dry Foam to apply the paint to the stamps. Tip: Squeeze some acrylic paint directly onto the sponge and work it into the surface using a palette knife. This saves washing up of palettes and it wastes less paint. Place the coloured sponges face down on a craft mat and the paint stays workable without drying out for ages. Apply to your stamp with a dabbing motion. Clean your stamps quickly after use with warm water. A soft toothbrush can be useful to remove paint from the stamp crevices.

Next the tall stylised flower (Punky Flowers set) was stamped with dark red acrylic. The top of the stamp was then stamped with StazOn along the base. Masks were then removed.

A bit of colouring was added using marker pens and pencils. The pencils gave a nice textured effect to the elephants. I then outlined elements of the tall floral stamp using a fine tipped black marker. This brought the images further forward and created a nice frame up the sides of the scene.

I then sprayed with pearlescent varnish to protect and finished by adding gold gilding wax to the edges.

Sunday, 28 February 2016

Floral Musica and Harlequin Bouquet Cards created for Chocolate Baroque


I have two cards to share with you today using the lovely new floral collage stamps – Floral Musica and Harlequin Bouquet.


I hope that you like the new stamps this month as much as we all have on the DT.

Happy crafting, Anne x.

Materials:


How it was done:

The images were stamped onto watercolour card with Versamark (Black Onyx). They were then masked with Pebeo Drawing Gum. I love this masking fluid. It is so easy to apply, and remove. Also brushes are cleaned easily with water.

The background washes were created by scribbling ink onto my glass mat and picking up with a wet brush and painting onto dampened card.

The masking fluid was then removed and the flowers coloured with watercolour markers, using a damp brush to blend.

The images were then cut out with dies. Seedless Preserves Distress Ink was blended in from around the edges to frame.

Harlequin Bouquet:

The topper was edged with black pen and a little glitter.

Pale blue card was embossed with harlequin texture on the top left and bottom right corners. The flat areas of the background were stamped using the floral stamp and Tumbled Glass Distress Ink. Faux stitching was added with black marker. Seedless Preserves Distress Ink was blended in from the edges. Organza ribbon was attached and the mat glued to the card front. The topper was attached with foam pads for added depth.

The butterflies were stamped onto pale blue card, coloured with watercolour pens, cut out and glued to the card front. The card was finished with a little more glitter glue and PVA pearls.

Floral Musica:

The topper was edged with black pen and a little gilding wax.

Cream and purple card were embossed with a script embossing folder. The dark card was sanded back to enhance the texture. Seedless Preserves Distress Ink and a little gilding wax were then used to further enhance the texture. The pieces were glued to the card front.

The sentiment was stamped onto a die cut tag using pink and purple watercolour pens to give varied shades when stamped.

Foliage was cut from gold card and glued to the card front along with ready made flowers and butterflies (these were in my CB Stash Box special offer that was recently available). The topper and tag were attached with 3D foam.

The card was finished with faux stitching and some gold PVA pearls.

Friday, 8 January 2016

Card Created using the Baroque Orchids Stamp from Chocolate Baroque

I created this sample for the recent TV shows from Chocolate Baroque on The Craft Channel. Lesley Wharton was fantastic and gave some wonderful demos using the new background stamps. They are so versatile for so many projects and styles.  I just love this Baroque Orchids stamp – definitely turning into one of my favourites. Happy Crafting, Anne xxx.

 
  • I created this one using up scraps of pre-stamped card, black and white, printed with the Baroque Orchids stamp and turquoise acrylic paint.
  • I used Distress inks, Broken China and Stormy Sky, to ink the card edges.
  • The sentiment was stamped from the Card Sentiments clear set.
  • The flower was created using dies and coloured with alcohol ink pens.