Showing posts with label Mackintosh Sentiments. Show all posts

Thursday, 15 March 2018

Quick and Easy Friend Card

Good morning. Today I am sharing some quick and easy makes. This one was created with Landscape Edges and Mackintosh Sentiments stamp sets from Chocolate Baroque.

 
The background was painted and spritzed onto cartridge paper with ink spritzers (orange, yellow, red, blue and gold with mica).

 
The images were stamped with Versafine. Distance was created in the foreground by repeat stamping the tree line without re-inking.

The reflection was created by stamping the scene again onto scrap acetate and transferring the wet ink.

White pencil was used to add highlights to the cloud and water. Clear sparkle pen and Stickles were used to add sparkling highlights.

Black marker was used to darken the base tree line and to edge the scene panel (note: stamping onto textured card gives a slightly grainy image).

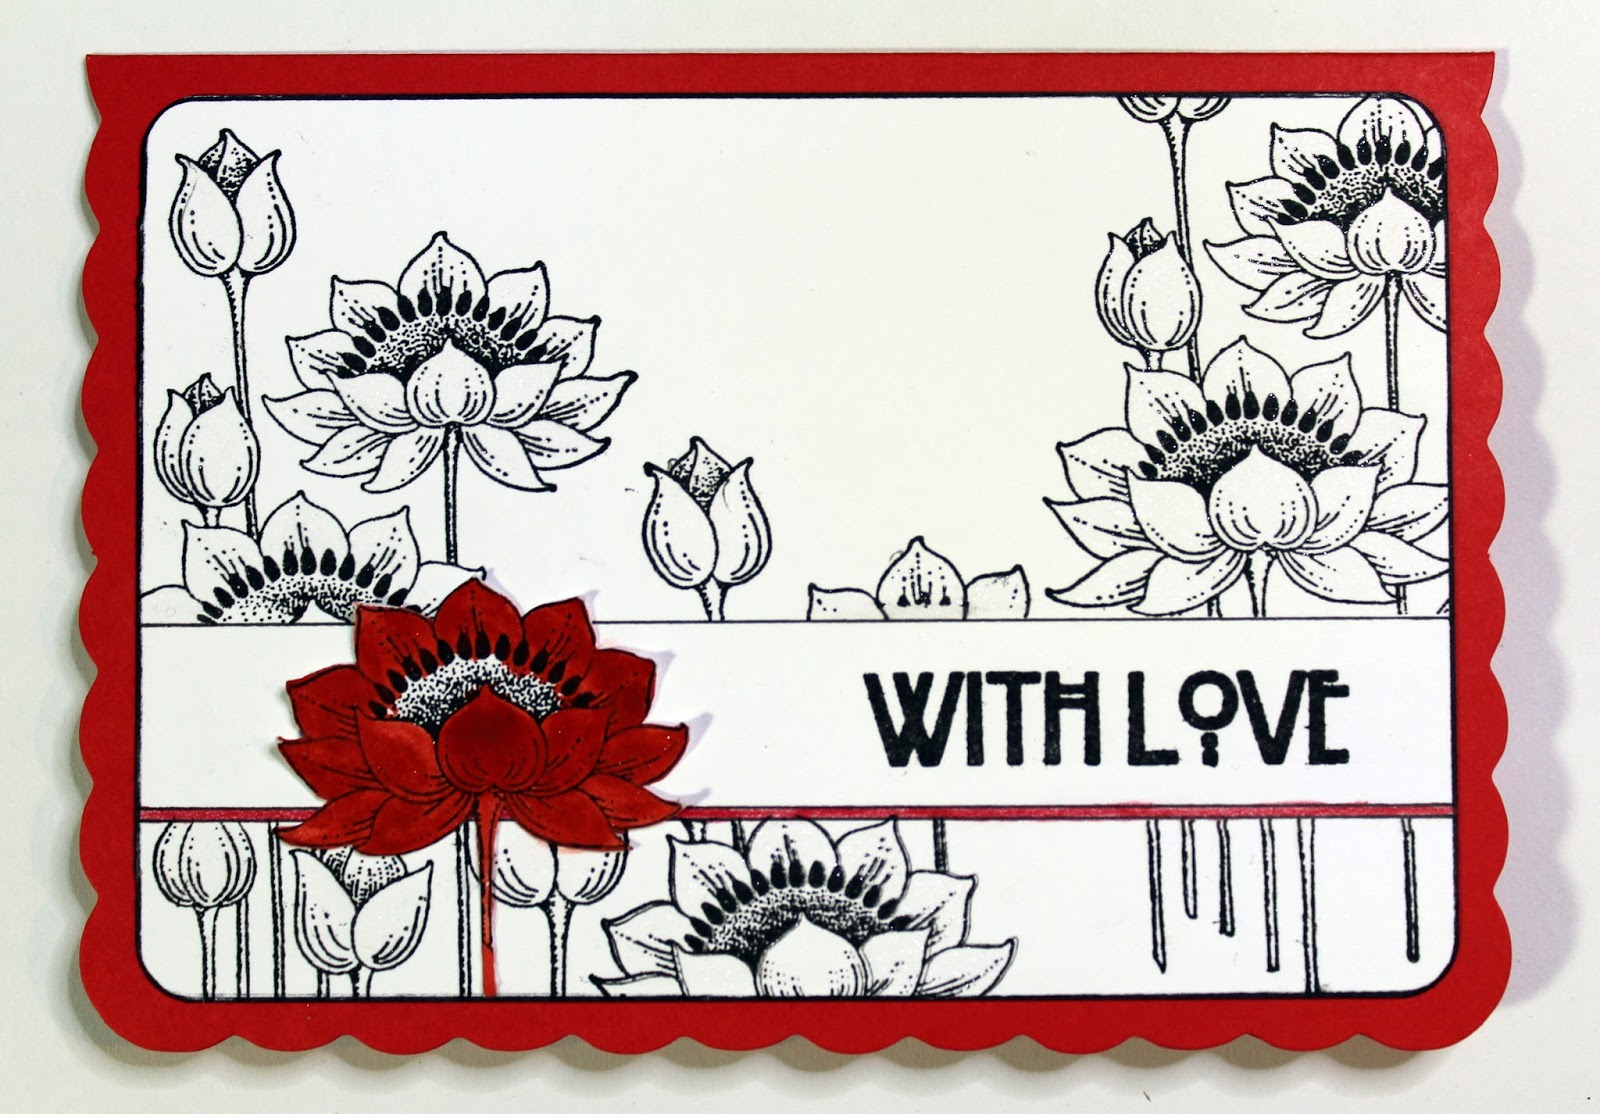
I used StazOn Ink to stamp my sentiment as my card blank had a slightly shiny coated finish (Versafine would not dry on this). If you have an uncoated card blank then Versafine would work ok.

Materials:

Saturday, 19 August 2017

Blue and White Baroque Tiles card created for Chocolate Baroque

Good morning. This was one of my recent show samples using the Baroque Corners stamp set. I built up a pattern using the large and small corners in Blue & white, reminiscent of vintage tiles.


Materials:

How to make it:
  1. Stamp the large corner stamp onto each of the 4 corners of the card blank. It is easiest to turn your card 90 degrees between stamping. An acrylic block with grid markings also helps to align the stamp straight with the edge of the card. I used the Tim Holtz stamping platform which made the pattern stamping really easy. Simply stamped, turned the card on the platform (butting it up against the platform ridges) and stamped again. It is not essential to use a stamping platform or alignment tool but it does make it so easy and quick. No hovering and aiming.
  2. Edge the card with blue marker to frame and draw faux stitching with the fine tipped pen.
  3. Trim the next panel to 13cm square and stamp using the smaller corner stamp. Add the faux stitching and layer onto the dark blue card. Glue to the card front with foam pads for added dimension.
  4. Trim the next panel to 11.5cm and stamp the small corner stamp into the centre. It may help to draw pencil cross hairs to help alignment. The little sticky out swirls also help you see where you are going and help align the stamps square.
  5. Stamp the sentiment into the space in the middle. This is quite easy to align with the clear stamp. Trim off the corners (at 45 degrees) to create the octagonal shape. Note: not all the sides are equal, 4 sides are a little shorter than the other 4. Add the faux stitching and mount onto blue card. Attach to the card front with foam pads.

Tuesday, 15 August 2017

Quick and Easy Floral Harmony card created for Chocolate Baroque

Good morning. Today I am sharing another of my show samples for Chocolate Baroque using another of the lovely stamps recently featured on Hochanda. This is also a quick and easy one using the Floral Harmony stamp.


Materials:
How to make it:
  1. Stamp and heat emboss the image and sentiment with white powder.
  2. Spray over the image with ink sprays, spraying more pink ink over the flower. While the ink is still wet drag out the colour over the stamped image using a damp brush. The embossed line makes this quick and easy. Use a little extra water and blotting with tissue where the colour needs lifting out and lightening.
  3. Drag some of the ink out across the base to anchor the image. I used a hair dryer to speed up the drying (a heat gun can bleach out some of the colour and may re-melt the embossing).
  4. Outline the topper with burgundy pen to frame and glue to the card front.

Quick and easy Chequered Flowers card created for Chocolate Baroque

Good morning. This one is a quick and easy card using the Chequered Flowers stamp from Chocolate Baroque.


Materials:

How to make it:
  1. Trim the stamping card to fit onto the card front. Mask the border using a strip of copy paper (tip: cut the strip wider than the card and tape to craft mat at either side).
  2. Repeat stamp the image across the card front.
  3. Remove the mask, stamp the sentiment and draw the border edges with black pen and a ruler. Colour the bottom edge with 3D glaze gel pen.
  4. Edge the topper with black marker to frame and glue to the card front.
  5. Stamp another flower onto scrap card, colour quickly with watercolour pen (don’t worry about staying within the lines – just scribble over to colour). Cut out the flower, shape slightly and glue to card front.
  6. Finish with clear sparkle pen over the background flowers, and by drawing faux gems and shiny detail on coloured flower with 3D glaze gel pen.

Tuesday, 13 June 2017

Butterfly With Love card created for Chocolate Baroque


Good morning. This was one of my samples for the recent butterfly stamp shows on Hochanda with Lesley Wharton and Chocolate Baroque.


Materials:
How to make it:
  1. Create the background by partially stamping the decorative floral panel into the corners of the card using Tumbled glass Distress Ink, turning the card 90 degrees between stamping.
  2. Stamp the butterfly, sentiment and swirls with Versafine ink. Colour with sparkle brush pens and ‘doodle’ around the stamped swirls with gold brush pen.
  3. Using the fine tipped blue sparkle pen add more ‘doodling’ to the lower left hand side of the background.
  4. Edge the topper with Black Soot Distress ink and the alcohol marker. Glue to card front and add faux stitching with the fine tipped black pen.
  5. Add Stickles around the topper edge, the butterfly and over the swirls. Finish with PVA pearls.

Monday, 15 May 2017

Quick and Easy Gold Bird card created for Chocolate Baroque

Good morning. This is another quick and easy make using the Spring Fairies stamp collection recently featured on Hochanda. Great for batch making.


.
I used a ready made gold aperture card. I stamped the bird and sentiment using Versamark and heat embossed in gold onto black card. I added a little colour with opaque gouache paint.
 
Materials:

Tuesday, 4 April 2017

Birthday card created with the Russian Floral Egg stamp from Chocolate Baroque


Good morning. Today I am sharing another of my TV show samples (Hochanda) created using the Russian Floral Egg stamp from Chocolate Baroque.

It started off as a completely different project. I wanted to create an opulent golden Easter egg with an aged effect. I stamped the egg onto mirror card and covered it with Ranger Crackle Accents. I was hoping that it would give me a crackle background which I could paint over with brown acrylic, wipe off the surface, and leave an aged effect. However, the crackle didn’t develop as expected. All I got was a few deep crackles and not the crazed crackle effect that I was after. Obviously Crackle Accents doesn’t work too well on shiny mirror surfaces. So I learned something new.

I decided to cut out a tag shape from my ‘disaster’ and mount it onto a card front. I added a bit of colour using alcohol pens, and stamped the crackle effect on top using the background stamp and StazOn ink.

I partially stamped the egg onto the orange background mat, coloured with sparkle pens (spritzed & splattered background), and added more texture and crackle by stamping with gold paint.

Materials:

Wednesday, 15 March 2017

Rose card created for Chocolate Baroque Colour Challenge 33


Good morning. Here is my first contribution for the Chocolate Baroque Colour Challenge No. 33.
 
The images were stamped with Versamark and embossed with gold powder. The edges were distressed (using the edge of scissors) and coloured with watercolour ink (picking up colour from my craft mat and applying with a sponge).
The images were quickly coloured with watercolour pens and a damp brush (the embossing powder resists so colouring is really quick and easy).
 
Materials:

Wednesday, 30 November 2016

Quick and Easy Floral card created for Chocolate Baroque


Good morning. Today I am sharing another quick and easy card. I used a gorgeous stamp from the Wild Meadow set and Mackintosh Sentiments. I stamped the images onto an ink spritzed background and heat embossed with white embossing powder.

Materials:
  • Wild Meadow and Mackintosh Sentiments stamp sets
  • Cream card blank (approx. 12 X 19.5cm)
  • Heavy cartridge paper (approx. 11.5 X 19cm)
  • Versamark Inkpad
  • WOW embossing powder (detail white)
  • Ink sprays (red, green, yellow with gold mica)
  • Alcohol ink marker (dark brown)
  • PVA pearls
How to make it:
  1. Spritz the background and dry fully. Tip: I tend to prepare large sheets of background papers in advance and then cut them down as I need. Great to use if you need something done in a hurry, or for batch making sets.
  2. Stamp the flower and sentiment with Versamark and heat emboss with white powder. Tip: to prevent the powder sticking where you don’t want it (especially if your card is still a little damp), dust the surface with a little talc.
  3. Edge with alcohol marker to frame and glue to the card blank. Finish with PVA pearls.

Sunday, 27 November 2016

Floral Notes With Love card created for Chocolate Baroque

Good morning. Today I am sharing a quick card using the lovely new Floral Notes stamp set. There are so many gorgeous images in this set.


Materials:
  • Floral Notes and Mackintosh Sentiments stamp sets
  • A6 scalloped card blank (red), white stamping card and a strip of copy paper
  • Versafine inkpad (Onyx Black)
  • Pencil and watercolour paint (red)
  • Alcohol marker and fine tipped pens (black)
  • Sparkle brush pen (clear)
How to make it:
  1. Trim the stamping card to fit the card front. Cut a strip of copy paper and lay onto the card front (mask). Stamp the images in black. Stamp again onto spare card and cut out one of the flower heads.
  2. Using the fine tipped pen draw the border and fill in any little gaps in the stamping (i.e. so that they join up with the border). Colour the lower edge of the border with pencil.
  3. Colour the flower head with watercolour. Curl the petals slightly and glue to the card.
  4. Brush over the flower petals with sparkle pen. Difficult to see in the photo but it just gives a little lift to the design.
  5. Outline the topper with alcohol pen and glue to the card front.

Thursday, 27 October 2016

Butterfly card created for Chocolate Baroque Colour Challenge 28


Good morning. Today I am sharing my contribution to the Colour Challenge this month. I am just loving these colours. Did you catch any of the shows recently on The Craft Channel where Lesley demonstrated the use of Angelina fibres? The butterfly stamps are just perfect for this technique.

I coloured a decorative card blank and tag with spray inks and made the floral embellishment from the waste pieces. I used stamps from Just Butterflies, Butterfly Blush and Mackintosh Sentiments stamp sets. The sparkling 3D butterfly was created by inking the stamp with black ink, overlaying with Angelina fibres and baking parchment, then ironing briefly on a hot setting. Note: Lesley recommends Black Archival Ink (Ranger). Mine did not work too well. However, I did manage to rescue it using a fine tipped alcohol ink pen to redraw my rather faint image.

I used a die cut scalloped circle (dark blue), ribbon, faux gems and glitter glue to finish.

Materials:
  • Just Butterflies, Butterfly Blush and Mackintosh Sentiments stamp sets
  • Decorative card blank, watercolour card tag, dark blue card
  • Spray inks (light and dark blue, lime and yellow)
  • Dye based inkpads (dark blue and black) – important: see note above
  • Glitter pens (green and blue)
  • Angelina fibre (Mint)
  • Baking parchment and iron
  • Organza ribbon and faux gems (blue)
  • Alcohol marker (dark blue) and fine tipped marker (black)
  • Glitter glue (light blue)
  • Scalloped circle die (Tonic)
  • High tac acrylic glue and 3D glue gel
How to make it:
  1. Spritz the tag with light and dark blue inks. Stamp the sentiment with dark blue ink. Edge the tag with alcohol marker to frame.
  2. Spritz the card blank with green, light blue and yellow inks. Note: I thought that the waste elements would make lovely petals. I left them in place while spritzing then used them to make a 3D flower. Alternatively you could spritz a ready-made paper flower to match.
  3. Stamp the butterflies and sentiment with blue ink. Colour with glitter pens.
  4. Ink up the large butterfly with black ink and overlay with Angelina fibres. Cover with baking parchment and iron on a hot setting without steam for a few seconds. If using the recommended Archival Ink you should see the image appear through the parchment – it will then be ready. Peel away from the parchment and trim out the butterfly. I made a bit of a mess of mine! I used Memento ink and it left a fairly feint image. To rescue it I used a fine tipped black marker to go back over the image and make it more visible. I made 2 butterflies to layer up.
  5. Add a dark blue scalloped circle behind the decorative card front, add a ribbon and bow, glue everything together and finish with glitter glue.

Wednesday, 20 July 2016

Mint Chocolate Rose cards created for Chocolate Baroque Anniversary Challenge 25


Good evening my crafting friends. I am running a little late today with showing my projects for the special Anniversary Chocolate Baroque Challenge 25. The theme is chocolate – yum! Check out the blog for more fabulous inspiration from my Teamies, and there is an extra special prize this month too.

I have created 2 projects for you with the theme of Mint Chocolate. I hope that you like them.  The first is an 8X8 twisted easel card where I have made a faux chocolate bar to create the stopper. I also used one of the lovely free digital papers from Challenge 19. The second is a quicker project using the same colour scheme.


Mint Chocolate Easel Card
Card front with decoupage elements.
Faux chocolate bar created using waste die cuts from a window die – they made lovely chocolate squares.
Open easel card with faux chocolate bar stopper.

Materials:
How to make it:
  1. Diagonally score the front of the card from bottom left to top right and fold to the inside to create the easel.
  2. Cut an 8X8 inch panel from the hammered card and colour the edge with mint alcohol pen. Colour the inside panel of the card to match.
  3. Trim 2 sheets of the digital paper to slightly under 8X8 inches. Stamp the rose image with Distress ink onto the right hand top corner. I used a damp brush to drag out some of the ink and add shading to the ‘inner’ sheet. Ink the edges with Distress Ink.
  4. Glue the digital papers to the hammered card panel and inside the card. See the picture to see how to orientate the paper. Draw faux stitching around the edges to frame.
  5. Cut a piece of thick card the same width but slightly longer than the printed ‘chocolat’ panel. Stick gold paper over the ends to imitate gold foil of a chocolate bar. Wrap with the paper, add a little ink to the edges and glue to the card front.
  6. Cut the decorative heart in brown card. Edge with faux stitching. Stamp the sentiment with Versamark and heat emboss with gold powder. Glue on the sweetie bow and add to the card front with 3D glue gel.
  7. Cut some small squares from brown card to imitate chocolate squares. I used waste pieces from a window die. Cut some thick card to create the faux chocolate bar stopper. Glue on the chocolate pieces. Wrap with the digital paper and the ends with the foil, creating a torn opening revealing the ‘chocolate’.
  8. Stamp the rose onto stamping card with Archival ink three times. Cut out one full images and then elements to decoupage up. Colour with alcohol pens. Shape slightly and glue to the card with 3D glue gel.
  9. Apply some glitter glue to a palette or craft mat and thin slightly with water. Paint onto the rose image.
  10. Glue the topper panel to the bottom right hand side card front triangle to create the twisted easel. Glue down the faux chocolate bar to create the stopper. Finish with PVA pearls.
Here is a quicker project using the same Mint Chocolate colours:
Materials: How to make it:
  1. Stamp the rose with Archival Ink and colour with alcohol markers. Trim to approx. 10.5 X 14cm. Blend Distress Ink around the edges and then rough up and distress using the edge of your scissors, and glue to card front.
  2. Stamp the sentiment with Archival Ink.


Saturday, 25 June 2016

Another Quick and Easy Project using stamps from Chocolate Baroque

Here is another quick and easy stamping project for you – make this in under 15 minutes.
I also created this for the recent TV shows with Lesley Wharton on the Craft Channel demonstrating the Punky Flowers stamps.
Materials: How to make it:
  1. Trim the patterned paper slightly to fit the card front and leave a small border. Edge with dark blue pen to frame.
  2. Stamp the sentiment with Versamark and emboss with the blue powder. Mask the lettering with a scrap of paper (to cover) and stamp the flowers. Emboss by sprinkling with blue and yellow powders. Note: keep the excess powder in a separate pot – it makes a nice mix for vintage projects.
  3. Glue to the card front and add the bow.

Sunday, 15 May 2016

Quick and Easy scene card created for Chocolate Baroque


This is a quick scene project using the Tall Trees stamp set. This set is gorgeous and is on a special offer at the moment.


Do have a look at the Chocolate Baroque Blog to see some more quick and easy projects from my lovely Teamies this week.


Materials:


Step By Step:

  1. Stamp the tree with the green and brown Distress Ink.
  2. Extend the scene and anchor the tree using the fine tipped brown pen. Quickly colour the scene with the Distress Inks and a water brush.
  3. Draw a border with the green pen and blend the edges using Distress Inks.
  4. Stamp the sentiment with the brown Distress Ink.
  5. Finished with a little glitter glue.

Really quick and easy.

Thursday, 28 April 2016

Quick and Easy stamping projects created for Chocolate Baroque

Here are some small cards and notelets that are really quick and easy to make. These were created for Chocolate Baroque - we were given the proviso that they should be possible to make in under 15 minutes. Eeeek – not an easy one for me as I like to stamp, layer, cut out and embellish. It took me a while to come up with these but I loved having a production line of quick and easy projects. I now have some lovely cards and notelets ready in my stash for sending out to my friends when I need something in a hurry. Do take a look at the other projects from my fabulous Teamies on the Design Team Blog.


Summary: The backgrounds and stamping were done using Distress Inks. The fern is from the Wild Meadow stamp set and sentiments from Words of Inspiration and Mackintosh Sentiments sets.

Saturday, 16 April 2016

Quick and Easy Scene Cards and Tag created for Chocolate Baroque


The gorgeous stamps from Chocolate Baroque are so versatile and can be used in so many different ways, from complex mixed media pieces to really quick and simple cards. This month we have been asked to create some quick projects which take under 15 minutes to make.

Here are some quick scene projects for you using the Tall Trees stamp set. This set is on a special offer at the moment.

Do have a look at the Chocolate Baroque Blog to see some more quick and easy projects from my lovely Teamies this week.


Materials:

  • A6 white card blank (suitable for stamping) and tag cut from watercolour card
  • A6 purple card blank, white stamping card, pale turquoise card (for layering)
  • Inkpads: Distress Inks (Seedless Preserves, Peacock Feathers) and dye ink (purple)
  • Alcohol ink pen (dark purple)
  • Glitter glues (turquoise and purple) and PVA pearls (turquoise)
  • Watercolour brush and spritzer bottle


The cards and tag were stamped using Distress Inks. To create the quick scene on the white card I stamped the tree three times without re-inking the stamp. On the purple card and tag I lightly spritzed the paper with water and used a brush to drag out and spread the ink and gift a softer diffuse effect. I used the purple marker to outline the card, tag and topper – just to give it a frame. They were finished with the stamped sentiment, glitter glues and PVA pearls. Really quick and easy.

Monday, 28 March 2016

Friendship card created for Chocolate Baroque using Lace Fragments stamps


This was one of my TV show samples created with the lovely Lace Fragments stamps from Chocolate Baroque which were demonstrated on the Craft Channel TV show by Lesley Wharton.


More recently Dawn Bibby also demonstrated these stamps. I decided to recolour my sample to give it a bit more impact for the new shows.


Materials:

  • Lace Fragments and Mackintosh Sentiments stamp sets
  • 19cm square cream card blank, white and cream card
  • Ranger Archival Inkpad (Coffee)
  • Marker pen (brown)
  • 2mm fine satin ribbon (brown)
  • Adhesive and sticky foam pads
  • Dies to cut trellis and sentiment topper (Tonic – Deco Trellis Base), and leafy sprigs (Heartfelt Creations – Cut Mat Create sets)


How to make it:

1.    Die cut a trellis topper from cream card and back with white. Thread with brown ribbon.

2.    Cut a sentiment topper in white card, and an 18cm mat in white, edge both with brown marker. Also edge the card blank.

3.    Stamp the floral corners and sentiment with Archival Ink.

4.    Mount the trellis and sentiment topper, decorate with die cut leafy vines.


How I revamped and recoloured it:

I masked the outer part of the card design and spritzed the central mat and die cuts with green and gold. The leaves and flowers were further coloured with watercolour pens (Spectrum Aqua).

The Lace Fragment floral corners were then also coloured with watercolour pens and the card edges inked with Shabby Shutters Distress Ink.


I like both versions of the card but I am definitely not a ‘less is more girl’ – more colour, more layers and more die cuts is ‘more’ me. Tee hee.

Anne ;0)