Thursday 30 November 2017

Mixed Media Kanzashi Pom Pom Flower using Powertex

Today I am sharing another of my Kanzashi flower show samples created for Gina Barrett. To make the flowers I followed instructions for the Kanzashi Hydrangea (from Gina-B Silkworks). Basically tiny 15mm squares of silk are folded up to create little fabric petals. I used the Kanzashi starch adhesive to help hold the petals until ready to glue on and build the flowers. These little flowers are very fiddly so it’s not really the best project for an absolute beginner. A fair bit of swearing was involved here – tee hee hee.


I used Powertex to create a mini vase and to coat a polystyrene ball with silk strips. Powertex is a fabric hardener which stiffens, glues, seals and protects natural fabrics and fibres – great for mixed media work.

I pushed a twisted wire (coated with florist tape) into the base of a small polystyrene ball – gluing with a little Powertex. I then covered the ball with strips of Powertex treated silk and dried before adding the tiny silk petals to build the flowers. I used fast grab PVA to glue them on, and Gemtac Glue to add the centre pearls.


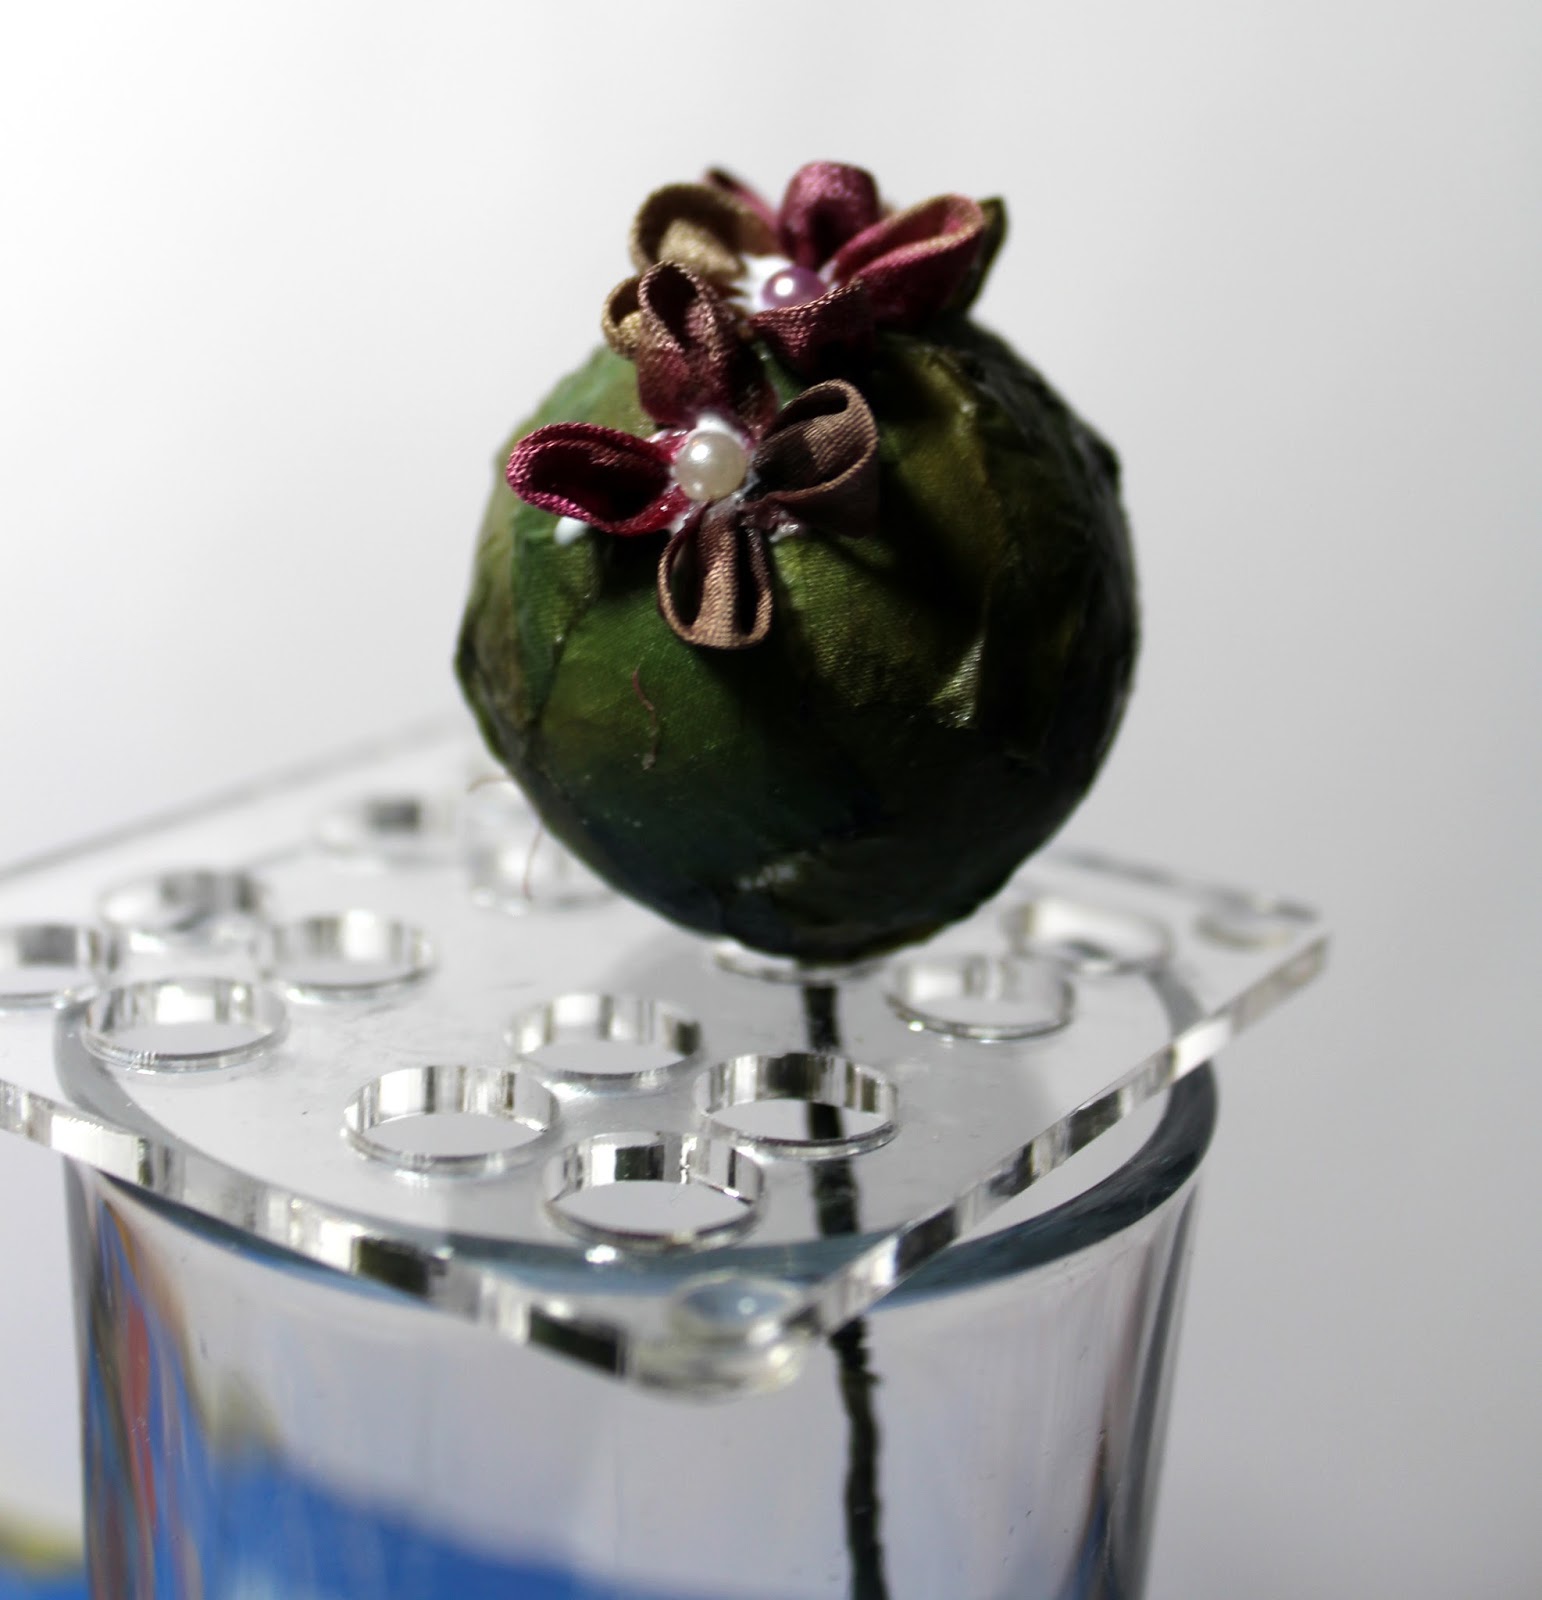
I used larger silk squares to make sepals and a leaf on the stem.

The mini vase was made with the inner card tube from a kitchen foil roll. I built out the shape using pads of kitchen foil and wrapped with masking tape. I then coated it with Powertex and with strips of Powertex treated silk, and secured the wire into the top. I stuffed the middle of the tube with cotton wool to give stability and a bit of weight. I dry brushed over the texture using metallic acrylic paint and then covered with tiny flowers and faux gems.

I painted the little flowers on the vase with transparent Powertex using a small brush. The fine silk soaks it up easily. I left the leaf and pom pom flower untreated as I liked the contrast in feel and texture.

Materials:
  • Kanzashi Hydrangea Project Card (Kanzashi Project Card Pack)
  • Kanzashi Starch Adhesive
  • Transparent Powertex
  • Polystyrene ball (approx. 1.5 inch diameter)
  • Twisted copper wire wrapped with florist tape (to make stem)
  • Recycled sari silk strips (variegated vintage greens, pinks, browns)
  • Kitchen foil card inner tube
  • Kitchen foil and masking tape (for building out the pot shape)
  • Cotton wool (stuffing)
  • Faux gems and flat backed pearls (pink, blue, pearl, green)
  • Acrylic paint (metallic pink) and PVA glitter glue (green)
  • PVA glue (fast grab/tacky glue), Gemtac Glue (sticks glass, plastic or metal gems & beads to fabric)
Optional extras:
I used additional tools for making the flowers which are really helpful and make the process easier. They are not essential but you will probably want to get them if you decide that you like this craft.
  • Pack of straight and bent fine tweezers – great for manipulating fiddly items such as the small fabric squares while folding. I would say that tweezers of some sort are pretty essential – especially when making these tiny fiddly flowers.
  • Kanzashi Flower Making Tool Kit – contains a mini turntable, gluing table and spreader plus a small drying table. Great to have.
  • Petal Holders & Medium Drying Table – another useful kit if wanting to make several flowers. Contains 2 sets of petal holders (for small and larger petals) plus a bigger drying table (for more flowers).
  • Kanzashi Hanabira Ruler – another great tool for cutting small fabric squares. It can be used with a rotary cutter or to draw cutting lines if you are not comfortable with using a rotary cutter.
  • Small rotary cutter and self healing cutting mat. If you are new to using these please take great care as the rotary blade is razor sharp! Always engage the blade safety cover between every cut. Never cut towards yourself, and take care where you place your hands and fingers while cutting.

Sunday 26 November 2017

Vintage Poppies True Friend card created for Chocolate Baroque


Good morning. This is another of my recent samples created for Chocolate Baroque and Hochanda. This time I picked a pretty decorative paper to stamp onto. I am not sure where I got it from but think that it came in a mixed grab bag from Chocolate Baroque. You could use any suitable vintage decorative paper.

Materials:
  • Butterfly Poppy Collage and Pretty Poppies (the sentiment) stamp sets
  • A5 card blank, decorative vintage paper, textured cream pearlescent card, piece waste acetate
  • Versafine (Vintage Sepia), Distress Ink (Tea Dye)
  • Spectrum Noir Sparkle Pens (Sage, Biscuit, Summer Sky, Smokey Quartz)
  • Satin ribbon (green)
  • PVA pearls (dark green/gold)
  • Clear glitter glue
  • Alcohol marker (dark brown)
  • Glossy Accents
  • Rectangle dies for creating mat & layer (Heartfelt Creations Cut, Mat, Create set)
How it was done:
  1. The decorative paper was trimmed to fit the card front and a panel was cut out with the rectangle die. The topper and background were stamped using Versafine and coloured with sparkle pens. The card and topper were edged with Distress Ink and alcohol marker to frame. Note: The poppy image on the left hand side was ‘reverse stamped’ to create a mirror image. This was done by stamping onto waste acetate then transferring the ink by ‘stamping’ from the acetate. The background image on the right hand side was repeat stamped, lining up the diamonds, to extend it up the side of the card.
  2. The butterfly was overlaid with Glossy Accents. A larger rectangle was cut from pearl card for matting.
  3. The images were also stamped onto the pearl card and cut out to create the decorative embellishments. 3D glue gel was used to stick down elements.
  4. I added PVA pearls and a little clear glitter glue for extra sparkle (cannot help myself – tee hee).

Sparkling Trio of Butterflies card created for Chocolate Baroque


Good morning. I hope that you like my sparkly trio of butterflies created with the Butterfly Poppy Collage stamp set.

Materials:
How it was done:
  1. Sparkly ink was applied through the stencil onto the textured card panel. I then applied Versamark and heat embossed with sparkly clear powder. The card was edged with alcohol marker to frame.
  2. The butterflies were stamped with Versamark onto acetate and heat embossed with gold sparkle powder. The butterflies were then cut out, lightly shaped and glued over the stencilled images.

Friday 24 November 2017

Poppy Scene card created for Chocolate Baroque

Good morning. This was another of my recent show samples for Chocolate Baroque on Hochanda with lovely poppy themed stamps.


Materials:
  • Pretty Poppies, Poppy Meadow, Nature's Peace stamp sets
  • 6 X 6 inch Kraft card blank, watercolour card
  • Spectrum Aqua watercolour pens (greens and red/pinks)
  • Distress Ink (Tumbled Glass)
  • Alcohol marker (black)
  • Tim Holtz Stamping Platform or similar (optional but makes it much easier)
How it was made:
  1. The stamps were coloured directly with different shades of red, pink and green watercolour pens. I used a stamping platform to create this one making it much easier to repeat stamp with different colours exactly positioning over the previous stamping. It can be done without but it’s a little more tricky. Colour the different areas of the stamp in one go and ‘huff’ (breath) over the image before stamping to activate the watercolour, alternatively lightly mist with water (but not too much).
  2. A damp brush was then used to drag out the colour and produce shading. A little extra colour was applied where needed, picking up colour from a palette with a damp brush (using ink from the pens as a watercolour paint).
  3. The card was trimmed and edged with Distress Ink. I also added a black border with alcohol marker to frame.

Tuesday 21 November 2017

Aphrodite’s Kiss Notebook Covers

I have been having a little play with the gorgeous Cassiopeia and Aphrodite’s Kiss stamps from Anna. They are stunners.


I stamped and heat embossed in black or gold embossing powder and coloured with various gel pens (glitter, metallic, glaze).


I used them to decorate a couple of small cheap notebooks – love my newly adorned books now.


I did a bit of freehand doodling around the edges with a fine tipped marker.


These are gorgeous stamps simply used in the traditional way. The textures and patterns give scope for so much more too. Great for pressing texture into Powertex clay. Off to have a play x.

Because I Care Poppy Card created for Chocolate Baroque

Good morning. This was another of my recent show samples for Hochanda using the lovely poppy themed stamps from Chocolate Baroque. I used Brushos on this one to create a loose watercolour background.


Materials:
How it was made:
  1. The border panel was cut from hammered card and glued to the card front.
  2. The pink card was trimmed to fit and the sentiment stamped with Versamark and embossed with white powder. Faux stitching and little dots in the background were added with white pen.
  3. The poppies were stamped onto watercolour card, ‘inking’ the stamp with the pink and green watercolour pens. To get the lovely watercolour effect the card was spritzed with water to get the stamping colours to bleed slightly. Brusho crystals were then dropped onto the background.
  4. After drying the image was overstamped using Versafine (Vintage Sepia) to bring back some definition. I used a black pen to enhance some of the stamped outlines. More colour was added using watercolour pens and a damp brush. The sentiment was stamped with black ink.
  5. The image was trimmed and glue to the card front. Finished the card with a few PVA pearls and yes …. obligatory glitter glue. Just cannot help myself x.

Sunday 19 November 2017

Airship Pirate Steampunk card created for Chocolate Baroque

Good morning. Today I am sharing one of my recent samples created for the Steampunk shows recently on Hochanda. I used a few of my dies to create this nautical themed card. I hope that you like it.


Materials:
  • Steampunkery and Punky Expressions stamp sets
  • 8 X 8 inch white card blank; white, blue and brown kraft card; recycled acetate from packaging
  • Versamark and Distress Ink (Vintage Photo)
  • WOW embossing powders (white plus mix of Copper and Gold Rich)
  • Koh-I-Noor Charcoals (White)
  • Sakura Glitter and Glaze Pens (red)
  • Dies to cut a circle frame (approx. 16cm diameter – TODO), steampunk cogs (Tattered Lace, Trimcraft) and nautical themed embellishments (Couture Creations)
How it was made:
  1. I trimmed the blue card to fit the card front and leave a small white border. The sentiment and airship were stamped with Versamark and heat embossed with the white powder.
  2. The circle porthole frame was cut from Kraft card. A piece of acetate was cut to fit behind.
  3. The cogs and wheel were cut from Kraft card and coloured with gold embossing powder or red glaze pen. The gulls were cut from white card.
  4. The scene was built up and coloured using the white charcoals. A little red glitter pen was added to the boat and a small die cut gull stuck down. The frame was glued over the top using 3D shaker foam. Note: you could add some sprinkles or glitter for added fun.
  5. The scroll was created from a rectangle, rolling the ends around a paint brush to curl. A little Distress Ink was added to the edges to age. The die cut embellishments were used to decorate.

Sneak Peek of show samples created for Chocolate Baroque on Hochanda Tomorrow

Good morning. Here is a sneaky peek at some of my samples created for Chocolate Baroque. Lesley Wharton will be bringing some lovely stamp sets to Hochanda TV tomorrow (Freeview Channel 85 or watch live online from their website). I think that the shows are scheduled for 4pm and 7pm – check their schedule for confirmation xxx.


Thursday 16 November 2017

Forget Me Not quick and easy card created for Chocolate Baroque


Good morning. This one is a quick and easy make using a pretty decorative background paper.


Stamps from Key to My Dreams set. Stamped with Versamark and embossed with detail white powder onto Crafty Individuals background paper from the 'Shades of Summer' pad. Applied Distress Ink (Tumbled Glass) around the inner edges of a heart stencil and over the text using a blending brush. The images were also lightly coloured with Distress Ink picked up from the mat using a damp brush. Mounted onto a 6 X 6 card blank and finished with a little glitter glue and PVA pearls. A little Glossy Accents was also added to give the keys added dimension and shine.

Wednesday 15 November 2017

Egyptian Canvas Duo created for Powertex UK

I so enjoyed helping out with samples for the Egyptian themed shows recently on Hochanda – and WOW the set looked amazing with so many wonderful creations from the team. I think that we all had a huge amount of fun. It really did look like an archaeological set.


I created this duo of canvases featuring Nefertiti and Tutankhamun to tell a little of their story.

Although their likeness was well known to me I really had little idea of their history, so I did a little research. I really enjoyed finding out more about these characters and I had so much fun immersing myself into their mystical world when creating these canvases.

I hope that my creative journey gives you some inspiration for your own ideas. There is a full materials list at the end if you need links to any of the specific products used xxx.

The creative journey:
The canvases were first coated with a layer of Ivory Powertex, and the plaster busts with Bronze Powertex.


The textured embellishments were made with air dry clay and small clay cutters from my stash. The Hiero Heaven and Scarabella stamps were pressed into the rolled out clay to add texture. Additional texture added to some pieces using a texture mat, and I made the little snakes using a mould (both from my stash). Strips from corrugated card were used to create pillars. I laid out all my elements to get a rough idea of placement and to assess space left for adding text.


Note: I used an air dry modelling clay that I had in my stash. It is fairly strong when making chunky items but I did find it very brittle when rolled thin. I left it to fully dry overnight and coated it with Ivory Powertex. The Powertex did sink in well (as it remained porous) and considerably strengthened my embellishments. So I was happy to use them on my canvases. However, I would fully recommend using Stone Art Clay if you want hard wearing items, and certainly if you need them to be weather proof (it is designed for this).

Following my bit of historical research I decided on some text to add to my canvases. Nefertiti was the chief wife of the Egyptian Pharaoh Akhenaten who was the father of Tutankhaten (later named Tutankhamun). Originally Akhenaten was named Amenhotep IV but he changed his name when he banned the worship of the old Egyptian gods and instated Aten (Sun Disc – an aspect of the sun god Ra) as the one true god. I therefore depicted the Aten symbol (Sun Disk with rays in gold) on Nefertiti’s canvas.

I used gilding wax around the edges of my canvas and on the Sun Disc (Atan) and gold relief paste to create the Atan rays.

Nefertiti was also known as ‘the beautiful one has come’ (translation of her name) and ‘the lady of the two lands’ – I included this in the gilded text.

Nerfertiti may have ruled for a time as Neferneferuaten, and for a short while alongside Tutankhaten (later named Tutankhamun) but there is some debate on this. She disappeared not long after her husband’s death and it is unsure where her body lays. Although interestingly there is some evidence that she may be in a secret chamber behind the tomb of Tutankhamun. Still a mystery.

Tutankhamun became king when only a boy (‘boy king Tut’) and as mentioned above he was originally named Tutankhaten (‘the living image of Aten’). After the death of his father there was an uprising and the old gods were eventually reinstated. He reinstated Amun-Ra (fusion of the gods Amun ‘the hidden/invisible one’ and Ra the ‘sun god’) and changed his name to Tutankhamun (‘the living image of Amun’). There is a lot of debate around the identity of his mother but it is fairly certain that she would have been a close relation to Akhenaten (sister or cousin, maybe even Nefertiti?).

I hope that I am not boring everyone with history but I found it all fascinating (but also very confusing with all the name changes and the various gods worshipped at the time).


The sentiments were printed on a laser printer (copy paper) and foiled with gold sublimation foil using my laminator. I stamped over the background using Memories Ink and the Hiero Heaven stamp. I then scrunched up the paper and further aged with distress inks.

The background textured paper and sentiments were glued to the canvas using Easy Coat.

The card pillars were coated (back and front) with Black Powertex. Bister was used to add depth to my textured embellishments. I also mixed various Powercolor pigments into Ivory Powertex and rubbed over the top of the embellishments to give the effect of faded chalk paints.


Elements were glued in place using Powertex and a little Easy Structure for some of the more uneven textured pieces. A little Easy Structure paste was also applied with a palette knife for filling and more texture.


A little Ultramarine Powercolor was mixed with Ivory Powertex and painted into the crevices of the pillars. Gold Colortricx pigment mixed with Easy Varnish was dry brushed onto the surface ridges.

The busts were also coloured with gold varnish, applied fairly liberally for an opulent effect. Where I wanted areas of strong colour (blue, red, green) I applied a base of Ivory Powertex first and then painted over with coloured varnish. Black Powertex was painted into the eye area.


Materials:


Sunday 5 November 2017

Macramé samples created for Gina B Silkworks

Gina Barrett is launching her new book on Create and Craft TV tomorrow (11am Channel 23 or watch live online from their website).

The new Textile Trimmings book is fabulous. It includes a variety of decorative knotting technique including ball buttons, frogging, filet and needle lace plus macramé.

I am a macramé novice. My favourite is the swan macramé hanger – I really didn’t think that I would be able to do it but following Gina’s fabulous instruction I am delighted with the results.


Paperlathe CD from Gina Barrett

Gina Barret is on Create & Craft TV tomorrow at 11am (Freeview Channel 23 or watch live online from their website). Gina will be launching her fabulous new book – Total Trimmings 2 featuring decorative knotting. In addition she will be bringing back some old favourites including her Tassel Making DVD’s and tools -  including the fabulous Paperlathe for creating beads and tassel moulds.

Traditional wooden tassel moulds are extremely difficult to obtain. This CD is brilliant and contains 100’s of patterns to make your own tassel moulds and beads.

I have been having a play and made various beads using wrapping papers. I have also made a set of tassel moulds.

I will share some of my finished projects soon xxx.


Tassel moulds ready for thread wrapping

The Paperlathe CD also comes with a variety of wrapping rods to create a range of shapes (round, square and triangular). Just brilliant and so easy to make.

Mini Textile Macramé Hangers from Gina B Silkworks

Gina Barret is on Create & Craft TV tomorrow at 11am (Freeview Channel 23 or watch live online from their website). Gina will be launching her fabulous new book – Total Trimmings 2 featuring decorative knotting. She is also going to be bringing lots of other goodies and tools including a Monkey Fist Jig, small frames for making Filet Lace, a fine Macramé Board and fabulous little textile hangers (approx 10cm wide) which are perfect for micro macramé or hanging other small textile art works. In addition she will be bringing back some old favourites including her Tassel Making DVD’s and tools.

I cannot wait to see the show.

I have been decorating my little textile hangers ready to work. I coated them with gesso to provide a surface for colouring and stamping. After decorating and colouring I added a final layer of clear heat embossing powder to add protection and shine. I will share some of my finished projects soon xxx.


Steampunk Travels Pop Up Box created for Chocolate Baroque

Good morning. I had so much fun creating a fantasy world with the Steampunk themed stamps recently featured on Hochanda. Today I am sharing one of my show samples. I just love this sentiment verse and the fun sentiments that come with these stamp sets.


Materials:
  • Steampunk Travel and Steampunkery stamp sets (also available as a multibuy)
  • Ready made white pop up card blank (approx. 7cm wide box with back panel approx. 16cm high), white stamping card, Kraft card
  • Inkpads: Dye based ink (brown) and Versamark
  • Ink sprays with mica (blue and gold)
  • Alcohol ink pens and coloured pencils (blue, orange, yellow)
  • Fine tipped pen (brown)
  • WOW heat embossing powders (mix of Verdigris and Gold)
  • Dies to cut steampunk cogs and shaped mat for verse
How it was made:
  1. The box was spritzed with inks to add colour and edged with brown ink.
  2. The images were stamped with brown ink and coloured with alcohol pens and some pencil shading.
  3. The verse was cut out with a die and edged with brown ink and faux stitching. The remaining sentiments were hand cut and edged with brown ink. The Steampunk images were cut out by hand.
  4. The cogs were cut from Kraft card, coated in Versamark and heat embossed with metallic powders.
  5. The images, cogs and sentiments were glued to the card layers to give depth. Thin card strips were glued behind some of the elements to add extra support where needed.