Monday 30 April 2018

Sunflower Project Tray created with Powertex


Today I am sharing a decorated recycled Balsa wood cheese tray (19 X 25cm) left over from Christmas. I needed a small project tray to collect together all my embroidery and sewing thread spools when working on one of my textile stitched paintings. I kept the 3D texture to a minimum as I didn’t want my fine threads catching and pulling on anything.

I chose one of the lovely Floral Rice Papers and the fab Duo Arty Quotes Mini Stencil from Powertex to decorate. I wanted to create something that would give me some ‘arty’ inspiration. I had a few grey board embellishments in my stash so added these too for a bit of interest.

I first used a water pen to dampen around the images enabling them to be torn and separated to form soft edged pieces that will blend into the background once decoupaged.

I coated the whole tray with Ivory Powertex and dried using a hair dryer. This provided a light background for the decoupage elements. Coating the tray with Powertex hardened up the soft Balsa wood and sealed it making it easier to keep clean too. I also coated the grey board elements with Ivory Powertex.

Decorative papers were then applied using Easy Coat Mat. Easy Structure Paste was then applied through the stencil using a recycled bank card. I also added a little more texture using a grid stencil from my stash.

The embellishments were stuck down with more Powertex and a little Easy Structure Paste where needed (i.e. onto textured areas).

In the background you can see a sneak peek of my next project in progress. I like to work on several things at once so that I don’t waste time waiting for layers to dry.

Next I used a white opaque pen (acrylic paint pen) to draw extra highlights onto the main sunflower image. Then I used the new transparent acrylic inks to brush over and add a bit of colour. These are fabulous as being transparent they don’t obliterate the layers beneath. I chose the Golden Metallic and Aqua Metallic Inks to blend in with the main colour theme of the decoupaged images and to add a little sheen. I emphasized the lettering using a brown fine tipped pen (suitable for going onto acrylic).

Where needed I also rubbed over a little more Ivory Powertex using my finger to blend in the colouring where I thought it was a bit heavy.

I also rubbed on a little gold gilding wax from my stash (Pebeo).


Finally I added a little clear PVA based glitter glue to bring a little sparkle. I just couldn’t help myself. Once dry I brushed over the whole tray with Easy Varnish.

Now I have a lovely inspirational project tray. Hope that you like it too.
Hugs all and happy creating, Anne xxx

Sunday 29 April 2018

Make Time to Make Art cards created for Chocolate Baroque

Good morning. Today I am sharing a few cards created with Wisteria Lane and Artistic Affirmations stamp sets from Chocolate Baroque.

Full of Colour Card
Materials:
  • Wisteria Lane and Artistic Affirmations stamp sets
  • 9 X 21cm card blank, white stamping card, black card
  • Ink sprays (pink, purple, black – Lindy’s Stamp Gang)
  • Embossing Powders (pink, yellow, white – Lindy’s Stamp Gang)
  • Versamark Inkpad
  • Border die (waste piece from a Sizzix strip die cut)
  • Alcohol marker (black)
  • Faux gems and sequins, PVA pearls (pink)
  • Straw to blow inks
How it was done:
  1. Inks were spritzed onto a craft mat and picked up onto the stamping card. The wet ink was spread by blowing through a straw.
  2. Images were stamped with Versamark and embossed with a mix of coloured powders. The sentiment was stamped onto a coloured strip. Black marker was used to edge the card and frame.
  3. The black die cut strip was glued to the top of the card. The sentiment strip attached with 3D foam for added dimension.
  4. Finished with faux gems and sequins plus a few PVA pearls along the die cut border.
 
Make Time Shabby Chic Card

This card uses the same stamp sets but looks totally different.

Materials:
  • Wisteria Lane and Artistic Affirmations stamp sets
  • 10.5 X 15cm card blank (turquoise), white stamping card
  • Versamark Inkpad and archival dye ink (purple)
  • Embossing powder (silver and gold sparkle)
  • Ink spritzers (purple, turquoise, gold and opaque white)
  • Fine tipped marker (black)
  • Faux gems and organza ribbon
How it was done:
  1. The card blank was lightly spritzed with opaque white ink. The stamping card was coloured with purple, turquoise and gold ink spritzers. The sentiment was stamped with Versamark and embossed with silver powder.
  2. The background images were stamped with purple dye ink. Further images were stamped on top with Versamark, heat embossed with gold powder and outlined with fine tipped pen.
  3. The edges of the topper were roughed up with the edge of my scissors. A little turquoise ink was also sponged around the edges.
  4. Finished with a ribbon and faux gems.
Make Time to Make Art

My third sample was different again using a bright sunshine yellow backdrop.
Materials:
  • Wisteria Lane and Artistic Affirmations stamp sets
  • 6 X 6 inch square card blank, white stamping card, yellow card
  • Versamark Inkpad
  • Embossing Powders (pink, yellow, purple – Lindy’s Stamp Gang)
  • Mylar stencil with polka dots
  • Alcohol marker (purple) and fine tipped pen
  • Glitter glue (yellow)
How it was done:
  1. I had some cheap glitter glues that were past their best. To use them up I embossed some of my stencils (through my die cut machine) then applied the glitter through the stencil using a palette knife. I used up my glitter glues and created a batch of textured backgrounds ready for my cards.
  2. The sentiment was stamped onto the textured card using dye ink (embossing with stencils only gives a shallow texture so it is fairly easy to overstamp – add just a little extra pressure on the stamp). Note the ‘I’ was left uninked.
  3. The mat was edged with marker and faux stitching drawn around the border of the card blank with fine tipped pen.
  4. The floral stems were stamped onto white card with Versamark, embossed with a mix of coloured powders and cut out.
  5. Cut outs were glued to the card front and finished with a ribbon.

Monday 16 April 2018

Mixed Media Dream Canvas

Good morning. Today I am sharing a couple of mixed media projects created with Wisteria Lane and Artistic Affirmations stamp sets from Chocolate Baroque.

My second is a small canvas.
Materials:
  • Wisteria Lane, Tranquility and Artistic Affirmations stamp sets
  • 20cm square canvas board, white stamping card
  • Embossing powders (yellow, pink, purple – Lindy’s Stamp Gang) and WOW (Clear Gloss)
  • Viva Décor crackle colour (pearl teal)
  • Ink sprays (pink, teal, purple – Lindy’s Stamp Gang)
  • Inkpads: StazOn (black), Brilliance Pigment (variegated pink & blue pearl)
  • Sparkle pens (pink, purple)
  • Fine tipped alcohol pen (black)
  • Puffy paint (green)
  • Glossy Accents and silver gilding wax
  • Faux gems and sequins, 3D glue gel
How it was done:
  1. Crackle paste was applied to the outer edges of the canvas and left to dry overnight.
  2. The canvas was spritzed with coloured inks. Some pink spray was also applied so that it sunk into the crackle crevices, excess being removed from the top surfaces with a damp cloth.
  3. Images were stamped onto the background with Brilliance Ink and embossed with clear powder. Floral stems were also stamped onto white card, embossed with coloured powders and cut out for decoupage.
  4. The sentiment was stamped with Stazon and quickly embossed with clear powder. Black pen was used to enhance the sentiment (the canvas is quite textured so detail doesn’t stamp well).
  5. Images were coloured with sparkle pen and floral stems stuck down with 3D glue gel for added depth.
  6. Glossy Accents was added to some of the flower heads, and dotted over the background.
  7. A little silver gilding wax was applied around the canvas edges and over the crackle texture.
  8. Puffy paint was applied along the base of the canvas and heated to give extra texture.
  9. Finished with lots of faux gems and sequins.


Art With Everything Mini Hanger

Good morning. Today I am sharing a couple of mixed media projects created with Wisteria Lane and Artistic Affirmations stamp sets from Chocolate Baroque.

My first is a small decorative hanger.


Materials:
  • Wisteria Lane and Artistic Affirmations stamp sets
  • White board panel (15 X 10cm) and circles (White Board Shapes kit), gold metallic satin card, pink card and turquoise glitter card
  • Decorative Lace and Regal Border dies (Heartfelt Creations) and decorative element die (unknown brand)
  • Acrylic paints (turquoise, pink, purple)
  • Versamark Inkpad
  • Embossing powders (yellow, pink, purple – Lindy’s Stamp Gang)
  • Texture paste and gilding wax (Pebeo)
  • Texture stencil (Claritystamp)
  • Glossy Accents
  • Scrap lace trim and pink ribbon
  • Faux gems, pearls and sequins
  • Glitter glue and 3D glue gel
  • Variety of small plastic container lids and a straw (for printing)
How it was done:
  1. Texture paste was applied onto the background panel through a stencil.
  2. The white board shapes were coloured with acrylic paints. Plastic lids and a straw were used to print circles. Gilding wax was applied to the edges.
  3. Images were stamped with Versamark and heat embossed with coloured powders.
  4. The hanger was extended on the top and base using die cut panels.
  5. Elements were glued down using 3D glue gel for added depth and dimension.
  6. Finished with lace trim, faux gems, sequins and glitter glue for sparkle.


Sunday 15 April 2018

Quick and Easy cards created for Chocolate Baroque


Good morning. Today I am sharing some quick and easy makes using Wisteria Lane, Tranquility and Artistic Affirmations stamps from Chocolate Baroque.
My first card is a small 7 X 13cm card. The background was from my inky stash of papers created by spritzing inks onto cartridge paper and dropping on dishwasher salt crystals. These were then brushed off when dry. I tend to create batches of these papers so that I always have something in my stash for a quick make. Alternatively a printed background paper could be used.
The images from Wisteria Lane and Artistic Affirmations were stamped with Versamark and heat embossed with detail white powder. Versamark was rubbed down the edges of the paper and sparkly silver embossing powder applied before sticking to the card front.

My next quick make is a 15cm square card. An 11cm square of white stamping card was quickly painted with watercolour inks (orange and yellow). Images from Tranquility and Artistic Affirmations were stamped with Versamark and heat embossed with gold powder. Sparkly gold powder was used around the edges. Water was applied to the blossoms and onto the background to create sky texture and the moon, blotting off dissolved ink with tissue. The flowers were then over coloured with alcohol ink pens and sparkle pen brushed over for shimmer. A 12cm square black card mat was cut for framing and mounting onto the card front.


My last quick and easy makes are a 15cm square card and small gift bag to co-ordinate. I cut my mini gift bag from smooth white card using my Silhouette electronic cutter. You could use a die cut or ready made plain bag, or a make simple gift tag to match. Images from Tranquility and Artistic Affirmations were stamped with Majestic Blue Versafine Ink and quickly coloured with water based blue sparkle pens, blending colour using a clear sparkle pen. The topper was edged with blue alcohol ink marker to frame. Small sticky pearls and a bow were added to finish.

Thursday 12 April 2018

Quilted Floral Tote Bag created for Gina B Silkworks


Good evening. Gina Barrett is back on Create & Craft TV tomorrow bringing back her new Flower Comb Ribbon Ruching Tools. Show time: Friday 13th April at 11am – Freeview Channel 23. You can also watch online live or on catch up via their website.

These are fantastic tools for quickly marking out ribbon with a variety of ruching patterns. Simply stitch along the marked lines and gather to create gorgeous ruched trims and flowers. Gina has also put up a Flower Comb instructional video on her YouTube Channel so you can see how the Flower Combs work.

The show is bringing a great deal on a Mega Bundle that contains everything. Gina’s new instruction book, all the new Flower Comb sets, ribbons, thread, fabric marker and Kanzashi starch. It’s on interest free Flexi Buy too which always helps to spread the cost of bigger craft stash ‘needs’. Individual comb sets are also available on the show or via Gina B Silkworks.

I have had so much fun creating samples for the show and have lots to share today with more posts coming later xxx.

Floral Tote Bag
I made this floral tote bag using recycled cream curtain lining, curtain interlining and old bed sheets. I love to recycle.
I dyed the lining using purple machine dye (Dylon). The fabric for the outer was first painted with dilute pink and purple fabric paints, letting the colours bleed together to create a mottled background (Vajello paints from Colouricious).
I then block printed with leaves and flowers (Colouricious blocks) using Vajello paints (purple and deep pink) and Starlight fabric paint (metallic gold). Tip: When block printing it is essential to use a foam pad underneath – the wooden blocks need a cushion to print properly.
Fabics were then heat set with ironing and washed to remove any excess colour.
Handles were created by stitching strips together. I used a machine decorative stitch to embellish.
Recycled pink and yellow cotton strips were torn from old bed sheets and further colouring added using pink and purple alcohol ink markers. An alcohol blender pen was used to blend the colour. Colour was fixed with ironing. I enhanced the soft frayed edges by pulling away strands.
I used the Rococo Flower Comb set to create the ribbon flowers and ruched strips. I added a felt circle and seed beads to the centre of the flatter flower. The bell flowers were created by wrapping ruched strips around stamens making a cone shape. Note: the stamens are not really washable but I did check that they did not run colour if dunked in soapy water and wet under a tap. There would be nothing worse than colour running everywhere or transferring to clothes if caught out in a rain shower.
Finally I stitched it all together. I made the lining panels slightly taller than the outer so that the lining created a border along the top, then top stitched through all the layers to hold neatly in place.
I have one more ribbon flower sample to blog later and it’s a wowzer – even if I say so myself. Back soon xxx


Wedding Pillow Embellished with Ribbonwork Flowers


Good evening. Gina Barrett is back on Create & Craft TV tomorrow bringing back her new Flower Comb Ribbon Ruching Tools. Show time: Friday 13th April at 11am – Freeview Channel 23. You can also watch online live or on catch up via their website.

These are fantastic tools for quickly marking out ribbon with a variety of ruching patterns. Simply stitch along the marked lines and gather to create gorgeous ruched trims and flowers. Gina has also put up a Flower Comb instructional video on her YouTube Channel so you can see how the Flower Combs work.

The show is bringing a great deal on a Mega Bundle that contains everything. Gina’s new instruction book, all the new Flower Comb sets, ribbons, thread, fabric marker and Kanzashi starch. It’s on interest free Flexi Buy too which always helps to spread the cost of bigger craft stash ‘needs’. Individual comb sets are also available on the show or via Gina B Silkworks.

I have had so much fun creating samples for the show and have lots to share today with more posts coming later xxx.

Wedding Pillow

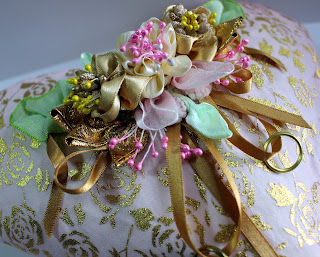
I made this heart shaped pillow using recycled curtain lining and a pale pink gold foiled organza gift bag that I couldn’t bear to throw away. I love to recycle. Even the stuffing was taken from an old bed pillow that had lost its shape. Everything was well laundered and no-one would ever know that this was made mainly from scraps and junk.
First I made a heart template from scrap computer paper taped together to make a sheet approx 12 X 12 inches square. I folded the paper in half and drew a half heart, then opened out. This ensures that the heart is equal on both sides. The heart template measured approx 11.5 inches at it’s widest X 9.5 inches deep.

I used the template to cut X 2 each of cream cotton curtain lining and organza plus recycled curtain interling to provide extra stability and padding (cotton interlining is like a thin wadding/batting). I stitched around the heart using a 1/2 inch seam attaching a ribbon hanger to the top and leaving an opening in the side for turning through. I left a wide enough gap to pass my fingers through and make stitching on embellishments easier.  The seam edges of the opening were folded in and tacked (basted) to hold the layers together and help stop them fraying while working on the next stages.
Next I created a couple of ribbon hangers to hold the wedding rings (brass curtain rings in the pic). I used thin gold satin ribbon and attached using small snap fasteners, so that the rings could be easily attached and removed.
I used some little pink pads cut from felt to reinforce the fastener attachments. I traced the circle shapes from the Leaves and Buds Comb sets directly onto the felt using a soft pencil, then cut out. Circles are always tricky to cut neatly just by eye. These will be hidden under the floral embellishments so stitching did not have to be perfect. Functionality was more important.
I used instructions from Gina’s new Ribbonwork Flowers Book plus the Leaf and Bud Comb set, along with the Rococo Flower Comb set, to create the satin ribbon flowers, buds and leaves used to embellish the pillow.
I created an array of overlap and doucet leaves following instructions from the book and Comb 36 (Leaves and Buds set). The green leaves were made from ribbon and the gold leaves from scrap pieces of gold foiled organza (from the recycled gift bag).
Flowers  were made using  gold and cream satin ribbons, wrapping the gathered strips around flower stamens and stitching into a cone shape (Combs 1 and 3 – Rococo Set).
Leaf shapes were also created with pink organza ribbon to create buds. These were stitched in place building out from the pillow centre and disguising the snap fasteners.
Extra ribbons were also stitched in place to create little swags.
I continued building from the centre outward.
I created a hand made tassel to finish off the design. The tassel head was created with rolled paper strips using templates printed from Gina’s Paper Lathe CD. A brilliant pattern resource for making hundreds of different shaped tassel moulds and for rolled paper beads too.
I painted the tassel head with gold acrylic. The tassel was made with short strands of cream Cotton Broder left over from another project (most would of thrown these away but I can never waste anything –tee hee). I loved the effect of the varied lengths. Knotting the thread ends added extra interest. I created the loop hanger using macramé.
The cushion was then stuffed and the opening closed (stitching up by hand).
I hope that you like my wedding pillow made mostly from rubbish.

Off to write up blogs for my other samples. Back soon xxx.


Woven Bangle created for Gina B Silkworks


Good afternoon. Gina Barrett is back on Create & Craft TV tomorrow bringing back her new Flower Comb Ribbon Ruching Tools. Show time: Friday 13th April at 11am – Freeview Channel 23. You can also watch online live or on catch up via their website.

These are fantastic tools for quickly marking out ribbon with a variety of ruching patterns. Simply stitch along the marked lines and gather to create gorgeous ruched trims and flowers. Gina has also put up a Flower Comb instructional video on her YouTube Channel so you can see how the Flower Combs work.

The show is bringing a great deal on a Mega Bundle that contains everything. Gina’s new instruction book, all the new Flower Comb sets, ribbons, thread, fabric marker and Kanzashi starch. It’s on interest free Flexi Buy too which always helps to spread the cost of bigger craft stash ‘needs’. Individual comb sets are also available on the show or via Gina B Silkworks.

I have had so much fun creating samples for the show and have lots to share today with more posts coming later xxx.

Woven Floral Bangle

To create the woven bangle I used the Beadalon Bangle Weaver Tool (Beads Direct), recycled sari silk strips, monofilament and a few beads.

I used the Rococo Flower Comb set (Gina B Silkworks) to create the satin ribbon flower embellishment; ribbons varying in width from 15mm to 3.5cm. The flower centre was finished with microbeads and a pearl cabochon, glued in place with Fevicryl (glue designed to stick beads and gems to fabric).
Off to write up blogs for my other samples. Back soon xxx.

Wednesday 4 April 2018

Tranquil Meditation and a Happy Place


Good morning. Today I am sharing some of my recent show samples using Tranquility, Wisteria Lane and Artistic Affirmations stamp sets from Chocolate Baroque.

I created 3 different scene cards, one using vibrant happy colours, one in blue & white monochrome and my third was an attempt at Parchment. I hope that you like them.


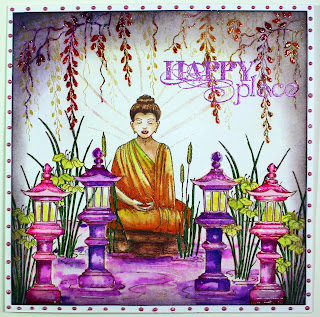
Happy Place
I love colour so I created this ‘Happy Place’ using a bright cheery colourway.
 
Materials:
  • Tranquility, Wisteria Lane and Artistic Affirmations stamp sets
  • 8 X 8 inch card blank, white stamping card, scrap copy paper
  • Inkpads: Versamark, Versafine (Vintage Sepia), Distress Ink (Wild Honey, Dusty Concord)
  • Pigment powders (Lindy’s Stamp Gang – Urban Amethyst, Poppin Pink, Luminous Lemon)
  • Embossing powder (purple and pink mix)
  • Watercolour, sparkle and glitter pens (Spectrum Noir and Sakura – yellow, green, purple, pink, orange, brown, clear sparkle) and coloured pencils
  • Fine tipped marker (waterproof brown, opaque white) and alcohol marker (dark purple)
  • Zig 2 way glue
  • Cosmic Shimmer PVA pearls (Vintage Pink), Stickles Glitter Glue (Star Dust) and Glossy Accents
How it was done:
  1. The lanterns were stamped onto copy paper and cut out to create masks. I dotted a little zig glue on the back and left to dry. This glue then gives a temporary tac to hold the masks in place while stamping.
  2. The scene was stamped with Versafine, stamping the foreground images first then covering with masks while stamping the images set behind. The scene was extended by drawing with the fine tipped pen (i.e. water swirls).
  3. The foliage across the top was stamped with Versamark and pigment powders were applied with a soft brush. Further foliage was stamped with Wild Honey Distress Ink. The sentiment was stamped with Versamark and heat embossed with powder.
  4. The image was coloured with watercolour pens, dissolved pigments, sparkle overlay and glitter pens. Highlights were added with white pen and additional shading added with pencils.
  5. The image was edged with alcohol marker and by blending with Dusty Concord Distress Ink.
  6. Extra sparkle was added with glitter glue and Glossy Accents. PVA pearls were applied to the border.
 
Tranquility

I have been trying to have a go at Parchment craft as I love the delicate result. I thought that it would make a lovely tranquil version. No picot cutting as I am hopeless, so I cheated with a die. I tried to hide the glue but still ended up with a blob of showing through the parchment – eek! I was fairly pleased with the results but have a lot to learn and more practice needed yet.

Materials:
  • Tranquility stamp set
  • 6 X 6 inch scalloped card blank, parchment, gold satin board
  • 6 X 6 inch decorative stencil
  • Pergamano tools (embossing mat, embossing tools, mapping pen, Sticky Ink and Perga Glue)
  • Inkpads: StazOn (Opaque White), Distress Ink (Tattered Rose)
  • Scalloped circle dies (Pin Dot Scalloped Circle - Tattered Lace)
  • PVA pearls (tangerine), extra fine glitter and sequins
  • Used tumble dryer sheet
How it was done:
  1. The gold card and parchment were cut out using dies. The background was created using Distress Ink through the stencil (using a blending brush).
  2. The image was stamped onto the front of the parchment using white StazOn. I then embossed the outlines on the back of the parchment using a fine embossing tool, tracing the stamped image. To help aid the embossing tool to glide on the parchment I rubbed over the surface using the tumble drier sheet first.
  3. Larger embossing tools were then used to add shading. Although it is generally called ‘shading’ it is actually ‘highlighting’ as embossing stretches the parchment and makes it whiter. You need to work gently and slowly, leaving the parchment to rest between layers of further whitening. I did tear her cloak (eeeeek) but managed to disguise it with a little Perga Glue which was later covered with glitter.
  4. Sparkly highlights were then added to the front using a mapping pen (dip pen), sticky ink and extra fine glitter.
 
Meditation


I love creating monochromatic blue & white cards. Perfect for a tranquil meditation.
 
Materials:
  • Tranquility and Wisteria Lane stamp sets
  • 15cm square card blank, blue card for die cut panel, white stamping card
  • Versafine Inkpad (Majestic Blue)
  • Water based sparkle pens (Spectrum Noir - blue and clear)
  • Alcohol marker (dark blue)
  • PVA peals
  • Decorative square and arched panel dies (Tonic)
 
How it was done:
  1. The images were stamped with Versafine ink and were coloured with sparkle pens and a damp brush to create shading. Decorative stamped elements were positioned to frame the central image.
  2. The panels were cut using dies and edged with blue marker to frame. 3D foam was used to mount the central image and give it more depth.
  3. Finished with PVA pearls.