Showing posts with label Card Making. Show all posts

Thursday, 20 September 2018

Indian Delights created with stamps from Chocolate Baroque


Good morning, today I am sharing a couple of projects created with the lovely Indian themed stamps from Chocolate Baroque.
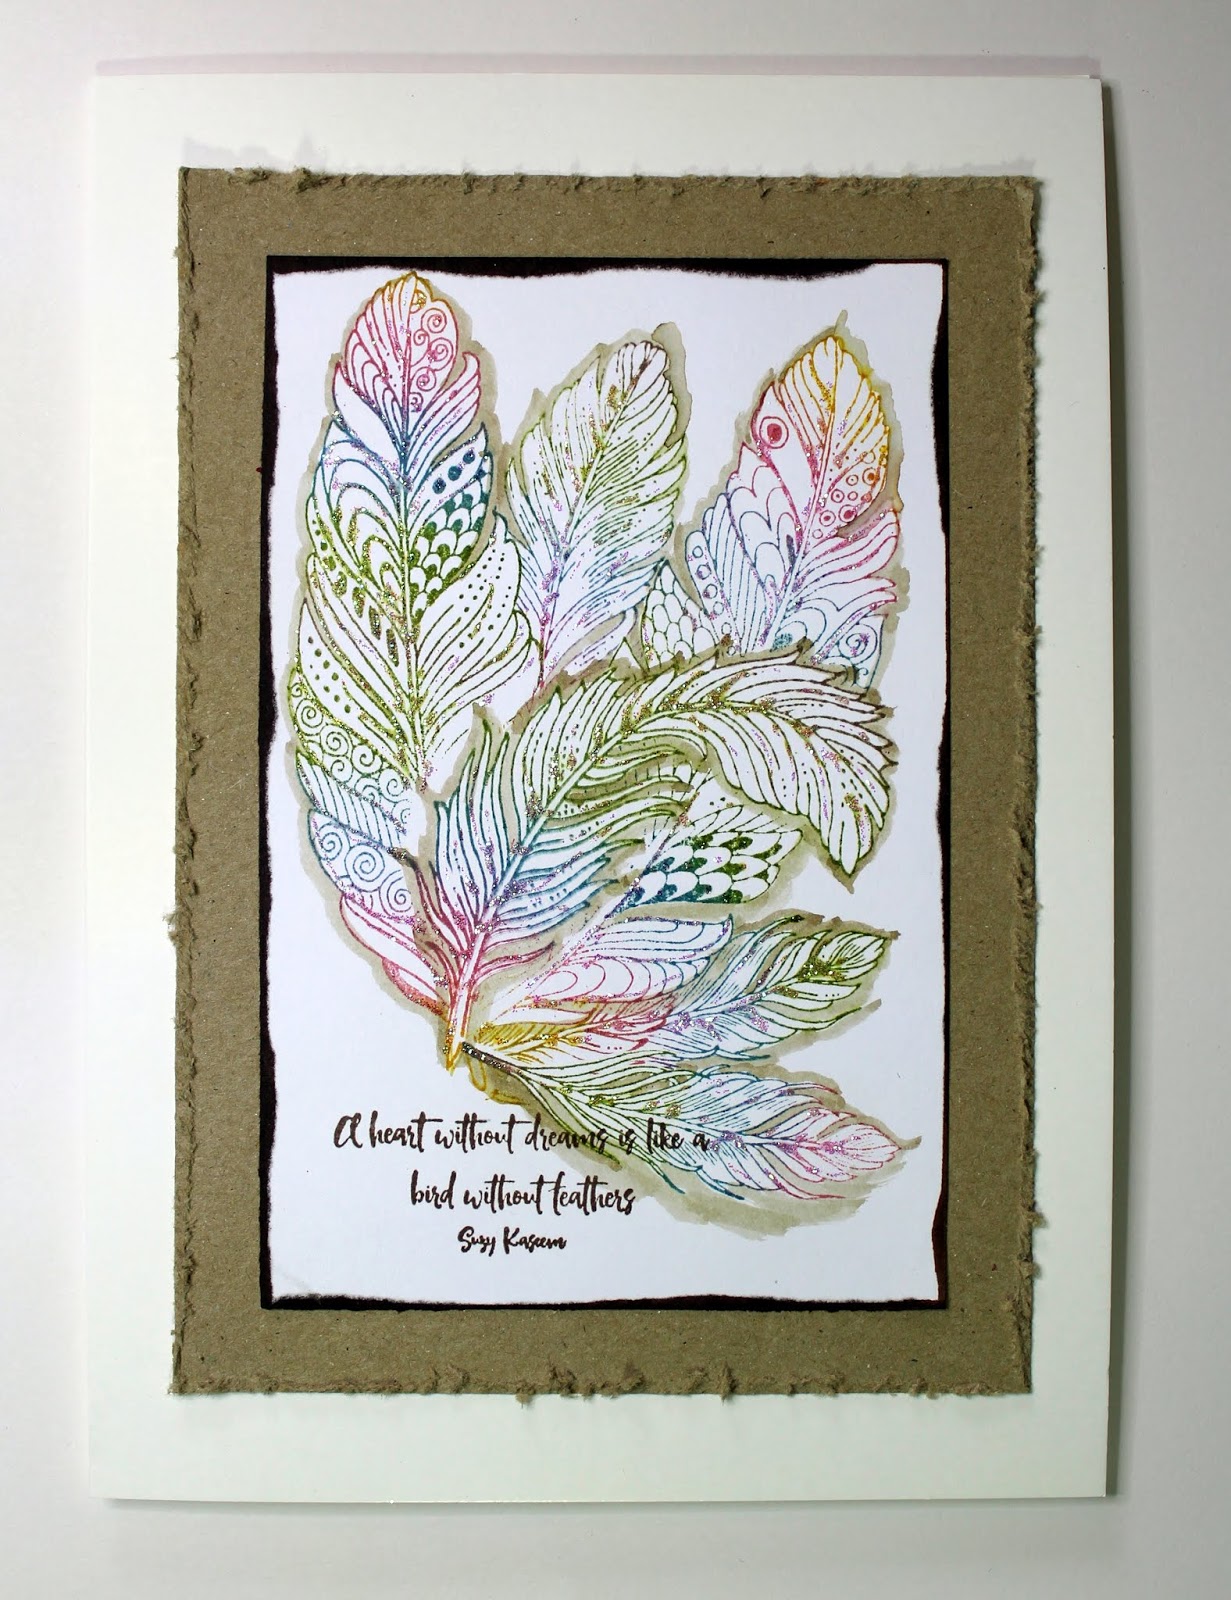
My first is a shabby chic style card. Think vintage block printed sari silk and old documents.

Materials:
  • Paisley Elephant and Nature’s Paisley stamp sets
  • A5 shaped card blank (14.5 X 20.5cm cream), cartridge paper (off white)
  • Inkpads: Rainbow dye ink (Kaleidacolor Country), Versafine (Vintage Sepia)
  • Ink sprays: Mr Huey’s (Classic Tan), Lindy’s Stamp Gang Starburst (Opal Sea Oats)
  • Alcohol marker (brown), Sakura Glaze pens (black and dark blue)
  • Soft Form Relief Paste (Copper)
  • Gilding Wax (Pebeo Empire Gold) and PVA pearls (Cosmic Shimmer Dark Bronze)
  • Textured velvet ribbon (brown),
How it was done:
  1. Soft Form Relief Paste was spread over the stamp and left to dry overnight before peeling away. Extra colour was added with glaze pens and gilding wax.
  2. The card blank was repeat stamped with the paisley background and rainbow ink. Alcohol marker was used to emphasise the edges. Textured ribbon was glued down to create a border.
  3. The cartridge paper was stamped using Versafine and trimmed to fit the card front. The edges were distressed and curled using scissors then coloured with alcohol marker. The paper was then spritzed with inks before gluing to the card front.
  4. The embellishment was glued to the card front with 3D glue gel for added depth. Finished with PVA pearls.
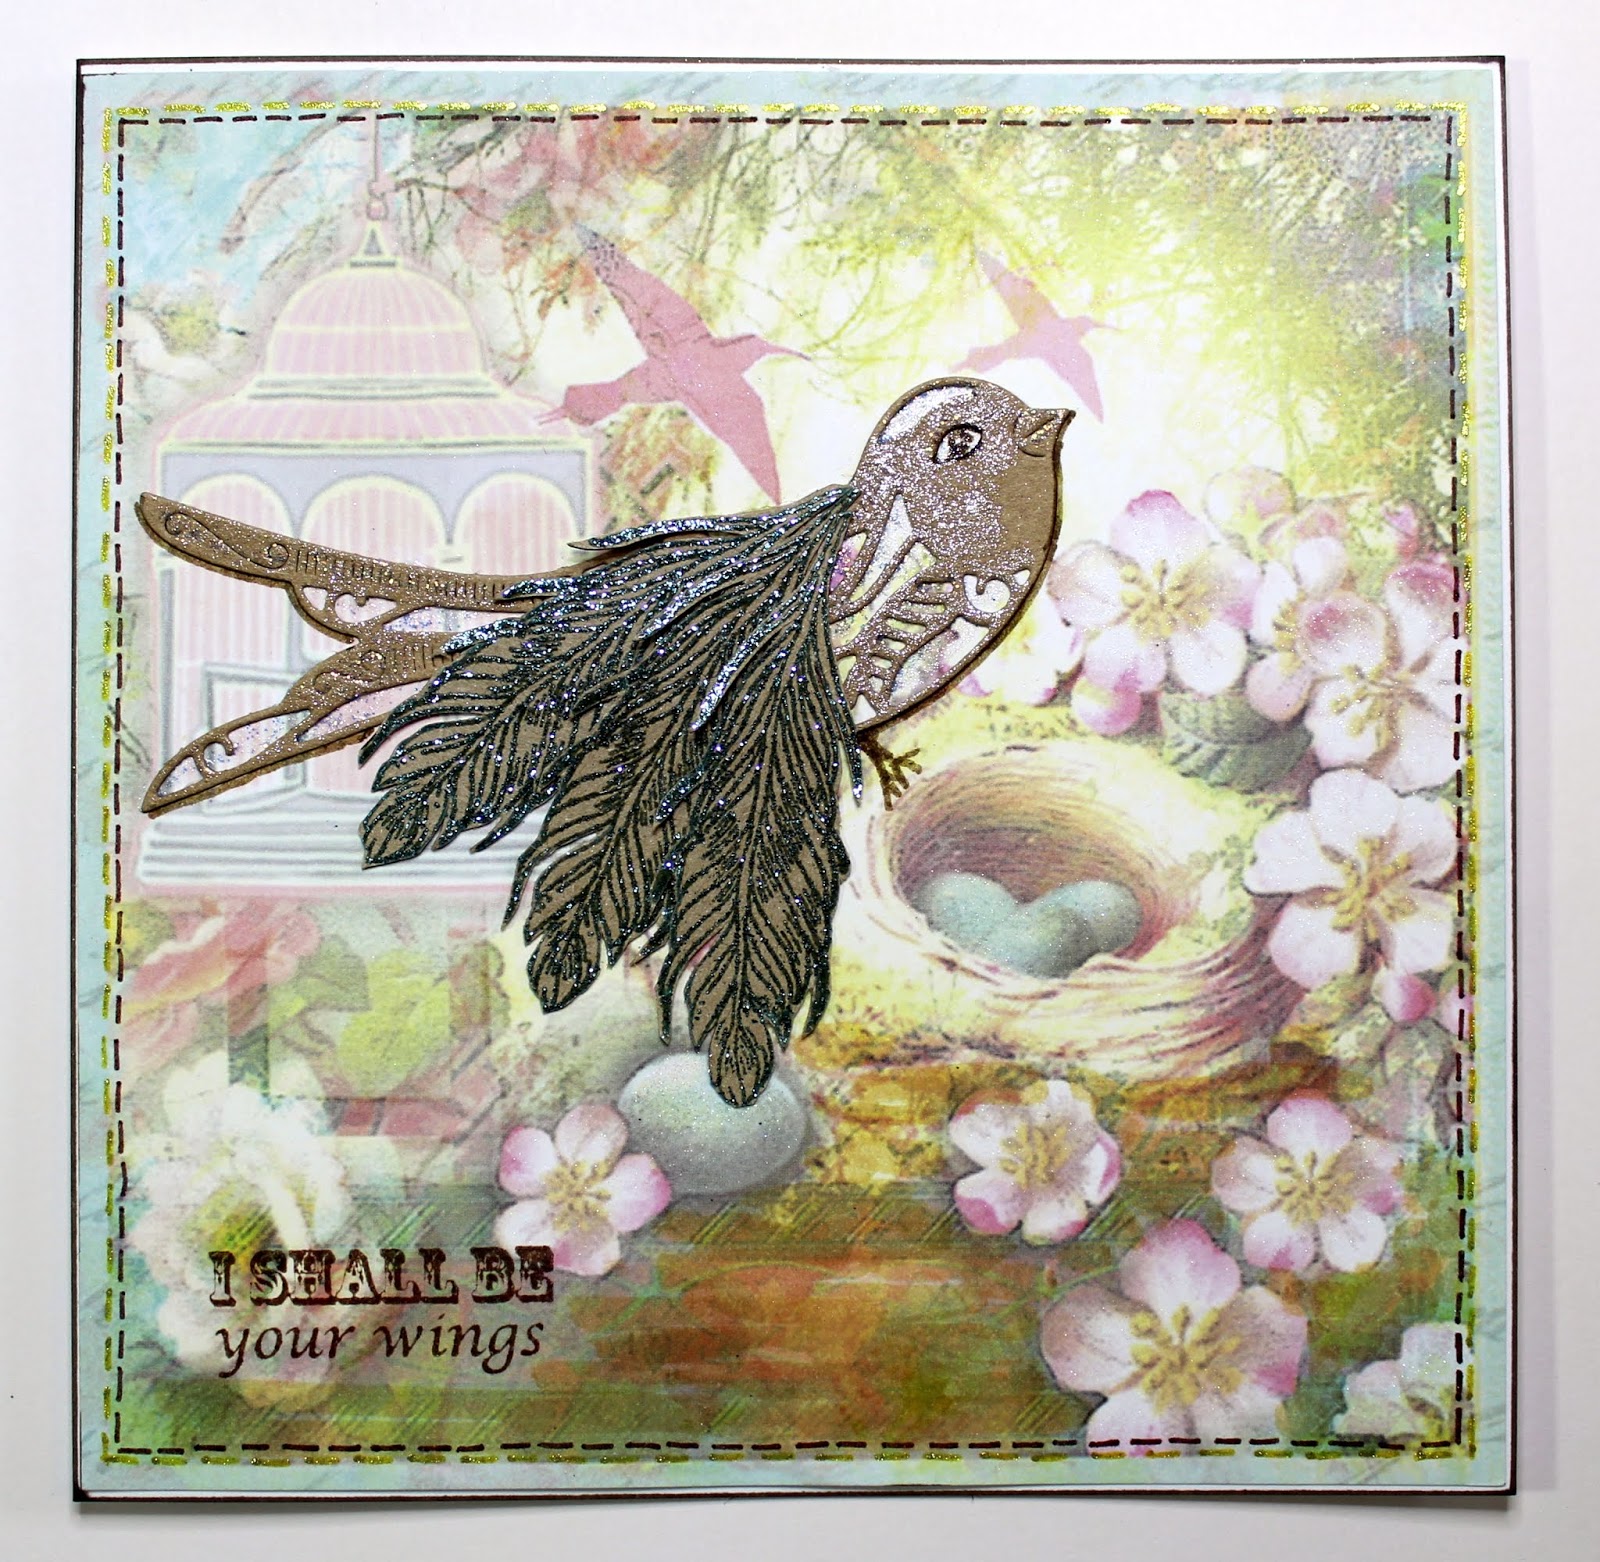
My second project is a bright and cheery elephant scene. You know how I love colour and bling. I had a lot of fun with this one.

Materials:
How it was done:
  1. Soft Form Relief Paste was spread over the stamps and left to dry overnight before peeling away. Extra colour was added using pink and gold metallic plus black paints. Glitter glue and PVA pearls were added for extra bling (you know me!).
  2. Watercolour card was spritzed with water and coloured by dropping on pigment powders. Images were stamped with Versafine (third generation stamping was used to faintly stamp the buildings in the background). The flowers were coloured with metallic pen (taking care not to obliterate the stamp detail – the ink was very opaque).
  3. The card was edged with Versamark and embossed with sparkly powder (Yay, more bling).
  4. The embellishments were glued to the card front with 3D glue gel for added depth. Yellow puff paint was applied to the foreground and heated to puff up and add texture.
Sad News
I hope that you like my latest projects. This will be my last regular post for Chocolate Baroque for a while. I have been working with this wonderful Design Team for over 3 years now and I am very sad to be leaving. Nothing to worry about, I just have to give extra priority to other things at the moment. However, you will still see the odd post from me in the guest blogger spot and in the Facebook Group. I simply cannot tear myself away completely.

Thank you all for your support and lovely feedback over the years. Big huggles, Anne xxxx.

Saturday, 15 September 2018

Quick and Easy Indian Themed Cards


Good morning. I have created a couple of very quick and easy makes using Indian themed stamp sets from Chocolate Baroque.
My first project was created using Indian Textiles and Paisley Elephant stamp sets, directly stamping onto a matte (absorbent) red scalloped card blank (12.5cm square). The border and sentiment were stamped with Versamark Ink and heat embossed with detail gold powder. A little colour was added with dark pink sparkle pen and purple glitter glue.
The background motifs were also stamped with Versamark and then a little mica powder (Jacquard Interference Red) brushed over using a soft make up brush.

My second card was created with Indian Textiles and Nature’s Paisley stamp sets.
The border was stamped directly onto the card blank (15 X 10 cm) using black StazOn Ink (note: I used StazOn as my card blank had a shiny coating - many other inks don’t dry properly on this surface).
The paisley motifs were stamped onto a black card panel using Versamark Ink and heat embossed with Mica Boss powder. This created a tacky finish on which gilding flakes were applied (special glue formulated to use with flakes could be used instead). Finished with little black sequins.

Thursday, 6 September 2018

Indian Palace Card and Tag

My second project  today is a vibrant card with matching Birthday tag.


Materials:
  • Indian Textiles and Paisley Elephant stamp sets, Silhouette Palaces Stencil 1 and Stencil 2
  • A5 card blank, mount board tag (11 X 5cm), white stamping card (21 X 7cm), flower cut from white vellum and white card leafy sprig
  • Inkpads: Versamark
  • Brusho Powders (Turquoise, Leaf Green) and Lindy’s Stamp Gang Magical Powders (pink, purple, yellow)
  • Fine embossing powders (Rich Gold, White)
  • Metallic paints (Starlight Rich Gold, Viva Décor Precious Metal 501 pink)
  • Sparkle pens (Spectrum Noir – clear, turquoise, deep purple, cerise pink)
  • Fine tipped markers (black, opaque white)
  • Gel pens (clear glaze and gold)
  • Large faux gem and sequins, organza ribbons (turquoise, lilac)
How they were made:
  1. The card strip and tag were coloured with water soluble powders, dropping them onto the card and spritzing with water.
  2. The palaces were stencilled with pink metallic paints. The masks were then overlaid and details added with gold paint. Extra highlights and the roof domes were also coloured with gold. The fine tipped black pen was used to draw in details and extra highlights were added with white pen.
  3. Sparkling rays were added from the dome tops using clear and gold gel pens plus clear sparkle pen. Black pen was used around the edges to frame.
  4. The sentiment was stamped onto the tag with Versamark and embossed with white powder. Finished with ribbons, vellum flower, leafy sprig, faux gem and sequins.
  5. The border was stamped onto the card blank with Versamark, embossed with gold powder and coloured with sparkle pens. Finished with sequins for extra bling. You know that I just cannot resist!
I hope that you have enjoyed my Indian bling makes today x.

Wednesday, 15 August 2018

Quick and easy cards created with Chocolate Baroque stamps


Good morning. Here are a couple of quick and easy makes using the Christmas stamps recently featured on Hochanda TV with Chocolate Baroque. With the volume of cards needed at Christmas we all need a range of quick and easy make ideas. There are more ideas from my Teamies on the Chocolate Baroque Design Team Blog today if you would like to see more.


My first sample is with the gorgeous new Bearing Gifts stamp. I used one of the 6 X 6inch background papers from Crafty Individuals (Travels in Italy) to create a quick background. The sentiment from the Lets Get Festive set was stamped with Versamark Ink and embossed with detail white powder. The paper was then roughened with the edge of my scissors and curled before gluing to the card front.
The kings were stamped onto white card with Versafine (Onyx Black). Colouring was done really quickly using watercolour pens. Colour was applied directly into the darker areas and brushed out with water or clear sparkle pen to give the shading. The image was then cut out and layered onto the card front with foam pads for added depth.
For my second quick make I chose one of my inky background papers (textured cartridge) created with ink sprays and Brusho powders.
The scene from the Winter Edges set was stamped across the centre with Versafine Ink (Onyx Black). It was stamped again without re-inking just above and to the left slightly (to create distance). The stamp was turned upside down and stamped along the base. Trees were then stamped randomly by inking only parts of the stamp. The reflection was created by stamping onto acetate and pressing this down onto the card to transfer the ink.
The scene was edged with black alcohol marker to frame, mounted onto white and red card before gluing to the card front (15 X 13cm card blank).

Thursday, 9 August 2018

Christmas Card and Treat Bag


Good morning. Today I am sharing a couple of Christmas projects – a simple card in non-traditional colours using the Pears and Baubles stamp set, and a pretty fabric pouch stamped and coloured using the Hark the Christmas Rose stamp (Chocolate Baroque).
A 6 X 6 inch white card blank was stamped with the lovely background stamp from the Pears and Baubles stamp set using pale pink dye based ink (Memories Baby Pink).
The sentiments were stamped with pink and Silver (Encore Ink) from the Let’s Get Festive stamp set.
An octagonal piece of pink card was embossed with a textured folder from my stash. A little Distress Ink (Tattered Rose) was applied across the surface with a sponge to enhance the texture. Versamark Ink was applied around the edges and embossed with white powder. This was glued to the card with foam pads for added depth.
The bauble was stamped with Silver Encore Ink onto plain white card and cut out. The bauble was sprayed with glittery varnish for added sparkle (Crafters Companion Spray and Sparkle) and Glossy Accents applied to the central star. The bauble was glued to the card with foam pads.
Finished with sequins, an organza bow, silver glitter glue (Dovecraft Silver) and silver PVA pearls (Tonic Nuvo – Silver Lining) – just couldn’t resist a bit more bling.

A scrap of cotton was trimmed into a rectangle approx. 13 X 34cm. This gave enough room for seam allowances and a fold over top to thread with a ribbon drawstring. Before sewing together the Hark the Christmas Rose was stamped onto one end using Nuvo Black Shadow Ink. The ink was left overnight to dry and ironed to fix (essential if you want to colour with water based media).
Rather than water based media I decided to colour the image with permanent alcohol markers (green, yellow, pink and blue). Colour was encouraged to bleed and give a soft blended effect using a clear alcohol blender pen.
When dry a little clear acrylic sparkly glaze was applied to the flowers (Silks Acrylic – Ice), and gold glitter glue was applied to the stamens (Pinflair Glitter Wand). Yes – just had to be more bling. The fabric was again left overnight before ironing with a hot iron to set everything.
A small channel for ribbon threading was stitched on each end, then the fabric folded in half and the side seams stitched (omitting the channel). Two pieces of ribbon were thread through the channels to create a simple pull drawstring.
I hope that you have enjoyed my Christmas makes xxx.

Sunday, 29 July 2018

Positive Thoughts Blossom


Good morning. Today I am sharing the last of my recent Hochanda TV show samples using the Scrumptious Succulents and Blossom and Grow stamp sets from Chocolate Baroque.
The blossoms were stamped directly onto a 6 X 6 inch pink card blank using Versamark Ink and heat embossed with detail gold powder. Tip: Stamp the four corners first by stamping then turning the card and stamping again, keeping the stamp and block in the same orientation. Then repeat the process stamping the other blossom in between. I used the Tim Holtz Stamping Press (Tonic) to make this really quick and easy. It is not essential to use a stamp press but it will make it much easier.
The blossoms were coloured with Distress Oxide Ink (Carved Pumpkin), green and gold sparkle pens and a damp brush. Metallic orange/silver and gold gel pens (Pentel and Sakura) were used to add highlights to the flowers.
Next I created a stamp mask by stamping the cactus onto scrap copy paper and cutting out. I used a few dots of Zig 2 Way glue to give a tacky temporary stick to the reverse to hold the masks in place while stamping. Alternatively you could use the special Masking Tissue to create masks.
The cacti were then stamped onto white stamping card using Versafine (Vintage Sepia), covering images with masks as required so that some images appear to be behind the foreground stamped images. The sentiment was stamped onto pink card.
The cacti were coloured using watercolour pencils and a damp brush to smooth and blend the colour. The topper was then cut out and lightly shaped to give dimension before sticking to the card with foam pads.
The sentiment was cut out using a small decorative panel die. A little Distress Oxide was used to colour the edges. This was mounted with 3D glue gel along with a small die cut flower and sprigs (Tattered Lace).
My next sample was stamped onto a patterned paper using Versafine (Onyx Black). Again I used masks where needed to build up the scene (prepared as above). Coloured with pencils and added a little yellow glaze gel pen (Sakura) to the blossom stamens.
The panel was edged with black alcohol marker to frame before mounting onto white card and gluing to the green card blank (6 X 6 inch).
For my next sample I dug out an inky background paper from my stash. This one was created with ink sprays and Brusho powders. I thought that it would make a lovely tropical background for a scene.
A background panel was created in the same way as my first sample but using Distress Ink (Old Paper) for a subtle effect. A little clear sparkle pen was used to add petal highlights. The panel was edged with green alcohol marker to frame and mounted onto green card before gluing to the card front (6 X 6 inch).
The scene was built up, stamping with Versafine Ink (Onyx Black) onto the coloured panel, using masks where needed (made from copy paper as given above). Images were coloured with Distress Oxide Ink (Carved Pumpkin), watercolour and sparkle pens. The panel was edged with black alcohol marker to frame and glued to the card front with foam pads for added depth.
I had so much fun with these gorgeous stamp sets.
Happy stamping x.

Sunday, 15 July 2018

Quick and easy monochromatic floral cards

I love to use a blue & white theme and it is a quick and easy method to create cards when you are in a hurry. I created these samples for the recent shows on Hochanda TV using the Blossom and Grow and Scrumptious Succulents stamp sets from Chocolate Baroque.

Images and sentiments were stamped with Versafine (Majestic Blue) and coloured with dark blue watercolour pen. Colour was quickly scribbled onto areas requiring darkest shading and the colour simply dragged out using a damp brush. Note: You need to use a quality stamping card or watercolour card for this technique to work. Card with a high chalk content will grab onto the ink colouring and it cannot be easily spread with water.

The panels were edged with dark blue alcohol marker to frame before gluing to the card fronts.

My first quick scene was created using the Blossom and Grow stamp set and textured watercolour card and mounted onto a 6 X 4 inch card blank. A little watercolour pen was run along the base to ground the image, spreading the ink with a little water. Clear glitter glue was added to the flowers for a bit of sparkle – I just cannot resist. Loving the sentiments in this stamp set, think that I will be using them a lot.

My second quick scene included the sentiment from the Scrumptious Succulents stamp set. Again I used textured watercolour card, mounting the finished scene onto a 3 X 5 inch card blank.

The scene was stamped and coloured as above. Extra colour was sponged around the edges by lifting watercolour pen scribbled onto my craft mat. A tiny drop of glycerine was blended into the sponge before lifting colour. This helps the ink to blend more easily and behave more like a Distress Ink (a Sheena Douglass tip). I then splashed the blended inked background with water and lifted off with kitchen paper to give added texture.


Saturday, 14 July 2018

Blossom and Grow Cacti

Good morning. I created these samples for the recent shows on Hochanda TV using Captivating Cacti, Blossom and Grow and Scrumptious Succulents stamp sets from Chocolate Baroque.


My first sample was created using a 5 X 4.5 inch card blank. The lower third of the card blank was embossed using a lacy textured embossing folder. The background was stamped using the Square Bubbles stamp and Distress Ink (Tattered Rose). Distress Ink, purple dye based ink and pink glitter glue were applied over the embossed section to colour and highlight.

The sentiment was stamped from the Blossom and Grow stamp set using purple dye based ink. The card was edged using purple alcohol marker to frame and a ribbon glued down to create a base for the flower pot.

I used a flower pot die (Sheena Douglass Herb Garden set) to cut the pot from Kraft card. A little colouring was added using watercolour and clear sparkle pens before shaping and gluing to the card front with 3D glue gel.

Cacti from the Scrumptious Succulents set were stamped onto smooth stamping card using Versafine (Onyx Black). Images were then coloured with watercolour pens (Crafters Companion Spectrum Aqua), dragging out colour and blending using a damp brush, then cut out. The large ‘face on’ cactus image was stamped several times, cut out, shaped and layered up. Elements were shaped using a ball tool and foam mat then glued down with 3D glue gel.


For my second sample I used the gorgeous Captivating Cacti stamp and a sentiment from Blossom and Grow.
I prepared a decorative card blank from a 6 X 6 inch Kraft card blank, extending the edges by adding die cut borders from white pearl card (Crafters Companion Die’Sire strip die). Finished by adding faux stitching with a fine tipped pen (opaque white) and PVA pearls.
Images were stamped onto textured watercolour card using Versafine (Onyx Black). Watercolour and sparkle pens (Crafters Companion) were used for colouring. Colouring was extended at the base to give the cactus grounding.
A little gold sparkle pen was flicked across the image for added texture. I didn’t intend to do this initially but I had to cover up an accidental splodge! I liked the result, so a ‘happy accident’ as they say – tee hee. The card was edged with dark brown marker to frame before gluing to the card front.


Wednesday, 4 July 2018

Growing Blossoms


Good morning. Today I am sharing a couple of my samples for the recent shows on Hochanda with the Blossom and Grow and Scrumptious Succulents stamp sets.
This one was created with a 6 X 6 inch Kraft card blank. First the flowers were stamped onto scrap copy paper and cut out to create a mask. A little Zig 2 Way glue was dotted on the back to provide a temporary tac. Alternatively you could use the special masking tissue.
The images were stamped directly onto the card blank using Versamark and embossed with detail white powder. The foreground florals were stamped first, covered with masks before stamping the background foliage.
A little texture was added using a little ‘pricking wheel’ and a ruler. Just something I have in my tools, like a mini pastry crimping texture wheel. Opaque white pen was then used to add faux stitching and dots. Light colouring was brushed over with watercolour pens, using a clear sparkle pen to dilute the colour.
The flower was stamped again onto white stamping card using Versafine (Onyx Black) and coloured with watercolour and sparkle pens. The image was trimmed out and mounted with 3D foam. Finished with PVA pearls.
My second is a wreath created with one of the small flower heads. A 6.5 X 5.5 inch textured card blank was randomly stamped using the Square Bubbles stamp and Versafine (Majestic Blue). I used various dies to cut mats and layers and to build out decorative sides to the card blank (using white and blue card). Dies: Pin Dot Decorative Circles (Tattered Lace) and Florence (Crafters Companion Die’Sire).
I used the Inkadinkadoo Stamping Gear to stamp the wreath using Versafine (Majestic Blue). This can be done manually by dividing the circle into 8 segments (mark lightly with a pencil). Tip: Stamp the first image and turn the card before stamping the next, keeping the stamp orientation the same as you go. It’s easiest to stamp the 4 quadrants first then go around again and fill in between. Practice on some copy paper.
The flowers were coloured with watercolour pens and clear sparkle pen to dilute out colour and give shading. 3D foam was used to add depth and dimension to layers.

Thursday, 21 June 2018

All about feathers, cards created with stamps from Chocolate Baroque


Good morning. Today I am sharing a few cards created with the ‘I Shall Be Your Wings’ stamp set from Chocolate Baroque.
My first is a colourful bunch of feathers in a shabby chic style.
I first stamped the feathers onto copy paper and cut them out to create masks. A few dots of Zig 2-way glue were applied to the back to hold the masks in place. This glue gives a temporary tac if left to fully dry before sticking down. Alternatively this could be done using the special Masking Tissue which comes with a tacky back. These masks can then be kept and re-used multiple times.
The feathers were stamped with multi-coloured dye based ink, layering images with masks and working from foreground to background. The sentiment was stamped with Versafine (Vintage Sepia). A drop shadow was added around the feathers using pale watercolour pen ink applied with a brush (to add more 3D depth).
Kraft card and the stamped panel were trimmed to fit an A5 card blank. The craft card was distressed using the edge of scissors, the stamped panel edged with alcohol marker to frame. A little Stickles (Crystal) was added for sparkle.


My second is a 6X6 inch card embellished with 3D shaped cut out feathers.

Faux stitching was added around the edge of the card, and small dots drawn, using a fine tipped opaque white pen.

The feathers were stamped onto a slightly paler version of Kraft card using Versamark and sparkly aqua embossing powder (WOW Calypso). These were then cut out and lightly shaped with a ball tool before gluing to the card front with 3D glue gel. Finished with a ribbon bow.
My third is another 6 X 6 inch card using a lovely background paper from Crafty Individuals (Shades of Summer). This particular pad is usually available on the Chocolate Baroque website (but depends on stock).
The paper was glued to a card blank and faux stitching added around the edge using a fine tipped pen. The sentiment was stamped with Versafine (Vintage Sepia). A little watercolour pen was painted over the image to help at more ‘weight’ to the base.
The feathers were stamped onto Kraft card using Versamark and sparkly aqua embossing powder (WOW Calypso), cut out and lightly shaped before sticking over a die cut birdy (Tattered Lace die) using 3D glue gel. Eye and leg details were added with fine tipped pen. A little clear sparkle pen was brushed over the bird for extra shimmer.


Saturday, 16 June 2018

Quick and Easy cards created with stamps from Chocolate Baroque


Good morning. Today I am sharing three quick and easy makes using stamps from Chocolate Baroque. These are great for batch making or for creating something in a hurry.
For my first make I used the Square Bubbles background stamp and I Shall Be Your Wings stamp set.
A black card blank (15 X 13cm) was stamped with Versamark and heat embossed with white powder. The feather was embossed with aqua glitter powder onto white card, and the sentiment with white powder. The card was sprayed with water and colours dropped on (sparkle pens) and blown around by puffing through a straw. Finished with a few sparkly sequins.
My second quick make was created using the Square Bubbles background and Rose Duo stamp set along with a sentiment from I shall Be Your Wings. I used dies to cut a fancy card blank and layers in black and watercolour card.
The card blank background and sentiment were stamped with Versafine (Onyx Black). The foliage was then stamped using a multi-coloured dye based inkpad. Spritzing with water spread and softened the prints. A black alcohol marker was used to edge the card.
A strip of copy paper was then placed across the sentiment (acting as a mask) and images stamped again with Versafine, repeating the stamping without re-inking to create depth. I added a tiny die cut bird to finish the scene.

I again used the Square Bubbles background stamp and Rose Duo set to create a pretty floral card.
The image was stamped with Versafine onto watercolour card and very quickly coloured with watercolour pens. A little colour was added directly to the darker areas and colour dragged out using a damp brush to give quick shading.
I then covered my image and stamped the background with pale ink. I had already stamped the image onto copy paper and cut out to create a mask. You could also use special Masking Tissue, which has a tacky temporary adhesive back, to create masks. I often do this with a new stamp set keeping the masks in my stash for future use (I re-use these masks multiple times). If you don’t have masks prepared then obviously you will need a little more than 15 mins to make this one. Alternatively just randomly stamp around the background avoiding the floral image. I finished by edging with alcohol marker and faux stitching using a fine tipped pen before gluing to the card blank.

Saturday, 26 May 2018

Surreal Dreamy Tree Landscapes created with stamps from Chocolate Baroque

Good morning. Today I am sharing a couple of projects using the Rose Tree and Essence of Nature stamp sets from Chocolate Baroque.

My first is a surreal dreamlike scene using the pretty rose tree as the main focal point.


The theme of this week’s Simon Says Stamp Challenge (Wed) is ‘use more than one stamp’ – so I have entered this one.

Materials:
  • Rose Tree and Essence of Nature stamp sets
  • 19.5cm X 14.5cm card blank, black card, white card (for backing), acetate (recycled packaging) and waste copy paper (to create masks)
  • Clear double sided sticky sheet
  • StazOn Inkpad (Jet Black)
  • Alcohol ink pens and opaque white marker
  • Bulb spritzer attachment to spray ink pen (similar to Ranger Distress Marker Spritzer)
  • Nail varnish remover
  • Glitters (green, gold and crystal)
  • Viva Décor Kristall Gel (Holographic)
  • Hexagon dies (Tonic)
How it was done:
  1. The scene was stamped onto the acetate using StazOn ink.
  2. Colouring was added to the reverse using alcohol ink pens. Strips of copy paper were used as a mask and alcohol ink spritzed using a bulb attachment for pens. Basically air is blown across the pen tip by squeezing the bulb, creating a spray. Some colour was dabbed away from the sky area using nail varnish remover.
  3. Double sided sticky sheet was then placed on the back and coloured glitters were dropped onto the scene, burnishing into the sticky sheet using a finger.
  4. A die was then used to cut out a hexagon shape from the centre of the scene. A little Kristall Gel was applied to the background panel for added texture and sparkle.
  5. White card was trimmed and glued to the back to make the images stand out. These were then backed with black card to create a border around the background and hexagon cut shape. White faux stitching was added to frame the images.

My second project uses the lovely butterfly tree as the main focus to create another dreamy scene.


Materials:
  • Essence of Nature stamp set
  • 15cm square card blank, cartridge paper, metallic satin card (blue/silver), pink vellum
  • Versamark Inkpad and pen
  • Embossing powders (aqua sparkle and detail white)
  • Ink spritzers (pink and green) and sparkle brush pens (deep pink and clear)
  • Stickles glitter glue (Diamond) and PVA pearls (pink)
  • Large decorative square die (Tonic)
How it was done:
  1. The background was created using ink spritzers. The image was stamped with Versamark, embossed with sparkly powder and coloured with sparkle pens. The embossing pen was used to draw in extra hills extending the scene and anchoring the tree.
  2. The image was stamped again onto the vellum, embossed with white powder. The butterflies were cut out, shaped and glued onto the tree.
  3. The image was then framed with the decorative die cut and finished with glitter glue and PVA pearls.
Happy stamping, Anne xxx.

Tuesday, 15 May 2018

Quick and Easy Nature Tree cards created for Chocolate Baroque


Good morning. Here are a couple of quick and easy cards created with the Essence of Nature stamp set from Chocolate baroque.

The first is a small 7 X 13cm card. The background was created with pink and purple ink spritzers. A little sparkle was added with a clear sparkle pen. The tree and sentiment were stamped with Versamark and embossed with sparkle silver embossing powder. A little silver sparkle was also added around the edges.
The second card measures 11.5 X 15cm. The images were stamped with Versamark and embossed with white powder. The background was created by painting green and orange water based inks onto wet card. A watercolour pen was used to draw in some grasses. The edges were roughened with the edge of my scissors.

Wednesday, 9 May 2018

Essence of Nature created with Chocolate Baroque Stamps


Good morning. I have three makes to share with you today using Essence of Nature and The Rose Tree stamp sets from Chocolate Baroque.

I used one of my inky background papers from my stash. This was created by wetting a large sheet of cartridge paper and then painting over the surface with dissolved Brusho powders to make a blended watery background. Dishwasher salt crystals were then dropped onto the surface and the paper left to fully dry before brushing away the salt to reveal the lovely texture effect.
My first is using the lovely tree panel from the Essence of Nature stamp set (and bee from the The Rose Tree set).
The background panel was trimmed to fit the card front (21 X 14.5cm) and images stamped with Versamark Ink and heat embossed with detail white embossing powder. Faux stitching was drawn around the edge with an opaque white pen.
A white card backing panel was trimmed to approx. 9.5 X 15cm. The tree scene and sentiment were stamped onto recycled acetate packaging using black StazOn Ink. Double sided sticky sheet was then applied to the back of the acetate and the image ‘coloured’ using a variety of extra fine and chunky glitters in blue, green and crystal.

I have used the tree panel again on this one but this time to create a textured paper clay embellishment. The clay was rolled out and pressed with the stamp. After drying it was coloured by spritzing water based ink sprays with mica. Pebeo Gilding waxes were then rubbed across the textured surface.
The background was stamped and heat embossed with sparkly gold embossing powder, trimmed and mounted onto a 15cm card blank.

On my third project I went a bit off the wall – tee hee. Again I made some textured paper clay embellishments and thought that they resembled coral – hence a sea themed card was born.
I combined tree and leaf stamps together to make a jelly fish. The images were heat embossed with white powder and extra detail drawn on using pens, plus an embossing pen and white powder. A little white charcoal was used to add some shading to the jellyfish.
I further embellished with lots of sea themed die cuts and added some texture to the foreground with a mix of embossing powders and frontage fragments. Finished with lots of sparkly glitter glue – had to be done.
I hope that you enjoy my makes today. Happy stamping, Anne x.

Sunday, 29 April 2018

Make Time to Make Art cards created for Chocolate Baroque

Good morning. Today I am sharing a few cards created with Wisteria Lane and Artistic Affirmations stamp sets from Chocolate Baroque.

Full of Colour Card
Materials:
  • Wisteria Lane and Artistic Affirmations stamp sets
  • 9 X 21cm card blank, white stamping card, black card
  • Ink sprays (pink, purple, black – Lindy’s Stamp Gang)
  • Embossing Powders (pink, yellow, white – Lindy’s Stamp Gang)
  • Versamark Inkpad
  • Border die (waste piece from a Sizzix strip die cut)
  • Alcohol marker (black)
  • Faux gems and sequins, PVA pearls (pink)
  • Straw to blow inks
How it was done:
  1. Inks were spritzed onto a craft mat and picked up onto the stamping card. The wet ink was spread by blowing through a straw.
  2. Images were stamped with Versamark and embossed with a mix of coloured powders. The sentiment was stamped onto a coloured strip. Black marker was used to edge the card and frame.
  3. The black die cut strip was glued to the top of the card. The sentiment strip attached with 3D foam for added dimension.
  4. Finished with faux gems and sequins plus a few PVA pearls along the die cut border.
 
Make Time Shabby Chic Card

This card uses the same stamp sets but looks totally different.

Materials:
  • Wisteria Lane and Artistic Affirmations stamp sets
  • 10.5 X 15cm card blank (turquoise), white stamping card
  • Versamark Inkpad and archival dye ink (purple)
  • Embossing powder (silver and gold sparkle)
  • Ink spritzers (purple, turquoise, gold and opaque white)
  • Fine tipped marker (black)
  • Faux gems and organza ribbon
How it was done:
  1. The card blank was lightly spritzed with opaque white ink. The stamping card was coloured with purple, turquoise and gold ink spritzers. The sentiment was stamped with Versamark and embossed with silver powder.
  2. The background images were stamped with purple dye ink. Further images were stamped on top with Versamark, heat embossed with gold powder and outlined with fine tipped pen.
  3. The edges of the topper were roughed up with the edge of my scissors. A little turquoise ink was also sponged around the edges.
  4. Finished with a ribbon and faux gems.
Make Time to Make Art

My third sample was different again using a bright sunshine yellow backdrop.
Materials:
  • Wisteria Lane and Artistic Affirmations stamp sets
  • 6 X 6 inch square card blank, white stamping card, yellow card
  • Versamark Inkpad
  • Embossing Powders (pink, yellow, purple – Lindy’s Stamp Gang)
  • Mylar stencil with polka dots
  • Alcohol marker (purple) and fine tipped pen
  • Glitter glue (yellow)
How it was done:
  1. I had some cheap glitter glues that were past their best. To use them up I embossed some of my stencils (through my die cut machine) then applied the glitter through the stencil using a palette knife. I used up my glitter glues and created a batch of textured backgrounds ready for my cards.
  2. The sentiment was stamped onto the textured card using dye ink (embossing with stencils only gives a shallow texture so it is fairly easy to overstamp – add just a little extra pressure on the stamp). Note the ‘I’ was left uninked.
  3. The mat was edged with marker and faux stitching drawn around the border of the card blank with fine tipped pen.
  4. The floral stems were stamped onto white card with Versamark, embossed with a mix of coloured powders and cut out.
  5. Cut outs were glued to the card front and finished with a ribbon.

Sunday, 15 April 2018

Quick and Easy cards created for Chocolate Baroque


Good morning. Today I am sharing some quick and easy makes using Wisteria Lane, Tranquility and Artistic Affirmations stamps from Chocolate Baroque.
My first card is a small 7 X 13cm card. The background was from my inky stash of papers created by spritzing inks onto cartridge paper and dropping on dishwasher salt crystals. These were then brushed off when dry. I tend to create batches of these papers so that I always have something in my stash for a quick make. Alternatively a printed background paper could be used.
The images from Wisteria Lane and Artistic Affirmations were stamped with Versamark and heat embossed with detail white powder. Versamark was rubbed down the edges of the paper and sparkly silver embossing powder applied before sticking to the card front.

My next quick make is a 15cm square card. An 11cm square of white stamping card was quickly painted with watercolour inks (orange and yellow). Images from Tranquility and Artistic Affirmations were stamped with Versamark and heat embossed with gold powder. Sparkly gold powder was used around the edges. Water was applied to the blossoms and onto the background to create sky texture and the moon, blotting off dissolved ink with tissue. The flowers were then over coloured with alcohol ink pens and sparkle pen brushed over for shimmer. A 12cm square black card mat was cut for framing and mounting onto the card front.


My last quick and easy makes are a 15cm square card and small gift bag to co-ordinate. I cut my mini gift bag from smooth white card using my Silhouette electronic cutter. You could use a die cut or ready made plain bag, or a make simple gift tag to match. Images from Tranquility and Artistic Affirmations were stamped with Majestic Blue Versafine Ink and quickly coloured with water based blue sparkle pens, blending colour using a clear sparkle pen. The topper was edged with blue alcohol ink marker to frame. Small sticky pearls and a bow were added to finish.