Thursday 29 November 2018

Mixed Media Floral Candle Bowl


Hi All. Today I am sharing a couple of upcycling projects. I have revamped an old chipped crackle glass bowl into a gorgeous faux candle holder and my old egg timer, over 20 years old and really looking very shabby. I love to revamp and upcycle items that otherwise may have been fit only for the bin.
Here is my finished bowl – I just love it now. I didn’t want to completely cover the pretty crackle glass and I thought a faux electric candle would be a perfect shimmering through.

I gathered together some recycled old cotton bedding, tore it into strips and treated with Black Powertex to make the textured side panels. 3D Sand and Balls were applied into the wet Powertex for more texture.

A recycled T shirt was cut into strips and stretched to create cords (it forms a cord when pulled). These were then Powertex treated and coiled around the rim to add strength and to cover up the chipped edge. Any drips on the glass panels were removed with a damp cloth to keep them clear.

I had several large flowers and leaves in my stash that had been created with air dry clay and silicone moulds. These were coated with Black Powertex and applied around the rim of the bowl. I used some Easy Structure paste tinted with Powertex as a 3D glue to apply them onto the uneven shaped surface.
Then came the colouring fun. I used Silver Colortricx and several of the new colours from the Secret Art Loft (Interference Blue, Interference Lilac and Mojito Lime). I mixed them with Easy Varnish and applied by dry brushing to pick up and emphasise the textures. I just love these new colours and they work fabulously on dark backgrounds.

This is my poor old egg timer. Definitely seen better days and it was coming to pieces a little too.

I took it completely apart for revamping so that I could get everything well stuck down and access all the parts for painting.

I painted all the components with a couple of layers of Black Powertex, along with a couple of air dry clay flowers. I chose a flower shape with a fairly flat top so that they could be placed on each end and not fall over.

Ta da. I love my new egg timer. Should be good for another 20 years now. I added a little dry brushing with Colortricx Silver and Interference Violet Pigments to add shimmer and bring out the texture.
Bye for now. Hope to have more to share soon, Anne x.

Thursday 22 November 2018

Unicorn Blessings


Hi all, today I am sharing one of my projects created during the Powertex Garden Party in July. It was an amazing weekend and I went along with my ex’s lovely daughter Marie. Living far apart we rarely get the chance to be together – so it was extra special to have a whole weekend creating together.
Others also came along with friends or family but many came along on their own. Some were familiar with Powertex and some, like Marie, were completely new to the medium. Whether experienced or not, travelling with friends or alone, the Team at Powertex were wonderfully inviting and everyone soon felt relaxed and eager to get started. Tracey gave us all fabulous instructions to help us along the way. It was a wonderfully relaxed weekend and we made many new friends.

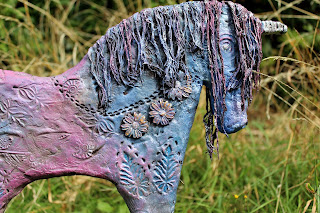
One of the projects was to create a Unicorn (or pony if preferred). We were taken through the process and instructed on the appropriate media to create a fully weatherproof piece that could be used as a garden ornament.
We were all give a Metal Base with attached MDF Unicorn Template which had already been wrapped with masking tape ready for working.
The first step was to paint the whole with a base layer of Bronze Powertex. Then layers of Powertex clay (created with Powertex and Stone Art) were built onto the surface and texturised using wooden print blocks and various tools. The Team had kindly mixed up the clay ready for us to use.
We then had a choice of floral silicone moulds to use to make pretty clay embellishments. I chose the lovely Daisy Moulds.
Next we treated Powercotton fibres with Powertex to create the mane and tail. Pigment colours were used to add colour. I chose to blend a mix of Ultramarine and Titanium White, plus Burgundy and Titanium White Powercolors, mixed with Easy Varnish and a little water to create a blended colour wash.
Next we dry brushed more colour over the surface to pick up and emphasise the texture. I used Colortricx in Silver.
When I got home I added a bit more colouring by dry brushing with Rich Gold Colortricx and Interference Violet (Secret Art Loft Pigment). 
If you know me you will know that I cannot resist a bit of bling. I just had to try adding glitter to the varnish and painted this onto the tail and mane. I used a holographic silvery glitter designed to be added to household paint. In theory it should be weatherproof when embedded in the Easy Varnish (will see how it holds up after she is installed in the garden). Oooooh I love her.
Note: There is a Unicorn Dreams Project Pack available which contains everything needed to create your own magical Unicorn - includes metal base, MDF Unicorn, Powertex, Art Stone, Flower Mould, Pigments, Varnish and instructions.
I also decided to add a little more texture to the base. I added a rough layer of clay and pressed in a crackle textured rubber stamp. I also added 3D Sand and Balls. Finally I treated a few stiff hessian threads with Powertex and pushed them into the clay to create grassy fronds. Various colours were dry brushed over the surface to blend in the base colours with the rest of the project.
Here is Marie’s amazing Unicorn. Truly fantastic.
We all had so much fun and between us created an amazing array of very different takes on this theme. All wonderful.
Sending Unicorn Blessings, Anne x.