Showing posts with label Heartfelt Creations. Show all posts

Saturday, 9 December 2017

Key to My Dreams card created for Chocolate Baroque

Good morning. This is another of my samples created for Chocolate Baroque using the Key to my Dreams stamp set.


Materials:
How it was made:
  1. A thin layer of copper paste was spread onto lock and key stamps and left to fully dry before gently peeling away. This can take up to 2 days so you need to plan ahead. StazOn Ink was then applied to the stamps and the moulded pieces pressed back on to transfer the ink into the crevices. The surface was then lightly rubbed over with gold gilding wax to add more depth of colour.
  2. The card blank was textured with the embossing folder and rubbed over with Distress Ink. Faux stitching was added to the main panel using the fine tipped pen.
  3. Background topper panels were created with linen textured card. The keys were stamped with silver ink and the background was lightly spritzed with mica inks. The paper doilies were also coloured with ink sprays and Distress Ink, trimmed and glued to the backgrounds. The edges of the panels were roughened up using the edge of my scissors, encouraging small tears. The edges were inked with Distress ink and edges and tears lightly shaped and curled.
  4. The heart panel and keys were cut from copper card, and the suitcase from Kraft card. The sentiment was stamped onto the suitcase with Versamark and heat embossed with gold powder. Small snips of the coloured doily were glued down and the edges inked with Distress Ink. The handles were coated with Versamark and heat embossed with gold powder. After decorating the suitcase was folded and glued to make the 3D embellishment.
  5. Mats, die cuts and embellishments were glued to the card using foam pads and 3D glue where needed. Finally a little Stickles glitter glue was added for a bit of sparkle.

Sunday, 18 September 2016

Sea Dragon card TV show sample created for Chocolate Baroque

Sea Dragon card - TV show sample created for Chocolate Baroque on The Craft Channel this week.
Materials:
  • Seadragon (sea dragon, mermaid, sentiment), Underwater Kingdom (mermaid), Underwater (starfish), Seashell Collage (Wheel and Anchor) stamp sets
  • 6 X 6 inch scalloped card blank, white stamping card
  • Versafine Inkpad (Onyx Black), archival dye ink (blue)
  • Brusho’s (Turquoise, Ultramarine)
  • Metallic paint (silver gold) *
  • Pebeo Drawing Gum
  • Watercolour pencils (yellow, golds, oranges) and brush
  • Alcohol ink marker (black)
  • Decorative Lattice Swirl Die (Heartfelt Creations). If you don’t have these dies, swirly or seaweed like foliage dies would produce a similar result.
* I used Starlight paint (Imagination Crafts) but the Aztec Paints featured in the shows this weekend would be perfect.
How to make it:
  1. Stamp the Sea Dragon with Versafine and mask with the Drawing Gum. Trim to approx. 10 X 14cm and edge with black pen.
  2. Drop Brusho crystals onto the card and spritz with water.
  3. Colour extra card with Brusho’s for die cuts. Cut out the swirly trellis with dies.
  4. Stamp the anchor, starfish and wheel with Versafine onto spare card and cut out. Stamp the sentiment with blue ink, cut out and edge with black marker.
  5. Stamp the silhouette mermaids with blue ink. Remove the masking from the dragon, colour the dragon and starfish with watercolour pencils. Add some shimmer paint to the dragon.
  6. Layer elements and glue to card front.

Saturday, 25 June 2016

Take Time To Love mixed media canvas created for Chocolate Baroque


This was another of my recent TV show sample created for Chocolate Baroque on The Craft Channel using the Gothic Fragments stamp set. Sorry that it has taken so long to blog the details – never enough hours in a day – tee hee. I had a lot of fun making this one. Anne x.
Materials:
  • Words of Wisdom, Gothic Fragments and Mini Scripts stamp sets
  • Dark green mount board, smaller piece of cream mount board, white stamping card, black card
  • Inkpads: Versamark, Versafine (Black Onyx), Memories dye based (Blue)
  • Fine detail embossing powders (silver, black)
  • Spectrum Noir alcohol ink pen (black)
  • Polychromos pencils (green, white)
  • Mr Huey’s Color Mist Spritzers (Leaf Green and Sunshine)
  • Viva Décor Kristall Gel (dark cerise – 501) and acrylic paint (lime)
  • Pebeo Gilding Wax (Silver)
  • Inscribe glitter glue (Mermaid)
  • Heart sequin waste (to use as stencil) and Texturised stencil (Crafters Workshop – Ronda Palazzari)
  • Dies: Pin Dot Hearts (Tattered Lace), Ornate Gateway (Heartfelt Creations), optional Small Easel (Tim Holtz BigZ die)
  • 3D glue gel and foam pads
How to make it:
  1. Trim the mount board to approx. 22 X 14cm. Using a craft knife score a border around the edge and peel away the top layer of card from the edge.
  2. Stamp the ‘be the change ……’ sentiment around the edges with Versamark and heat emboss with silver powder.
  3. Stamp the verse onto white card with black ink and cut out sections to create the word embellishments. Edge with black pen.
  4. Stamp the arches onto the background panel with Versamark and heat emboss with black powder. Colour with green and white pencils. Apply glitter glue around the edges. Then lightly apply gilding wax around the edges to give a metallic distressed look.
  5. Spritz some cream board with the green and yellow sprays. Use the Mini Scripts stamp to add texture into the wet paints. Once dry stamp again with blue ink. Cut into three strips and edge with black pen.
  6. Die cut hearts from black card. Using a spatula apply paste or acrylic paint through the stencils to create added texture on the background, plus the hearts and smaller panels. Once dry apply more gilding wax.
  7. Die cut decorative ‘toppers’ from black card. Apply gilding wax to pick up texture, and glue to the back of the upper edge border.
  8. Mount the smaller panels with foam pads (to give even depth) and other embellishments with 3D glue gel.
I die cut an easel from scrap mount board to add to the back as a stand. Alternatively it could be made into a hanging.

Thursday, 24 March 2016

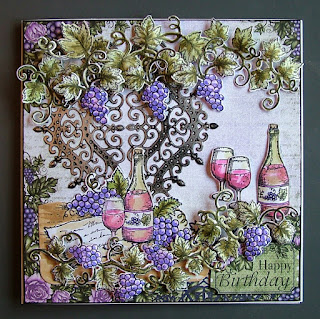
I have been playing with the Italiana Riviera Collection from Heartfelt Creations


I have been playing with the Italiana Riviera Collection from Heartfelt Creations. I love this set of stamps, dies and co-ordinating papers.


Materials from Heartfelt Creations:

  • Italiana Riviera 12 X 12 Paper Pad (for background papers and images)
  • Cut, Mat, Create 12 X 12 Paper Pad (for the wedding card sentiment)
  • Decorative Window Scene Die (HCD708)
  • Ornate Gateway Die Set (HCD737)
  • Italiana Grape Clusters Die and Stamp Sets (HCD1773 and HCPC3697)
  • Italiana Grapevines Die and Stamp Sets (HCD1772 and HCPC3696)


Other Materials:

  • Plain card blanks – A6 in purple and 6 X 6 in white
  • White stamping card (Sheena Douglass)
  • Waste black card (recycled packaging)
  • Happy Birthday sentiment stamp
  • Spectrum Aqua watercolour pens (Crafters Companion): Browns (Fawn, Dessert), Purples (Heather, Orchid, Purple), Reds (Crimson, Burgundy)
  • Inkpads: Versafine (Black Onyx), Distress Ink (Gathered Twigs), and purple dye based
  • Pebeo Gilding Wax (Silver)
  • PVA and 3D glue gel


How it was all put together:

Backing papers were trimmed from the decorative paper pad.  Images were stamped with waterproof ink, cut out and then coloured with watercolour pens. They were then shaped with a ball tool and soft mat to give them dimension. The gate and window decorative elements were cut and embossed from black card. Gilding wax was applied sparingly to give a metallic effect.

I have taken a quick pic on my phone to show you the elements that I used on each card.
Variation 1 - small A6 card:

Variation 2 - 6X6 Birthday card:


Variation 3 - 6X6 Birthday card:


Variations 4 and 5 - 6X6 Birthday and Wedding cards: