Showing posts with label Words of Inspiration. Show all posts

Sunday, 7 January 2018

Floral Rocker card created for Chocolate Baroque

Good morning. This rocker card was one of my samples using the Tangled Garden stamps from Chocolate Baroque. The stamps went perfectly with one of my embossing folders from Sheena Douglass. Something bright and cheery on a gloomy day x.


Materials:
  • Tangled Garden and Words of Inspiration stamp sets
  • Hammered card and stamping card (white)
  • Inkpads: Marvey Matchables Dye based (Violet), Versamark
  • WOW Embossing Powder (Fuchsia)
  • Brusho Powder (Purple)
  • Spectrum Noir Sparkle Pens (peacock, orange, pink and Clear Overlay)
  • Gel (orange) and glitter pens (blue)
  • Spectrum Noir alcohol pen (purple)
  • Fine tipped pen (purple)
  • Glitter glue (aqua) and PVA pearls (orange)
  • Glycerine
  • Glass seed beads (silver lined green)
  • Circle Rocker die (Tattered Lace), sentiment panel die (Sizzix)
How it was made:
  1. The circle rocker card blank was cut using the die and embossed with the floral embossing folder. The sentiment was stamped with purple ink and cut out. Peacock Sparkle Pen colour was blended over the surface using a sponge. I used the technique recently demonstrated by Sheen Douglass: Add a drop of glycerine to the craft mat and work into sponge. Then pick up some pen colour, after scribbled onto the mat. The glycerine makes it blend onto the card like a Distress Ink.
  2. The card and sentiment panel were edged with alcohol marker and the fine tipped pen used to draw faux stitching.
  3. The flowers and leaves were stamped with Versamark and embossed with pink powder, cut out and coloured with sparkle, glitter and gel pens. While wet a little Brusho powder was dropped onto the petals for extra colour and texture.
  4. The flowers and leaves were shaped and glued to the card with 3D glue gel.
  5. Glass beads were glued to the flower centres. Finished with PVA pearls and glitter glue.

Tuesday, 18 April 2017

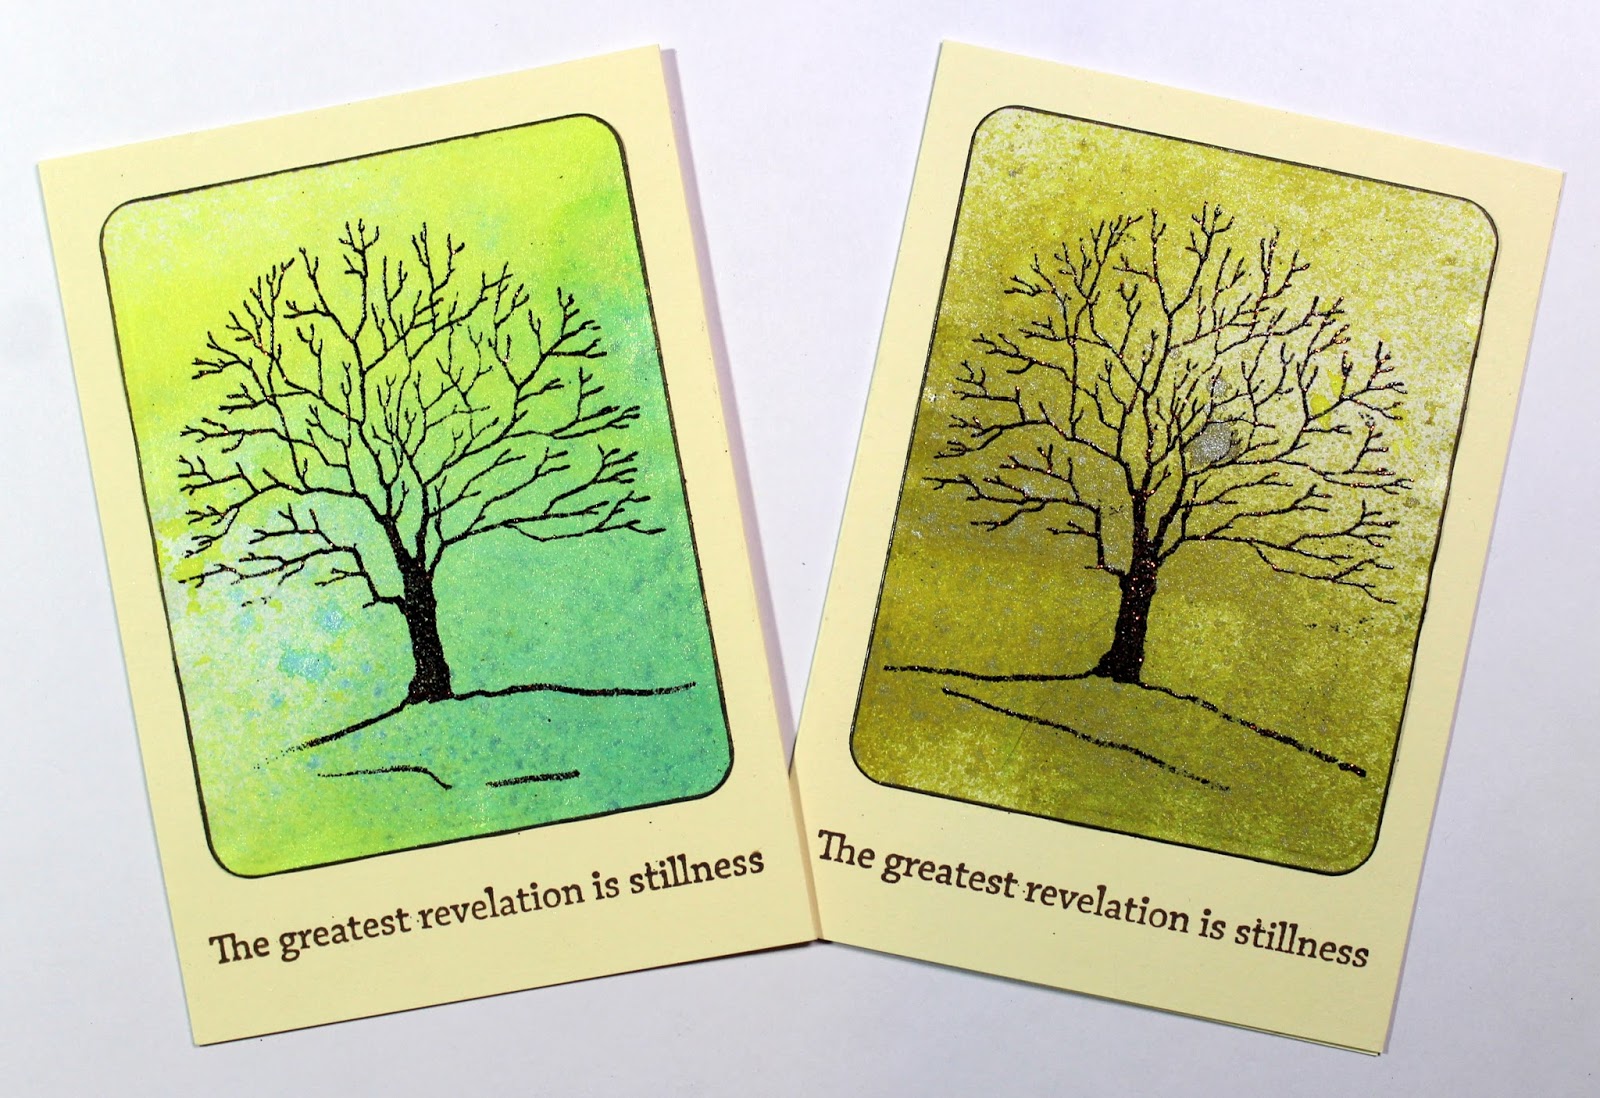
Quick and Easy Tree cards created for Chocolate Baroque


Good morning. Here are another couple of quick and easy cards using the Orchard Design a Tree stamp set from Chocolate Baroque. These are great for batch making. The sentiment space could be left blank and stamped as needed for those emergency last minute cards that we often need. Make them in lots of different colours or try stamping on ready patterned paper.

I used ink spritzers with mica to create the backgrounds (these were left over offcuts from another project), trimmed and used a corner rounder punch to finish. Edged quickly with marker pen to frame.

I stamped the trees with Versamark and used a sparkly embossing powder (difficult to see in the photos). I used a Versamark embossing pen to anchor the trees and extend the scene with just a couple of quick drawn lines.
The sentiment was stamped with Versafine.

Materials:

Tuesday, 15 November 2016

Quick and Easy Still Reeds card created for Chocolate Baroque

Good morning. Today I am sharing another quick and easy card. I used the reeds border from the Owl Edges stamp set and sentiment from Words of Inspiration. I used ink sprays to colour the background and sparkling heat embossing powder for the reeds.

Materials:
  • Owl Edges and Words of Inspiration stamp sets
  • A6 yellow card blank (approx. 10 X 15cm)
  • Heavy cartridge paper (approx 9.5 X 14.5cm)
  • Ink sprays (red and yellow with gold mica)
  • Versamark Inkpad
  • Dye based archival inkpad (dark brown)
  • WOW embossing powder (Halloween)
  • Alcohol marker (dark brown)
How to make it:
  1. Spritz the background and dry fully. Tip: I tend to prepare large sheets of background papers in advance and then cut them down as I need. Great to use if you need something done in a hurry, or for batch making sets.
  2. Stamp the reeds with Versamark and heat emboss with the glitter powder. Tip: to prevent the powder sticking where you don’t want it (especially if your card is still a little damp), dust the surface with a little talc.
  3. Stamp the sentiment with dark brown ink.
  4. Edge with alcohol marker to frame and glue to the card blank.

Wednesday, 2 November 2016

Still Reeds card created for Chocolate Baroque Colour Challenge 28

Good morning. Today I am sharing one of my projects for the Chocolate Baroque Colour Challenge. I used the reeds border from the Owl Edges stamp set and sentiment from Words of Inspiration (Chocolate Baroque). I used ink sprays to colour the background and some die cuts to finish.

Materials:
·         Owl Edges and Words of Inspiration stamp sets
·         A6 white card blank (approx. 10 X 15cm)
·         Die cut white stamping card (approx 9.5 X 12cm)
·         Ink sprays (green, yellow, blue)
·         Dye based inkpad (dark blue)
·         Alcohol marker and fine tipped pen (dark blue)
·         Glitter glue (light and dark blue)
·         Die cuts to finish (Spellbinders)

How to make it:
1.    Spray green and yellow ink onto a craft mat and pick up colour onto lower half of stamping panel. Paint blue ink across the top and dry.
2.    Stamp the sentiment and reeds, use second generation stamping to create the fainter background reeds. Edge with blue marker and glue to card front.
3.    Glue on the die cuts. Finish by drawing a faux stitched border and adding glitter glue.
4.    If you don’t have dies just trim down the card base to fit the stamped mat and it will still look good.

Tuesday, 27 September 2016

Mini Indian Canvas created for Chocolate Baroque

Good morning. Today I am sharing a mini canvas for this month’s texture theme.


Materials:
  • Gothics Fragments, Texture Fragments, Indian Elephant, Words of Inspiration stamp sets
  • Mandala Stencil (Martha Stewart) and fossil stencil (Andy Skinner)
  • Mini stretched canvas (21 X 14.5cm), watercolour card (20 X 14cm), scrap stamping card
  • Mod Podge (Matte)
  • WOW embossing powder (Gold detail)
  • Ink sprays with mica – archival type, waterproof when dry (teal, pale pink)
  • Inkpads: archival dye (teal), Versamark
  • Sakura Starlite pens – archival glitter (green, blue, pink, purple)
  • Coloured pencils (greys)
  • Viva Décor Glitter Paste (603 teal)
  • Microbeads (pink multi)
  • Alcohol marker (teal) and fine tipped marker (cerise)
  • Acrylic paint (cerise pearl)
  • Decorative corner punch
  • 3D glue gel
How it was done:
  1. Spritzed the watercolour card with water, teal and pale pink inks. Laid down the fossil stencil while wet and left to dry overnight. The ink gets pulled under the stencil by capillary action giving a negative image.
  2. Randomly stamped the background with the texture stamp and teal archival ink.
  3. Stamped the gothic arch and sentiment with Versamark and heat embossed with the gold powder. Coloured with the glitter pens and fine tipped pink marker.
  4. Applied glitter paste with a palette knife through the mandala stencil. Whilst wet dropped on some microbeads – pressed lightly into surface. Dried overnight.
  5. Stamped elephant with Versamark onto scrap stamping card and heat embossed with gold powder. Coloured with glitter pens and grey pencils, Cut out and shaped slightly. Glued to card with 3D glue gel.
  6. Punched corners and outlined with teal marker.
  7. Coloured outer edges of canvas with acrylic paint.
  8. Glued the card to the canvas with Mod Podge. Also applied over the top to seal the image. Note: I thought that my pink fine liner was archival but it was water soluble! Hence it bled and smeared across the canvas when I applied the Mod Podge – eeeek! However it did add to the texture effect – tee hee.

Thursday, 1 September 2016

Christmas Canvas created for Chocolate Baroque Colour Challenge 26

I couldn’t resist making something for Christmas using this month’s colours – for the golden orange I substituted metallic gold. Check out the Chocolate Baroque Challenge Blog for more lovely projects from my Teamies.

Looking forward to seeing your entries this month x. Materials: How it was done:
  1. Embossed black card with folder and rubbed over with gilding wax. Trimmed to make background panel.
  2. Brushed the canvas with black acrylic leaving some background canvas texture showing through, and dried. Sponged Distress Ink into the spaces.
  3. Applied crackle paste in corners and around the edges and left to dry overnight. Brushed over the top with green acrylic (the paste was not quite the right green). I dropped on some chunky gold glitter into the wet paint.
  4. Glued down the embossed background panel. Stamped the sentiment with gold acrylic and outlined with green glitter pen. Applied Glossy Accents.
  5. Stamped the bauble diamond 9 times onto white card with Versamark and heat embossed with the black sparkle powder. Coloured the card with Distress Ink. Coloured the baubles with glitter pens. Cut out and glued to canvas with 3D glue gel. Added Glossy Accents to enhance the baubles.
  6. Applied Kristall Gel to the canvas through the stencil. Also applied to scrap acetate, dried overnight and cut out.
  7. Stamped the lantern and reindeer onto white card. Coloured with Distress Ink and glitter pens. Cut out and glued to canvas. Added Glossy Accents.
  8. Stamped the gem decorations onto acetate with StazOn. Coloured the back with glitter glues. Left to fry overnight. Painted the back with black gesso, cut out and glued to canvas. Added gold hanging chains and gold glitter glue to finials.
  9. Glued down the berries and twigs. They were already decorated with fake snow. Added a bit more sparkle with gold glitter glue.
  10. Finally glued down the acetate snowflakes. Added PVA pearls and dropped on gold glitter.

Sunday, 31 July 2016

Quick and easy sea themed cards created for Chocolate Baroque


Good morning. Today I am sharing 3 quick makes using Seashell Collage stamps from Chocolate Baroque.
I must got down to the sea
A smooth sea never made a skilled mariner
These first two were stamped onto the same background paper created by randomly spritzing an A4 sheet with blue, red and gold mica sprays.
Seagulls in Italy My third project was stamped onto a patterned paper from Crafty Individuals.
Materials:
  • Seashell Collage and Words of Inspiration stamp sets
  • A4 sheet of thick cartridge or watercolour card, 11 X 14cm cream card blank, 15cm square card blank in cream and white, cream stamping card, Crafty Individuals 6X6 inch backing paper (Travels in Italy)
  • Inkpads: Archival (Coffee), Versamark, Versafine (Onyx Black), Distress Ink (Antique Linen)
  • Mr Huey’s Ink spritzers (blue/grey, red, gold with mica)
  • Alcohol marker (black), fine tipped marker (brown, black)
  • Polychromos pencils (brown, grey, white, black, red, orange)
  • WOW embossing powder (Blueberry)
  • Glossy Accents
  • PVA pearls (gold)
  • Die to fit sentiment panel (Heartfelt Creations Cut, Mat, Create set) or hand cut and use a corner rounder punch.
Step By Step - ‘I must go down to the sea’
  1. Trim the randomly spritzed sheet to fit the card front (11 X 14cm) leaving a small border.
  2. Stamp the gulls with Archival Coffee ink. Edge the topper and card with black pen and glue down.
  3. Stamp the sentiment onto cream card with Coffee ink. Edge with Distress ink and brush over with some of the spritzer ink. Cut out and edge with black ink. Draw faux stitching with fine pen. Stick down with 3D foam.
  4. Finish by adding Glossy Accents to the stamped image (this enhances it and makes it stand out from the background).
Step By Step – ‘A smooth sea never made a skilled mariner’
  1. Trim the randomly spritzed sheet to fit the card front (15cm square) leaving a small border.
  2. Stamp the boat, anchor and small sentiment with Archival Coffee ink. Stamp the inspirational sentiment with Versamark and heat emboss with the powder. Draw in sun rays, and extend the scene, and add faux stitching with fine tipped pen. Edge the topper and card with black pen and glue down.
  3. Finish by adding Glossy Accents to the stamped images, and PVA pearls.
Step By Step – ‘Seagulls in Italy’
  1. Trim the printed sheet slightly to fit the card front (15cm square) leaving a small border. Edge with black marker.
  2. Use Versafine ink and partial stamping to create the scene across the card by leaving ink off parts of the stamp e.g. omitting the seagulls from some of the posts. No complicated masks needed for this but clean the stamp well between stamping to avoid residual ghost images where you don’t want them. Use the fine tipped pen to hand draw missing sections from the top of the posts.
  3. Quickly colour the posts and gulls with pencils. No need for fancy colouring as the stamps already provide shading details.
  4. Stamp the sentiment and glue to the card front.
I hope that you like them.  Anne x.


Wednesday, 6 July 2016

Wild Meadow Dream Card created for Chocolate Baroque Colour Challenge 24

Here is a quick and easy project that I created for the Chocolate Baroque Colour Challenge 24. Loving the vibrant colour scheme this month. Materials: How to make it:
  1. Lightly spritz the card with water and paint with inks, blending yellow into orange and violet. Dry.
  2. Sponge water onto the texture stamp and randomly stamp over the background. Repeat stamping will pick up and transfer some of the underlying ink. Blot with tissue. Dry.
  3. Stamp the thistle with violet ink. Repeat stamp to give paler background impressions (second generation ink stamping).
  4. Partially ink the sentiment stamp to create the sentiment and ‘background’ text.
  5. Outline the panel and card blank with the alcohol marker to frame. Glue down the panel

Wednesday, 15 June 2016


I so enjoy the monthly colour Challenges. Looking forward to seeing all the inspiration from my Teamies and of course all of your FAB creations too.
This was also one of my samples for the recent TV shows with Lesley Wharton demonstrating Brusho inks on The Craft Channel.

Anne x.


Materials:

  • Purple A6 card blank and white stamping card
  • Alcohol marker (black) and glitter gel pen (purple)
  • Water based inks (yellow, orange, purple) - Spectrum Noir Aquatints
  • Versamark and dye based inkpad (purple)
  • WOW embossing powder (Detail White)
  • Dishwasher salt


Step By Step:

  1. Trim the stamping card to fit the card front leaving a small border.
  2. Paint the background with the inks. Add a few splatters, drop on some dishwasher salt and leave to dry. This creates an interesting texture. I have used ready mixed vibrant inks but you could use Brusho’s.
  3. Stamp the gears with Versamark and heat emboss with white powder. Colour with the purple glitter pen.
  4. Stamp the sentiment with purple ink. Edge the card with black marker and glue to the card base.

Wednesday, 8 June 2016

Card created for the Chocolate Baroque Colour Challenge 23


I am loving the Colour Challenge this month – just my colours. I have used Brushos for the background and the Gothic Fragments stamp set. I have stamped and cut out the elements, so there is no tricky masking involved. I hope that you like it.

I also sent this one in as one of the TV samples for the recent TV shows on the Craft Channel. Lesley is a fabulous demonstrator – so do look out for the shows and catch up online.
Materials:

Step By Step:
  1. Colour the watercolour card with Brushos. Drop crystals into the wet ink and spray with water to get a mottled effect. Spray randomly with mica spray to add more texture and sparkle. Leave to dry.
  2. Stamp the die cut banner background texture with pale turquoise ink and emboss with the clear powder. Stamp the sentiment in dark turquoise.
  3. Stamp the main images onto smooth card with Versafine. Colour with watercolour pens and cut out.
  4. Trim the watercolour card slightly smaller than the card blank and glue down. Glue on the stamped fragments and sentiment banner.
  5. Edge the card with black marker and add faux stitching around the border with white pen.
  6. Finish with a little glitter glue, PVA pearls, die cuts and organza bow.

Wednesday, 1 June 2016

Still Moon created for Chocolate Baroque Colour Challenge 23 and recent TV show


I am loving the Colour Challenge this month – just my colours. I created this one as one of my TV samples for the recent Brusho’s show on the Craft Channel with the Design-A-Tree sets. Wasn’t Lesley brilliant!


Materials:


Step By Step:

  1. Trim the stamping card to approx.14cm square (slightly smaller than the card blank).
  2. Stamp the trees in Vintage Sepia and the sentiment and birds in Onyx Black ink.
  3. Draw a circle in the sky and apply masking fluid.
  4. Prepare Brushos for painting by adding crystals to a little water in a palette. Paint the picture with the inks. Remove the masking fluid and drag some of the colour across the moon.
  5. Spray the moon and central area of the painting sparingly with a little mica spray.
  6. Add a little shading to the trees with the fine tipped marker, extending at the roots to anchor the trees.
  7. Edge the card with black marker and blend Distress Ink in from the edges.
  8. Mount onto the mirror card and glue to the card blank. Finish with a little glitter glue for moonlight sparkle on the branches.

Monday, 30 May 2016

A quick and easy card created for Chocolate Baroque


Here is another quick and easy stamping project for you – make it in under 15 minutes.

I used an Inkadinkadoo stamping gear circular stamping wheel to create this. This makes stamping in a circle really quick and easy. If you don’t have one of these simply draw a circle (approx. 11cm diameter) lightly with pencil (use a compass,  template or die to draw around) and divide it into 8 segments (make a little mark every 45 degrees – dig out that old school protractor) to help position your stamping.

I inked my background card blank, but ready coloured or pretty printed card would make it an even quicker to make.
I have not played with my stamping gear for a while now. I am off to rummage through my stamp collection and try out a few more designs.
Materials:
  • Owl Edges and Words of Inspiration stamp sets
  • 6X6 inch scalloped card blank
  • Inkpads: Distress Ink (Forest Moss), dye based (blue) and multicolour (Kaliedacolor – Country)
  • Optional: circular stamping gear (Inkadinkadoo)
  • Shaped dies: Scalloped circle approx. 12.5cm diameter (Tonic) and smaller sentiment panel dies approx 3 and 5cm across (Spellbinders)
  • Stickles glitter glue (Diamond)
 How to make it:
  1. Stamp the floral spray in multi-coloured ink using a stamping gear (see note above if you don’t have one of these). Cut out with scalloped circle die. Edge with blue ink.
  2. Cut out the sentiment mats and stamp the sentiment. Colour the card blank and sentiment mats with blue and green inks.
  3. Glue mats to card front with 3D foam for dimension. Finish with glitter glue for sparkle.


Sunday, 29 May 2016

Scene cards created using the Landscape Edges stamp sets from Chocolate Baroque


Here are two more of my scenes created for the recent TV shows on The Craft Channel where Lesley demonstrated Brusho’s. You can still see the show on catch up online if you missed it.
Materials:

How it was done:
The Backgrounds

  1. I first created the backgrounds using Brusho’s on A5 sheets of card. The first piece was painted onto smooth card, blending the red into yellow, then black at the base. I tipped the card whilst wet to get interesting streaks and bleeding of the colours together. I then sprayed it sparingly with a little gold mica.
  2. The second piece was created in a similar way but on watercolour card. I coated the card with clear mica spray before applying the Brusho’s.
  3. I trimmed the backgrounds to approx. 13cm square.
Inspiring Sky
  1. Images and sentiment were stamped with Versafine and heat embossed with clear powder to intensify.
  2. I used water to lift a little of the stain from the cloud to lighten it against the background. To get a more intense effect try dilute bleach.
Red Sky
  1. The clouds were stamped with Memento (London Fog).
  2. The remainder of the scene was stamped with Memento (Tuxedo Black) using second generation stamping along the tree line.
  3. A bit of shading was painted using wet brush the black watercolour pen ink.
Finishing
  1. The images and card blanks were edged with black marker to frame.
  2. Images were mounted onto black card to create a border and then glued onto the card blank.

Tuesday, 24 May 2016

Dream Tree Scene created for Chocolate Baroque


I created this one for Chocolate Baroque as a TV show sample for the recent Brusho’s show on the Craft Channel. Lesley was brilliant! You can still watch the show on catch up if you missed it.


Materials:


Step By Step:


Brusho Backgrounds. I used the one on the right for this project.


  1. Paint the watercolour card with Brusho blending blues and reds for the sky into yellows and greens at the base. Drop on crystals and spritz with water to provide foliage texture in the foreground. Dry.
  2. Lay down the sunburst stencil and spray though with mica to create the sparkling sun rays. Dry and trim to approx. 14cm square to fit the card front.
  3. Stamp the tree (Orchard), birds (Landscape Edges), and foreground pebble texture (Glade) with Versafine.
  4. Stamp the foreground leaves (Woodland) in Mowed Lawn Distress Ink and the tree foliage (Woodland) in Barn Door Distress Ink. Touch up the tree image, and draw a base to anchor the tree, using a fine tipped brown pen. Add touches of glitter glue to the tree foliage.
  5. Apply Versamark around the card edges and heat emboss with glitter powder to give a distressed effect.
  6. Stamp the sentiment with Versafine onto a small panel. Edge with Crushed Olive Distress Ink.
  7. Outline the topper and card front with black alcohol marker to frame. Attach ribbon to topper and glue to card front. Glue on flowers and sentiment panel with 3D glue gel.

Sunday, 22 May 2016

Copper Tree scene card created for the Chocolate Baroque TV show on The Craft Channel


I created this one for Chocolate Baroque as a TV show sample for the recent Brusho’s show on the Craft Channel. Lesley was brilliant! You can still watch the show on catch up if you missed it.


Materials:


Step By Step:

  1. Paint Brusho onto the watercolour card. Whilst still wet drop on some of the crystals and spritz with water to create the tree foliage and foreground. Dry.
  2. Stamp the tree with glue and apply the gilding flakes. Press down the flakes and leave for a few minutes before buffing off with a sponge (to remove the excess). Clean the stamp quickly to remove any glue residue.
  3. Use the fine tipped pen to add some shading to the tree and draw in a base to anchor the tree.
  4. Stamp the leaves with Sepia ink, and the sentiment with black ink.
  5. Edge the card with black marker. Attach the ribbon and bow and mount onto black card, and then glue to card front.

Wednesday, 11 May 2016

Scene card created with the new digital paper download from Chocolate Baroque


The new digital paper this month is a stunner. I decided to make a fold back scene card so that the full beauty of the paper can be seen as the card is pulled open.
Open Card

Closed Card


Materials:


How to make it:

  1. Score the front panel of the card blank vertically down the centre and fold back the panel. Trim the digital paper and glue to the inside back panel.
  2. Trim another print out panel and cut in half vertically to stick on the inside front and left hand fold back front panel. Check that the front panel pattern aligns with the inside back panel. Glue the inside panel but do not glue down the outer front left panel yet.
  3. Lay the green mat onto the front printed panel and mark the position of the bottom left hand section with a pencil. Trim a slot around the leaves with a craft knife so that the mat can be tucked into the paper (i.e. under and behind the leaves). Glue the printed panel to the card front taking care to omit glue from the cut slot area. Stamp the sentiment with Versafine.
  4. From the third sheet of digital paper cut out the vine leaves and shape slightly for decoupage. Shape the tiny blossoms. Add green glitter glue to the leaf veins and Star Dust to the flower centres.
  5. Stamp the stone wall onto the bottom of the topper panel with Versafine. Stamp the tree (Orchard set) with the multicolour stamp pad so that the trunk is dark brown, blending to lighter brown for the upper branches.
  6. Stamp the leaves in the light and darker green Distress Inks (Woodland set).
  7. Stamp the blossoms with pale pink acrylic paint (Spinney set). Dot with Star Dust glitter glue.
  8. Colour the wall and landscape using the Distress Inks and a damp watercolour brush. Ink the edges of the scene with Peeled Paint Distress Ink. Glue to the green mat.
  9. Glue the topper onto the card front tucking the bottom left corner into the cut slot of the patterned paper. Glue on the leaves and blossoms with 3D glue gel. Take care not to add glue to the topper overhang section. Finish with a few PVA pearls.


Wednesday, 4 May 2016

Fern Scene created for the Chocolate Baroque Colour Challenge 22


Here is another project that I created for the Chocolate Baroque Challenge 22 this month. It is quick and easy to make too.

Materials:


Step By Step:

  1. Using CutNDry Foam blend Distress inks straight onto the card, using Carved Pumpkin at the top, blending into Mustard Seed, then Crushed Olive at the base. Dry  with a heat gun or hair dryer.
  2. Place the stencil over the card and sponge through gently with water. Lift the ink by patting with tissue. Dry. Tip: Do this quickly and do not rub the card or the fibres may start to break up.
  3. Stamp the ferns and sentiment with Mowed Lawn Distress Ink. Stamp the ferns quickly, inking the stamp and stamping 2 or 3 times in succession (i.e. without re-inking) to get the more faded ferns in the background. Repeat until you are happy with the arrangement.

Thursday, 28 April 2016

Quick and Easy stamping projects created for Chocolate Baroque

Here are some small cards and notelets that are really quick and easy to make. These were created for Chocolate Baroque - we were given the proviso that they should be possible to make in under 15 minutes. Eeeek – not an easy one for me as I like to stamp, layer, cut out and embellish. It took me a while to come up with these but I loved having a production line of quick and easy projects. I now have some lovely cards and notelets ready in my stash for sending out to my friends when I need something in a hurry. Do take a look at the other projects from my fabulous Teamies on the Design Team Blog.


Summary: The backgrounds and stamping were done using Distress Inks. The fern is from the Wild Meadow stamp set and sentiments from Words of Inspiration and Mackintosh Sentiments sets.

Blossom Branch created for the Chocolate Baroque Colour Challenge


I am loving the colours for this month’s Colour Challenge 22 from Chocolate Baroque. Here is a contribution from me to inspire you (I hope! Tee hee xxx).


Materials:


How it was done:

  1. Orange, yellow and green Distress Inks were blended across the card. After drying the sun rays were created using a stencil and lifting out colour with water.
  2. The branches were then hand drawn very lightly with a pencil – just to get a rough layout to follow while stamping.
  3. The leaves were stamped with Crushed Olive Distress Ink. This was done quite randomly with 1st and 2nd generation stamping following the pencil outlines as a guide.
  4. The blossoms were stamped with Versamark and heat embossed with silver powder. Tip: Ensure that the card is fully dry and dust with talcum powder to prevent the powder sticking where you don’t want it. Buff with a dry cloth after embossing to remove any residue talc.
  5. The blossoms were then coloured with the glitter markers. The branches were then hand drawn with a fine tipped black pen. Touches of glitter glue were then added for additional sparkle.
  6. The scene was then edged with black ink, mounted onto the pearl card and black card base to frame.
  7. The sentiment tag was cut and inked with Scattered Straw Distress Ink through the die, edged with a little Carved Pumpkin and a black marker. The sentiment was then stamped with Versamark and heat embossed with the silver powder. The attached with foam pads for dimension.


Wednesday, 2 March 2016

MDF Bookstand decorated for Chocolate Baroque Challenge 20

I had so much fun using this month’s hot colours to decorate this book stand for my desk. The colours just said ‘Indian Theme’ to me. I used acrylic paints and mixed and matched stamps from several different stamp sets. The design could easily be adapted to create a wall hanging or small canvas.


Good luck everyone with the Challenge – some wonderful projects on there already this month.

Anne xxx.

Materials:


·         MDF book stand (Creative Expressions Kit)

·         White gesso and acrylic paints (pink, pearl pink, dark red, orange and yellow)

·         StazOn Inkpad (Jet Black)

·         Zig 2 Way Glue Pen

·         Fine tipped alcohol markers (black, pink, dark red and orange)

·         Polychromos pencils (pink, dark red, orange and yellow)

·         Cut-N-Dry Foam

·         Gold gilding wax (Pebeo Renaissance Gold)

·         Iridescent spray varnish (Crafters Companion Pearl Diamond)

·         Scrap paper for planning and masking plus dye based black inkpad


Step By Step:

I first sealed and primed the MDF stand with white gesso. Tip: When painting MDF items it is often best to paint them after constructing as the MDF can expand slightly making it difficult to fit the joints together afterwards.

The sides were painted with pink acrylic. The back and front panels were painted using orange and yellow acrylics. I painted from the outside edges working inward and blending the orange into the yellow in the centre.

The sides were randomly stamped with the paisley motif (Indian Elephant set) using StazOn. A bit of colouring was added using pencils.

I cut a piece of scrap paper the same size as the front panel in order to plan out the stamping. I have included a picture of my sketchbook page. I then worked out the order of stamping and which images needed masking. You will need to protect (mask) the foreground stamped images while building up the scene.
 

I stamped the lettering, elephants and border (Exquisite Edges set) with dye ink onto copy paper and cut around them to create masks. I added a few dots of Zig 2 Way Glue to the back and left to fully dry. This then acts as a temporary tacky adhesive to hold the masks in place while stamping.

It is tricky to stamp some areas on a ready-made item. The stamps need to be positioned on the stamping block to enable stamping into corners etc. It is also easy to slip when you are stamping at an angle on a 3D item. Tip: You could paint a piece of card to fit the area, stamp onto that instead, and then glue this onto your project afterwards.

I first stamped the sentiment, elephants and lower border with StazOn Ink. I then covered with the masks as shown in the picture.
 

Next I stamped the background arches (Gothic Fragments set) with a mix of pearl pink and red acrylic paints using Cut-N-Dry Foam to apply the paint to the stamps. Tip: Squeeze some acrylic paint directly onto the sponge and work it into the surface using a palette knife. This saves washing up of palettes and it wastes less paint. Place the coloured sponges face down on a craft mat and the paint stays workable without drying out for ages. Apply to your stamp with a dabbing motion. Clean your stamps quickly after use with warm water. A soft toothbrush can be useful to remove paint from the stamp crevices.

Next the tall stylised flower (Punky Flowers set) was stamped with dark red acrylic. The top of the stamp was then stamped with StazOn along the base. Masks were then removed.

A bit of colouring was added using marker pens and pencils. The pencils gave a nice textured effect to the elephants. I then outlined elements of the tall floral stamp using a fine tipped black marker. This brought the images further forward and created a nice frame up the sides of the scene.

I then sprayed with pearlescent varnish to protect and finished by adding gold gilding wax to the edges.