Showing posts with label Seashell Collage. Show all posts

Monday, 31 October 2016

Sail Away quick and easy card created for Chocolate Baroque


Good morning – I love stamping directly onto pretty background papers to produce quick and easy cards – great if you need to put something together in a hurry.

I stamped elements from the Seashell Collage and flying gulls from the Landscape Edges stamp sets using Archival Ink (Coffee) onto one of the pretty background papers from Crafty Individuals (Book 5 – Travels in Italy). The sentiment is from the Steampunk Travel set, and was heat embossed with white powder. I added a few details with a fine liner pen and quickly coloured some areas with brown pencil. I also blended a little pink dye ink around the edges and over the sentiment to make it stand out – the white embossing resists the ink colour.

Materials:
How to make it:
  1. Trim the paper down slightly (approx. 14.5cm square) and stamp the scene using Archival Coffee Ink. Add some quick colouring to the gulls and wooden posts using brown pencil.
  2. Stamp the sentiment with Versamark Ink and heat emboss with the white powder.
  3. Draw in some faux stitching around the sentiment to extend the scene (just add a few wavy lines) using the fine tipped pen.
  4. Blend pink ink in from the corners and over the sentiment to make it stand out more (the white embossing will resist the ink).
  5. Use the marker to outline and frame the edges and glue to the card front.

Sunday, 18 September 2016

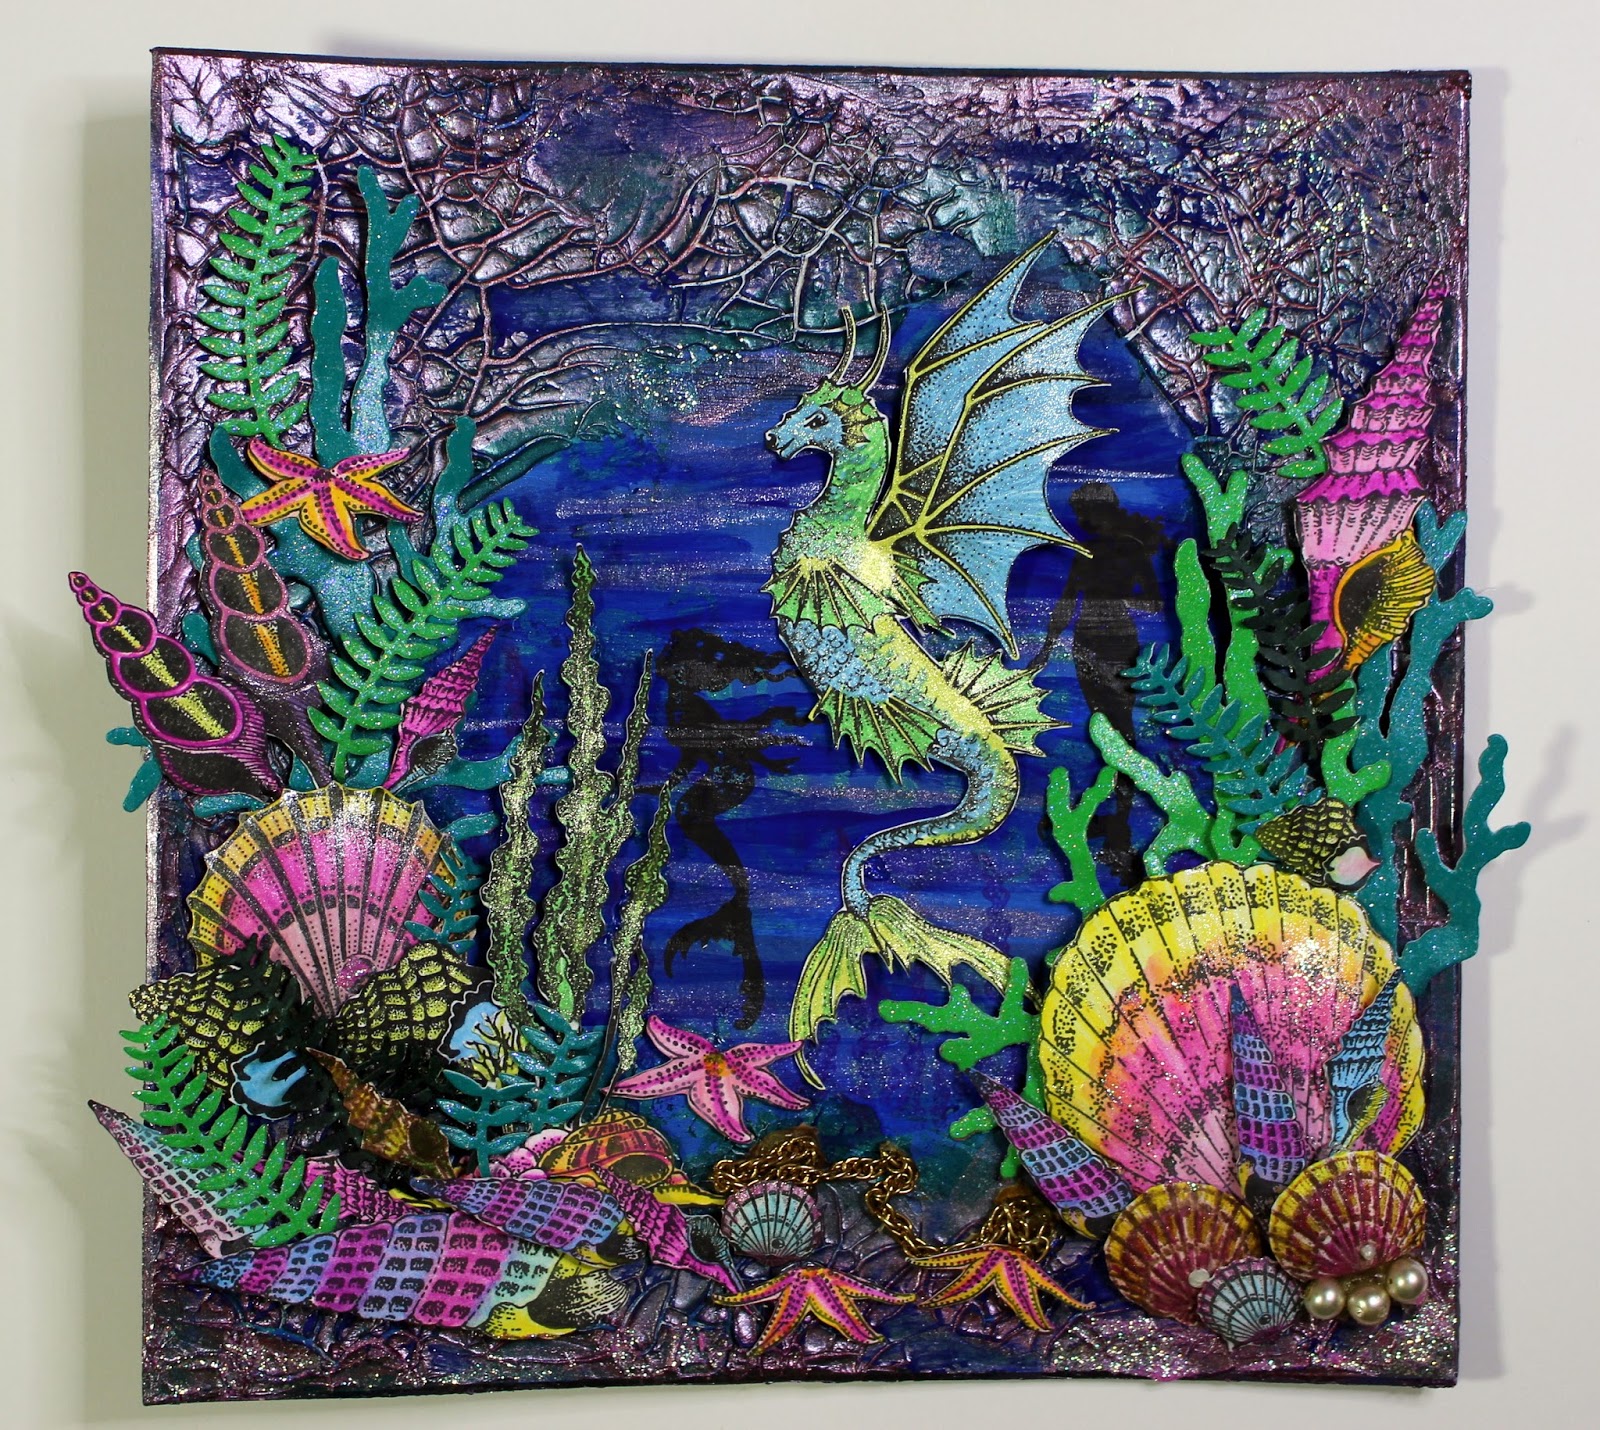
Sea Dragon Canvas TV show sample created for Chocolate Baroque

Sea Dragon Canvas - TV show sample created for Chocolate Baroque on The Craft Channel this week.

Materials:
  • Seadragon, Mermaid Queen, Underwater Kingdom, Underwater and Seashell Collage stamp sets
  • White stamping card, teal green glitter card
  • 20cm square canvas board
  • White Gesso
  • Acrylic paints (blues, greens and teal metallic)
  • Viva Décor Croco Crackling Colour (green shimmer -501)
  • Viva Décor Precious Metal Colour (pink)
  • Alcohol pens – for colouring die cuts (greens)
  • Watercolour pencils (pinks, purples, blues, greens, yellow, orange)
  • Versamark Inkpads (Vintage Sepia and Onyx Black)
  • Archival inkpad (dark blue)
  • Watercolour or acrylic transparent shimmer paints (blue, green – for dragon)
  • Recycled jewellery pieces (chains, pearls etc.)
  • PVA pearls
  • Iridescent glitter glue (pink)
  • 3D glue gel
  • Dies to cut seaweed - mixed branches (Heartfelt Creations) and leaves (Couture)
  • Stencils with swirls or water patterns (optional)
How to make it:
  1. Add a coat of white gesso to the canvas. Note: The canvas was already primed but I find that the gesso adds a bit more of a key for adhering acrylic gels etc.
  2. Paint the background with streaks of blue and green acrylics. Add some texture with stencils (if you like).
  3. Stamp some of the weeds etc. with dark blue ink. Stamp the mermaid silhouettes in black ink.
  4. Apply the crackle paste all around the edges using a palette knife and leave to dry overnight. Rub over the crackle texture with some pink metallic paint. Add some sparkly streaks into the water. Rub a little teal metallic in some areas.
  5. Die cut a range of seaweed shapes using dies from plain card (colour with pens) and teal glitter card.
  6. Stamp the dragon, seaweed, shells and starfish onto white stamping card using black ink, and brown ink for some of the shells. Colour with watercolour pencils and a damp brush. Add some shimmer paint to the dragon. Cut out and shape slightly to give them dimension.
  7. Glue on the die cuts and stamped images using 3D glue gel. Add some ‘treasure’ – chain, pearls etc. Add PVA pearls to some of the shells, and extra sparkle with glitter glue.
Finishing your artwork: Optional: Spray the canvas with acrylic varnish. This will protect the canvas, particularly the watercoloured images. I used a Tim Holtz BigZ Easel die to cut a stand from mount board (attached to the back). Alternatively punch some holes and hang with cords.

Sea Dragon card TV show sample created for Chocolate Baroque

Sea Dragon card - TV show sample created for Chocolate Baroque on The Craft Channel this week.
Materials:
  • Seadragon (sea dragon, mermaid, sentiment), Underwater Kingdom (mermaid), Underwater (starfish), Seashell Collage (Wheel and Anchor) stamp sets
  • 6 X 6 inch scalloped card blank, white stamping card
  • Versafine Inkpad (Onyx Black), archival dye ink (blue)
  • Brusho’s (Turquoise, Ultramarine)
  • Metallic paint (silver gold) *
  • Pebeo Drawing Gum
  • Watercolour pencils (yellow, golds, oranges) and brush
  • Alcohol ink marker (black)
  • Decorative Lattice Swirl Die (Heartfelt Creations). If you don’t have these dies, swirly or seaweed like foliage dies would produce a similar result.
* I used Starlight paint (Imagination Crafts) but the Aztec Paints featured in the shows this weekend would be perfect.
How to make it:
  1. Stamp the Sea Dragon with Versafine and mask with the Drawing Gum. Trim to approx. 10 X 14cm and edge with black pen.
  2. Drop Brusho crystals onto the card and spritz with water.
  3. Colour extra card with Brusho’s for die cuts. Cut out the swirly trellis with dies.
  4. Stamp the anchor, starfish and wheel with Versafine onto spare card and cut out. Stamp the sentiment with blue ink, cut out and edge with black marker.
  5. Stamp the silhouette mermaids with blue ink. Remove the masking from the dragon, colour the dragon and starfish with watercolour pencils. Add some shimmer paint to the dragon.
  6. Layer elements and glue to card front.

Fantastic shows from Lesley Wharton on the Craft Channel this week

Did you catch the great shows with Lesley Wharton (from Chocolate Baroque) yesterday on The Craft Channel – you can watch catch up videos online if you missed it.

The first show was demonstrating fab paints and gels from Viva Decor. Lesley then had a 2 hour show (7-9pm) demonstrating the wonderful sea themed stamps from Chocolate Baroque. She has another show this afternoon with Aztec Paints. Lesley will also be back later in the week with another sea themed show. I always love her demos – definitely worth watching.

Here are some of my projects using the sea themed stamps. Some have featured on the show along with more FAB samples from the rest of my Chocolate Baroque Teamies.

Projects with the Seashell Collage stamp set.

Projects with the Mermaid Queen and Seadragon stamp sets.

A 3D boat card and variation on a tag card using the Seashell Collage stamp set.

Quick and easy projects using the Seashell Collage set.

The Mermaid Queen set is fabulous – I have made several variations of this card for friends, and for the show.

A canvas and card using the marvellous Seadragon set.


Stamp sets used: Seashell Collage, Underwater, Seadragon, Underwater Kingdom and Mermaid Queen.

All these sets mix and match and work together beautifully – can you tell how much I love these sets?
I will add details and step by steps for all the projects later xxx.


Sunday, 31 July 2016

Quick and easy sea themed cards created for Chocolate Baroque


Good morning. Today I am sharing 3 quick makes using Seashell Collage stamps from Chocolate Baroque.
I must got down to the sea
A smooth sea never made a skilled mariner
These first two were stamped onto the same background paper created by randomly spritzing an A4 sheet with blue, red and gold mica sprays.
Seagulls in Italy My third project was stamped onto a patterned paper from Crafty Individuals.
Materials:
  • Seashell Collage and Words of Inspiration stamp sets
  • A4 sheet of thick cartridge or watercolour card, 11 X 14cm cream card blank, 15cm square card blank in cream and white, cream stamping card, Crafty Individuals 6X6 inch backing paper (Travels in Italy)
  • Inkpads: Archival (Coffee), Versamark, Versafine (Onyx Black), Distress Ink (Antique Linen)
  • Mr Huey’s Ink spritzers (blue/grey, red, gold with mica)
  • Alcohol marker (black), fine tipped marker (brown, black)
  • Polychromos pencils (brown, grey, white, black, red, orange)
  • WOW embossing powder (Blueberry)
  • Glossy Accents
  • PVA pearls (gold)
  • Die to fit sentiment panel (Heartfelt Creations Cut, Mat, Create set) or hand cut and use a corner rounder punch.
Step By Step - ‘I must go down to the sea’
  1. Trim the randomly spritzed sheet to fit the card front (11 X 14cm) leaving a small border.
  2. Stamp the gulls with Archival Coffee ink. Edge the topper and card with black pen and glue down.
  3. Stamp the sentiment onto cream card with Coffee ink. Edge with Distress ink and brush over with some of the spritzer ink. Cut out and edge with black ink. Draw faux stitching with fine pen. Stick down with 3D foam.
  4. Finish by adding Glossy Accents to the stamped image (this enhances it and makes it stand out from the background).
Step By Step – ‘A smooth sea never made a skilled mariner’
  1. Trim the randomly spritzed sheet to fit the card front (15cm square) leaving a small border.
  2. Stamp the boat, anchor and small sentiment with Archival Coffee ink. Stamp the inspirational sentiment with Versamark and heat emboss with the powder. Draw in sun rays, and extend the scene, and add faux stitching with fine tipped pen. Edge the topper and card with black pen and glue down.
  3. Finish by adding Glossy Accents to the stamped images, and PVA pearls.
Step By Step – ‘Seagulls in Italy’
  1. Trim the printed sheet slightly to fit the card front (15cm square) leaving a small border. Edge with black marker.
  2. Use Versafine ink and partial stamping to create the scene across the card by leaving ink off parts of the stamp e.g. omitting the seagulls from some of the posts. No complicated masks needed for this but clean the stamp well between stamping to avoid residual ghost images where you don’t want them. Use the fine tipped pen to hand draw missing sections from the top of the posts.
  3. Quickly colour the posts and gulls with pencils. No need for fancy colouring as the stamps already provide shading details.
  4. Stamp the sentiment and glue to the card front.
I hope that you like them.  Anne x.