Sunday 29 July 2018

Positive Thoughts Blossom


Good morning. Today I am sharing the last of my recent Hochanda TV show samples using the Scrumptious Succulents and Blossom and Grow stamp sets from Chocolate Baroque.
The blossoms were stamped directly onto a 6 X 6 inch pink card blank using Versamark Ink and heat embossed with detail gold powder. Tip: Stamp the four corners first by stamping then turning the card and stamping again, keeping the stamp and block in the same orientation. Then repeat the process stamping the other blossom in between. I used the Tim Holtz Stamping Press (Tonic) to make this really quick and easy. It is not essential to use a stamp press but it will make it much easier.
The blossoms were coloured with Distress Oxide Ink (Carved Pumpkin), green and gold sparkle pens and a damp brush. Metallic orange/silver and gold gel pens (Pentel and Sakura) were used to add highlights to the flowers.
Next I created a stamp mask by stamping the cactus onto scrap copy paper and cutting out. I used a few dots of Zig 2 Way glue to give a tacky temporary stick to the reverse to hold the masks in place while stamping. Alternatively you could use the special Masking Tissue to create masks.
The cacti were then stamped onto white stamping card using Versafine (Vintage Sepia), covering images with masks as required so that some images appear to be behind the foreground stamped images. The sentiment was stamped onto pink card.
The cacti were coloured using watercolour pencils and a damp brush to smooth and blend the colour. The topper was then cut out and lightly shaped to give dimension before sticking to the card with foam pads.
The sentiment was cut out using a small decorative panel die. A little Distress Oxide was used to colour the edges. This was mounted with 3D glue gel along with a small die cut flower and sprigs (Tattered Lace).
My next sample was stamped onto a patterned paper using Versafine (Onyx Black). Again I used masks where needed to build up the scene (prepared as above). Coloured with pencils and added a little yellow glaze gel pen (Sakura) to the blossom stamens.
The panel was edged with black alcohol marker to frame before mounting onto white card and gluing to the green card blank (6 X 6 inch).
For my next sample I dug out an inky background paper from my stash. This one was created with ink sprays and Brusho powders. I thought that it would make a lovely tropical background for a scene.
A background panel was created in the same way as my first sample but using Distress Ink (Old Paper) for a subtle effect. A little clear sparkle pen was used to add petal highlights. The panel was edged with green alcohol marker to frame and mounted onto green card before gluing to the card front (6 X 6 inch).
The scene was built up, stamping with Versafine Ink (Onyx Black) onto the coloured panel, using masks where needed (made from copy paper as given above). Images were coloured with Distress Oxide Ink (Carved Pumpkin), watercolour and sparkle pens. The panel was edged with black alcohol marker to frame and glued to the card front with foam pads for added depth.
I had so much fun with these gorgeous stamp sets.
Happy stamping x.

Sunday 15 July 2018

Quick and easy monochromatic floral cards

I love to use a blue & white theme and it is a quick and easy method to create cards when you are in a hurry. I created these samples for the recent shows on Hochanda TV using the Blossom and Grow and Scrumptious Succulents stamp sets from Chocolate Baroque.

Images and sentiments were stamped with Versafine (Majestic Blue) and coloured with dark blue watercolour pen. Colour was quickly scribbled onto areas requiring darkest shading and the colour simply dragged out using a damp brush. Note: You need to use a quality stamping card or watercolour card for this technique to work. Card with a high chalk content will grab onto the ink colouring and it cannot be easily spread with water.

The panels were edged with dark blue alcohol marker to frame before gluing to the card fronts.

My first quick scene was created using the Blossom and Grow stamp set and textured watercolour card and mounted onto a 6 X 4 inch card blank. A little watercolour pen was run along the base to ground the image, spreading the ink with a little water. Clear glitter glue was added to the flowers for a bit of sparkle – I just cannot resist. Loving the sentiments in this stamp set, think that I will be using them a lot.

My second quick scene included the sentiment from the Scrumptious Succulents stamp set. Again I used textured watercolour card, mounting the finished scene onto a 3 X 5 inch card blank.

The scene was stamped and coloured as above. Extra colour was sponged around the edges by lifting watercolour pen scribbled onto my craft mat. A tiny drop of glycerine was blended into the sponge before lifting colour. This helps the ink to blend more easily and behave more like a Distress Ink (a Sheena Douglass tip). I then splashed the blended inked background with water and lifted off with kitchen paper to give added texture.


Saturday 14 July 2018

Dream, Wish, Create a Beautiful World

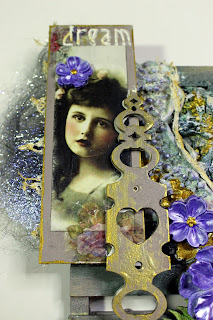
This lovely image of a young girl (Victorian Photographs Rice Paper) really called to me and inspired me to make this piece. To me she portrayed a young girl that had experienced in her life far more than any child should.  Alone she would dream and wish for a better world. Her creativity would enable her to escape from the trauma and open the door to a world full of beauty.
I know that many can testify that using imagination and creativity really does take them to a happy place and can increase wellbeing. Sorry, maybe a bit heavy? I hope that you like the ‘beautiful world’ that I have created.
I first collected together lots of elements from my stash; a small wooden pallet (15cm square from Art-C), a thick greyboard panel with frame (13.5cm X 5cm, 6cm X 2cm centre, from Tando Creative) plus smaller panel, silicone moulds to create flowers and fern, MDF Heart Keyplate, Penny Washer and Heart Flower (Powertex), scraps cotton fabric and lace.
I created the flowers and ferns using silicone moulds and Stone Art Clay. Stone Art was mixed approx. 50:50 with Ivory Powertex plus a little Transparent Powertex. Ivory Poweretex was also used to coat the inner greyboard pieces.
The wooden pallet and remaining greyboard and MDF pieces were coated with a leftovers mix of Powertex (mainly Lead and Ivory). I keep any leftover Powertex in recycled little takeaway sauce pots (plastic with fully airtight lids). My mix gave a lovely warm grey colour.
I spread Easy Structure Paste across the centre of the pallet and then spritzed with Green Bister.
The rice paper images were applied to the Ivory Powertex coated panels using Easy Coat Mat Medium. Note: the sentiment is actually snipped from the ‘Creative Paper’ branding down the side of the paper. I also used some small leftover snips from a floral paper.
Cotton fabric was treated with Ivory Powertex and draped diagonally across the middle. More texture was added using 3D Sand & Balls.
The flowers, ferns, Heart Flower and Penny Washer were coloured with Acrylic Inks; Palm Leaf, Viola, Viola Metallic and Golden Metallic. A little gold colour was also applied to the edges of the keyplate and image panels, plus drizzled onto the texture paste. The fabric was spritzed with a little Green Bister.
A strip of thin fabric braid was treated with Powertex, coiled tightly into a spiral, and added to the MDF flower centre (coloured with gold ink when dry). A sheet of Angelina fibre was created by ironing heat fusible sparkly fibres between sheets of baking parchment. I collected together a few snips of lace plus some Powercotton.
Next I put it all together. I hung a small metal ‘wish’ charm from the base.
I used Easy Structure Paste through the Duo Arty Quotes Mini  Stencil to add the ‘Dream’ sentiment.
More Acrylic Ink colour was dry brushed over textured areas.
I love the new Acrylic Inks. The fluid formula enables you to drizzle areas with intense colour too.
I was really pleased with my ‘Dream, Create, Wish’ mini artwork. I think that I might just have to keep this one for me.
Off to get busy as I have so many ideas. I will share more soon. Hugs all xxx.


Blossom and Grow Cacti

Good morning. I created these samples for the recent shows on Hochanda TV using Captivating Cacti, Blossom and Grow and Scrumptious Succulents stamp sets from Chocolate Baroque.


My first sample was created using a 5 X 4.5 inch card blank. The lower third of the card blank was embossed using a lacy textured embossing folder. The background was stamped using the Square Bubbles stamp and Distress Ink (Tattered Rose). Distress Ink, purple dye based ink and pink glitter glue were applied over the embossed section to colour and highlight.

The sentiment was stamped from the Blossom and Grow stamp set using purple dye based ink. The card was edged using purple alcohol marker to frame and a ribbon glued down to create a base for the flower pot.

I used a flower pot die (Sheena Douglass Herb Garden set) to cut the pot from Kraft card. A little colouring was added using watercolour and clear sparkle pens before shaping and gluing to the card front with 3D glue gel.

Cacti from the Scrumptious Succulents set were stamped onto smooth stamping card using Versafine (Onyx Black). Images were then coloured with watercolour pens (Crafters Companion Spectrum Aqua), dragging out colour and blending using a damp brush, then cut out. The large ‘face on’ cactus image was stamped several times, cut out, shaped and layered up. Elements were shaped using a ball tool and foam mat then glued down with 3D glue gel.


For my second sample I used the gorgeous Captivating Cacti stamp and a sentiment from Blossom and Grow.
I prepared a decorative card blank from a 6 X 6 inch Kraft card blank, extending the edges by adding die cut borders from white pearl card (Crafters Companion Die’Sire strip die). Finished by adding faux stitching with a fine tipped pen (opaque white) and PVA pearls.
Images were stamped onto textured watercolour card using Versafine (Onyx Black). Watercolour and sparkle pens (Crafters Companion) were used for colouring. Colouring was extended at the base to give the cactus grounding.
A little gold sparkle pen was flicked across the image for added texture. I didn’t intend to do this initially but I had to cover up an accidental splodge! I liked the result, so a ‘happy accident’ as they say – tee hee. The card was edged with dark brown marker to frame before gluing to the card front.


Wednesday 4 July 2018

Growing Blossoms


Good morning. Today I am sharing a couple of my samples for the recent shows on Hochanda with the Blossom and Grow and Scrumptious Succulents stamp sets.
This one was created with a 6 X 6 inch Kraft card blank. First the flowers were stamped onto scrap copy paper and cut out to create a mask. A little Zig 2 Way glue was dotted on the back to provide a temporary tac. Alternatively you could use the special masking tissue.
The images were stamped directly onto the card blank using Versamark and embossed with detail white powder. The foreground florals were stamped first, covered with masks before stamping the background foliage.
A little texture was added using a little ‘pricking wheel’ and a ruler. Just something I have in my tools, like a mini pastry crimping texture wheel. Opaque white pen was then used to add faux stitching and dots. Light colouring was brushed over with watercolour pens, using a clear sparkle pen to dilute the colour.
The flower was stamped again onto white stamping card using Versafine (Onyx Black) and coloured with watercolour and sparkle pens. The image was trimmed out and mounted with 3D foam. Finished with PVA pearls.
My second is a wreath created with one of the small flower heads. A 6.5 X 5.5 inch textured card blank was randomly stamped using the Square Bubbles stamp and Versafine (Majestic Blue). I used various dies to cut mats and layers and to build out decorative sides to the card blank (using white and blue card). Dies: Pin Dot Decorative Circles (Tattered Lace) and Florence (Crafters Companion Die’Sire).
I used the Inkadinkadoo Stamping Gear to stamp the wreath using Versafine (Majestic Blue). This can be done manually by dividing the circle into 8 segments (mark lightly with a pencil). Tip: Stamp the first image and turn the card before stamping the next, keeping the stamp orientation the same as you go. It’s easiest to stamp the 4 quadrants first then go around again and fill in between. Practice on some copy paper.
The flowers were coloured with watercolour pens and clear sparkle pen to dilute out colour and give shading. 3D foam was used to add depth and dimension to layers.