Showing posts with label Tattered Lace. Show all posts

Friday, 3 March 2017

Butterfly Stepper Card created for Chocolate Baroque


Good morning. Today I am sharing another of my show samples using the Breath of Spring stamp set from Chocolate Baroque. The butterfly swirl can be used to make lovely backgrounds but it also works well as the main decorative feature. I used sparkly black embossing powder for added dimension (a bit difficult to see in the pic). I stamped and cut out extra butterflies and used them to embellish this stepper card, along with some die cut swirls and paper punched flowers. I also used a pretty background paper from Crafty Individuals (6 X 6 inch pad – Springtime). Victorian Velvet Distress Ink was used on the card blank and edges.
I cannot wait for more shows coming at the end of the month. Lesley will be bringing us something a little different. My lips are sealed – tee hee x.

Materials:

Wednesday, 15 February 2017

Butterfly Wreath Card created for Chocolate Baroque Colour Challenge 32


Here is my first contribution to Chocolate Baroques Colour Challenge 32 this month.

I came up with this after playing with my Inkadinkadoo stamping gear (circular wheel) – I hope that you like it.

Looking forward to seeing your entries x
 
Materials:
 
How it was made:
  1. I created the wreath using the stamping gear and the Sticks & Stones stamp set with green Distress Inks. I stamped the butterflies and sentiment with copper pigment ink and heat embossed with clear powder. Similar can be achieved by drawing a circle and dividing it into 8 sections. Keeping the stamp orientation steady, stamp and turn the card between each stamping, or just work more freely around a circle.
  2. The background was spritzed with pale blue ink. I cut out the topper and created a circular card using scalloped circle dies. I used the fine tipped pen to draw faux stitching and edged the card with blue Distress Ink.
  3. The butterfly was stamped and embossed with copper powder and coloured with sparkle pens. I cut then cut it out and shaped for added dimension. Twigs were cut from mirror card.
  4. I finished with the copper PVA pearls and a few dots of glitter glue for sparkle.

Saturday, 11 February 2017

Spring Iris Card created for Chocolate Baroque


Good morning. Today I am sharing another of my TV show samples using the Kingfisher Song stamp set from Chocolate Baroque. The new stamps are now available directly from Chocolate Baroque. I hope that you like this Spring themed card.
I so enjoyed the shows and Demos with Lesley Wharton on Hochanda. More shows coming very soon! I am beavering away to finish the next set of samples. I feel hugely privileged to be on the Design Team for Chocolate Baroque. It can be hard work but I get to play with some wonderful stamp sets – yay!
 
Materials:
 
How to make the Stepper Card blank:
Cut the A5 card blank through both front and back panels starting approx. 8cm in from the left side and stopping 3cm up from the bottom. Score the front and back sections equally, 3 and 6cm in from the edge. ‘Mountain fold’ at the 3cm score line to create the side stepper.
 
How to make the card:
  1. Lightly spritz the card blank with blue and gold mica sprays. Tip: if the card curls a bit I tend to pop mine under a stack of die cutting mats while I work on the rest of the card.
  2. Cut the blue background panels and glue to the card. Cut the leafy sprig from green card. See below for how to create the die cut Iris.
  3. Cut the main panels from stamping card and lightly spritiz with blue mica spray. When dry add faux stitching with the fine tipped pen.
  4. Stamp the sentiment and image with Versamark. Colour the Iris image with watercolour pens.
  5. Glue the sentiment and image panels to the card using 3D foam for added depth. Glue on the leafy sprig and 3D Iris to finish.
How I created the 3D Iris Flower:


I created this using the Spellbinders ‘Create an Iris’ die. I cut it from approx. 180gsm card and coloured it with Spectrum Noir alcohol pens. I shaped it using ball tools and an embossing mat/foam mat. Colours used: DG3 for leaves, CT2 and 3 for larger petal centres, LV2 and 3 for outer petal edges, LV1 and 2 for inner small petals, and the blender to add highlights.

Monday, 6 February 2017

Kingfisher stepper card created for Chocolate Baroque


Good morning. I made this card for a friend using the Kingfisher Song and scene building sets from Chocolate Baroque. These are still exclusive to Hochanda at the moment but will be on the Chocolate Baroque site in a few days.
 
Materials:

Monday, 31 October 2016

Halloween Canvas using the Day Of The Dead Collection from Sheena Douglass


Oooh I do love Halloween. I so enjoy making spooky projects. I created this canvas for a couple of my friends. I used Sheena Douglass ‘Day Of The Dead’ stamps and dies, and I coloured the image so it looked like them. I also used Sheena’s Festive Ivy and Christmas Foliage dies to decorate.

Materials:
  • Stretched canvas approx. A4 size
  • A4 sheet white stamping card (Sheena Douglass)
  • Black, white and green card
  • Brother ScanNCut CM300 machine
  • Silhouette Cameo machine
  • Die cutting machine (EBosser)
  • Sheena Douglass Day Of The Dead Collection (Eternal Love stamp and Dancing Skeleton, and Pawprint memories dies)
  • Sheena Douglass dies (Festive Ivy and Christmas Foliage)
  • Other dies: acorn (Spellbinders) and leaves (Tattered Lace)
  • ScanNCut files: built in designs for the ‘Happy’ and ‘Halloween’ text
  • Silhouette files: JM Rush for spiders (Spider Web Lantern), Bats Flying and Spooky Banner
  • Gesso (black)
  • Inkpads: Versafine (Tuxedo Black), Distress (Gathered Twigs and Tea Dye)
  • Spray and Sparkle (Crafters Companion Diamond Pearl)
  • Pebeo Gilding Wax (King Gold)
  • Spectrum Aqua watercolour pens (pinks, oranges, greens, teals, turquoises, greys, yellows and reds)
  • Brown pencil (to colour bats)
  • Black fine tipped marker (to enhance shading & detail to stamped image)
  • Stickles glitter glue (Crystal)

Tuesday, 16 August 2016

Summer T-Shirt decorated using Tattered Lace dies to create stamps and stencils

Good evening. I hope that you like my summer themed project. You may of seen my stamped and decorated summer top in my last posting. This time I have created a variation using dies to create the stamps.
I designed this to showcase how dies can be used to create stamps by cutting from funky foam. Stencils can also be created by cutting acetate or plastic stencil sheet.
Use the coordinating stamps or stencils to complement die cuts on cards, or use them to decorate fabrics for sewing projects, or to decorate ready made items.


Front


Back


Decorated tag to match

Materials:
*I used Vallejo fabric paints (Green, Metallic Turquoise, Bengali Rose, Parma Violet, Blue and Black) plus Martha Stewart Multi Surface paint (Spring Pasture) and Pinflair Glitter Wand.
Note: If you want to stamp onto a darker coloured fabric you will need to use opaque fabric paints specially formulated for dark fabric. IMPORTANT NOTE: I was assured that the Pinflair glitter wand was suitable and fixable on fabric (after heat fixing) but mine has just washed out - eek! I will find another glitter glue suitable and let you know when I find an alternative.
How to do it:
Prewash the shirt in plain soap to remove any fabric treatments or conditioners (I use ordinary dish washing liquid). Dry and iron to give a smooth stamping surface.


Load the paints onto the CutNDry foam and work in well with a palette knife. Place them sponge side down onto a palette (I used a piece of waste packaging) and lightly spritz with water to keep them damp. While not using I also place a damp cloth over the top. This keeps the paints useable while working on your project. I have found this to be the best method for getting nice crisp stamping without paint clumping or drying out. They will even keep overnight if placed in a plastic bag.


Use the dies to cut funky foam shapes. Apply Zig 2 Way glue and leave to go tacky (this glue is blue on application and dries clear to give a repositionable tacky surface). Mount stamps onto acrylic blocks for stamping.
Cut the butterflies from waste acetate and use the apertures as a stencil.
Stamp the butterflies onto copy paper and cut around the outer edge to create masks for stamping.
Wash stamps immediately after use (or place face down on a wet cloth until ready to clean).


Lay some plastic sheeting inside the shirt to protect any paint from seeping through layers (i.e. front to back) while stamping. I placed my glass mat inside the shirt while working. Stencil the butterfly silhouettes with multi colours. Dry. A hair dryer is useful to help speed up the drying process while working (the paints do dry quite quickly).
Stamp the butterfly details over the top of the silhouettes using black paint.
Stamp the foliage using paper masks to protect the butterfly images.
Finally add glitter glue to the butterflies on the shirt front.
Leave overnight for the paints to fully cure and then iron fix the paints on the reverse to make them permanent and washable.


Wednesday, 20 July 2016

Mint Chocolate Rose cards created for Chocolate Baroque Anniversary Challenge 25


Good evening my crafting friends. I am running a little late today with showing my projects for the special Anniversary Chocolate Baroque Challenge 25. The theme is chocolate – yum! Check out the blog for more fabulous inspiration from my Teamies, and there is an extra special prize this month too.

I have created 2 projects for you with the theme of Mint Chocolate. I hope that you like them.  The first is an 8X8 twisted easel card where I have made a faux chocolate bar to create the stopper. I also used one of the lovely free digital papers from Challenge 19. The second is a quicker project using the same colour scheme.


Mint Chocolate Easel Card
Card front with decoupage elements.
Faux chocolate bar created using waste die cuts from a window die – they made lovely chocolate squares.
Open easel card with faux chocolate bar stopper.

Materials:
How to make it:
  1. Diagonally score the front of the card from bottom left to top right and fold to the inside to create the easel.
  2. Cut an 8X8 inch panel from the hammered card and colour the edge with mint alcohol pen. Colour the inside panel of the card to match.
  3. Trim 2 sheets of the digital paper to slightly under 8X8 inches. Stamp the rose image with Distress ink onto the right hand top corner. I used a damp brush to drag out some of the ink and add shading to the ‘inner’ sheet. Ink the edges with Distress Ink.
  4. Glue the digital papers to the hammered card panel and inside the card. See the picture to see how to orientate the paper. Draw faux stitching around the edges to frame.
  5. Cut a piece of thick card the same width but slightly longer than the printed ‘chocolat’ panel. Stick gold paper over the ends to imitate gold foil of a chocolate bar. Wrap with the paper, add a little ink to the edges and glue to the card front.
  6. Cut the decorative heart in brown card. Edge with faux stitching. Stamp the sentiment with Versamark and heat emboss with gold powder. Glue on the sweetie bow and add to the card front with 3D glue gel.
  7. Cut some small squares from brown card to imitate chocolate squares. I used waste pieces from a window die. Cut some thick card to create the faux chocolate bar stopper. Glue on the chocolate pieces. Wrap with the digital paper and the ends with the foil, creating a torn opening revealing the ‘chocolate’.
  8. Stamp the rose onto stamping card with Archival ink three times. Cut out one full images and then elements to decoupage up. Colour with alcohol pens. Shape slightly and glue to the card with 3D glue gel.
  9. Apply some glitter glue to a palette or craft mat and thin slightly with water. Paint onto the rose image.
  10. Glue the topper panel to the bottom right hand side card front triangle to create the twisted easel. Glue down the faux chocolate bar to create the stopper. Finish with PVA pearls.
Here is a quicker project using the same Mint Chocolate colours:
Materials: How to make it:
  1. Stamp the rose with Archival Ink and colour with alcohol markers. Trim to approx. 10.5 X 14cm. Blend Distress Ink around the edges and then rough up and distress using the edge of your scissors, and glue to card front.
  2. Stamp the sentiment with Archival Ink.


Monday, 11 July 2016

Twinkle Christmas card created for Tattered Lace


Materials:
  • Twinkle Die set
  • White card blank (14 X 18cm)
  • Black Card (13 X 17cm)
  • White stamping card (suitable for wet media)
  • Spider Web Netting (silver grey)
  • White organza ribbon with silver sparkle thread
  • PVA pearls (black), glitter glue (silver), faux sticker gems (holographic black)
  • Ink sprays (Black, grey and silver with mica)
  • Fine tipped alcohol marker (black)
  • Pinflaire Craft Glaze
  • Wax paper and baking parchment
How to make it:
  1. Cut the frame and oval from wax paper. Transfer the wax onto stamping card by ironing (low to medium setting). Protect your iron with a layer of baking parchment on top of the wax paper.
  2. Spritz the card with ink sprays – the transferred wax acts as a partial resist. Dab with tissue to remove excess ink from the waxed areas.
  3. Cut around the outer frame with scissors. Apply glaze to the outer frame and oval. This darkens and enhances the contrast.
  4. Cut the bauble and leaves. Spray with inks to colour – slightly lighter than the background colour.
  5. Lay the bauble into the oval and draw around with the alcohol marker. Apply glaze to the area behind the bauble to enhance. Also use the pen to draw around the inside of the oval, and to edge the outer frame, to give the appearance of added depth. Glue down the bauble and leaves.
  6. Glue the black mat onto the card. Cover with a layer of Spider Web and trim to fit. Tip attach with tape under the topper panel. Apply the topper panel with 3D foam.
  7. Apply the bow, faux gems, PVA pearls and glitter glue to finish.

Christmas Stockings and Christmas Lights Washing Lines cards created for Tattered Lace

Here is a quick look at the projects that I created with the Christmas Stockings and Christmas Lights Washing Line dies from Tattered Lace.- available on Create & Craft TV today.
I will blog some instructions soon, Anne x.


The Christmas Lights die doesn't just have to be for Christmas


Cute Penguin Christmas Place Setting created for Tattered Lace

Good evening. I am sharing some instructions for some of my TV show samples today. This one is using the Penguin die from the Christmas Cuties range.

A special Christmas Cuties Multibuy bundle is still available on the Create & Craft website. Materials:
  • Christmas Cuties Penguin die
  • Decorative Centre Stepper – for the little branch and mini tag dies
  • Black and white card
  • Sentiment stamp from my stash
  • Versafine inkpad (Onyx Black), alcohol markers (black and yellow), Stickles glitter glue (Diamond), PVA pearls (black)
  • Organza ribbon
  • Sentiment for tag printed on a laser printer
  • Optional: Holographic silver toner transfer foil (such as Midas Touch) and Minc Foiling machine (or laminator)
How to make it: The procedure is a little complex to explain in words but hopefully it will become clear as you try it. If you are unsure then try it out using some cheaper card or paper first.
  1. Cut the Penguin in white card. Score the card along the line of the small edge cuts from the die and fold. To create the table place setting trim to approx. 3.5cm high X 11cm using a craft knife.
  2. Where the Penguin has cut from the back there will be a hole. Cut another piece of card to cover the back (3.5 X 11cm). Place the bottom part of the Penguin onto the top edge positioning to correspond with the cut Penguin on the place card. This is done so that the base card will not show through the lacy tummy of the penguin on the finished card. Glue to the back.
  3. Cut the Penguin in black card. Snip away sections (eyes, beak, tummy, feet) and glue down onto the white Penguin. Colour the beak and feet with alcohol pen.
  4. Stamp the sentiment and edge the place card with black pen.
  5. Cut the little branches in black card.
  6. Cut the printed sentiment with the tag die. I has used a laser printer and foiled my sentiment with toner foil. Alternatively use a plain printed or stamped sentiment.
  7. Outline the tag with black marker and add ribbon. Glue the tag and branches onto the place setting. Finish with touches of glitter glue and black PVA pearls.
Happy crafting, Anne x

Cute Penguin Rocker Card created for Tattered Lace


Good afternoon. I am sharing some instructions for some of my TV show samples today. This one is using the Penguin die from the Christmas Cuties range.

A special Christmas Cuties Multibuy bundle is still available on the Create & Craft website.
Materials: How to make it:
The procedure is a little complex to explain in words but hopefully it will become clear as you try it. If you are unsure then try it out using some cheaper card or paper first.
  1. Cut the largest plain circle in heavy white card. Score down the centre and fold in half to create the rocker card.
  2. Place the bottom part of the Penguin onto the folded card aligning the small protruding edges just above the fold. Cut through both layers to remove this section. You may need scissors or a craft knife to completely remove the section if your card is very thick and it doesn’t cut completely through the front and back layers. This is done so that the base card will not show through the lacy tummy of the penguin on the finished card.
  3. Cut the decorative circle in blue card and cut in half. As above, cut away the Penguin base from the top edge of the semi circle. Align the blue half circle onto the card front to help you align the die to cut away the corresponding section. Use the white pen to draw faux stitching along the edge.
  4. Cut the Penguin in white and blue card and snip the penguin free. Snip away the tummy, eyes and beak sections from the blue card and glue onto the white Penguin.
  5. Cut the Penguin again in white card. Using a ruler extend the small edge cuts made by the die, and cut away the background from the top half. I used a steel rule and craft knife. Alternatively mark the line with a pencil and cut with scissors.
  6. Use the torn edge circle die to cut the bottom half into a semi circle, leaving the Penguin intact on the top edge. Tip: Lay the blue half circle onto the die cut Penguin aligning the bottom of the Penguin and top straight edge. Now lay the torn edge circle die on top to align it into the desired position. Carefully ease the blue card away and tape down the die. Ensure that the top half of the Penguin is sitting over the die, and not under the cutting edge. You will end up with an embossed edge from the die across the Penguin but this will be covered up.
  7. Glue the semi circles onto the card front. Glue the separate blue and white Penguin onto the white edger Penguin. The Penguin will be nice and strong ready for repeated ‘rocking’.
  8. Cut the twigs, flower centre and petals in blue and white card. The small poinsettia is made up from 2 sets of the smallest petals. The large poinsettia is made by cutting the largest twin petals 3 times in blue and white. One petal is snipped away to create the 5 petalled flower. Shape the flowers to add dimension. I used a ball tool and embossing mat.
  9. Stamp the sentiment with blue ink. Glue on the flowers. Finish with sparkly glitter glue.
I hope that I haven’t given you a headache with the instructions – it really is easier than it sounds. Happy crafting, Anne x

Saturday, 25 June 2016

Take Time To Love mixed media canvas created for Chocolate Baroque


This was another of my recent TV show sample created for Chocolate Baroque on The Craft Channel using the Gothic Fragments stamp set. Sorry that it has taken so long to blog the details – never enough hours in a day – tee hee. I had a lot of fun making this one. Anne x.
Materials:
  • Words of Wisdom, Gothic Fragments and Mini Scripts stamp sets
  • Dark green mount board, smaller piece of cream mount board, white stamping card, black card
  • Inkpads: Versamark, Versafine (Black Onyx), Memories dye based (Blue)
  • Fine detail embossing powders (silver, black)
  • Spectrum Noir alcohol ink pen (black)
  • Polychromos pencils (green, white)
  • Mr Huey’s Color Mist Spritzers (Leaf Green and Sunshine)
  • Viva Décor Kristall Gel (dark cerise – 501) and acrylic paint (lime)
  • Pebeo Gilding Wax (Silver)
  • Inscribe glitter glue (Mermaid)
  • Heart sequin waste (to use as stencil) and Texturised stencil (Crafters Workshop – Ronda Palazzari)
  • Dies: Pin Dot Hearts (Tattered Lace), Ornate Gateway (Heartfelt Creations), optional Small Easel (Tim Holtz BigZ die)
  • 3D glue gel and foam pads
How to make it:
  1. Trim the mount board to approx. 22 X 14cm. Using a craft knife score a border around the edge and peel away the top layer of card from the edge.
  2. Stamp the ‘be the change ……’ sentiment around the edges with Versamark and heat emboss with silver powder.
  3. Stamp the verse onto white card with black ink and cut out sections to create the word embellishments. Edge with black pen.
  4. Stamp the arches onto the background panel with Versamark and heat emboss with black powder. Colour with green and white pencils. Apply glitter glue around the edges. Then lightly apply gilding wax around the edges to give a metallic distressed look.
  5. Spritz some cream board with the green and yellow sprays. Use the Mini Scripts stamp to add texture into the wet paints. Once dry stamp again with blue ink. Cut into three strips and edge with black pen.
  6. Die cut hearts from black card. Using a spatula apply paste or acrylic paint through the stencils to create added texture on the background, plus the hearts and smaller panels. Once dry apply more gilding wax.
  7. Die cut decorative ‘toppers’ from black card. Apply gilding wax to pick up texture, and glue to the back of the upper edge border.
  8. Mount the smaller panels with foam pads (to give even depth) and other embellishments with 3D glue gel.
I die cut an easel from scrap mount board to add to the back as a stand. Alternatively it could be made into a hanging.

Saturday, 11 June 2016

Buddleia Created using the small flower stamps from the Spinney set from Chocolate Baroque


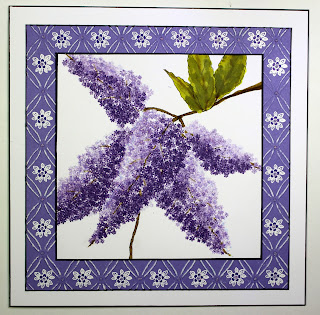
I used the small solid silhouette floral stamps from the Design-A-Tree Spinney stamp set from Chocolate Baroque to create this Buddleia.

Materials:
 Step by step:
  1. Emboss the purple card using the embossing folder. Sand back to reveal the white core. Stamp the small open flower with Versamark and heat emboss with the white powder. Colour with the glitter marker. Add glitter glue dots.
  2. Gently outline the position of the branch and flower heads by drawing with the soft pencil.
  3. Using the small solid flower stamps and Dusty Concord Distress Ink, stamp the flowers following the outline of the drawn flower heads as a guide. Work quickly and repeat stamp without re-inking, placing the strongest ‘first generation’ ink on the lower edges of the flowers, working the ‘second’ and ‘third generation’ stamping across the flower so that the darkest ink is at the base, changing to lighter ink near the top of the flower head. The trick is not to think too hard – just ‘go for it’.
  4. Using the fine tipped pen draw the detail of the leaves and branches. Colour using the brown and green Distress Inks and a damp brush. Dot some of the purple glitter pen onto the lower sections of the flower heads, and some stickles on the upper sections to give sparkly highlights.
  5. Outline the base card, purple mat and topper with black alcohol pen to frame. Glue together. Use foam pads if desired to add further dimension to the layers.

Sunday, 29 May 2016

Steampunk Flower Stepper Card Created for Chocolate Baroque


I love this Punky Flower stamp set from Chocolate Baroque. This is a variation of a previous card that I made for a friend. I created this one for the recent TV shows on The Craft Channel; stamping, cutting out and layering up the images.
I also used one of my favourite dies, the Decorative Centre Stepper from Tattered Lace. Perfect for building up layers and dimension.

Materials:
 Step By Step:
  1. Cut the decorative stepper card from the cream card. Use the included mat and layer dies to cut the background mats from gold pearl paper and the panels from stamping card. Also cut a small tag from stamping card (also included in the stepper die set) and several cogs from Kraft card.
  2. Use the embossing folder to create the gear textures on the side panels, corner of the tag, and lower section of the large front panel.
  3. Colour the panels using Mustard Seed, Carved Pumpkin and Gathered Twigs Distress Inks, applying with a sponge. Also add a bit more colour to the die cut cogs.
  4. Randomly apply some Versamark Ink over the die cut and embossed cogs. Heat emboss with a mix of the Gold, Copper and Verdigris embossing powders. Also sprinkle some of the powder randomly over the background and heat from underneath to melt. Outline the main panels with black marker to frame.
  5. Glue the background and main panels onto the card blank. Add ribbon to the tag.
  6. Stamp the images with Versamark and heat emboss with the fine gold powder. Colour with Mustard Seed, Carved Pumpkin and Peacock Feathers Distress Ink. Apply the colours to a craft mat, pick up with a damp brush and paint the colours. Colouring is easy within the gold embossed outlines. Cut out the images for decoupage.
  7. Apply the cut out images and die cuts with 3D glue gel to give added depth.

Tuesday, 10 May 2016

Flowering Baroque Heart Easel Cards created for Chocolate Baroque


I love this month’s new Flowering Baroque Heart stamp from Chocolate Baroque. I just had to combine it with heart dies from my stash and some die cut flowers that I shaped to co-ordinate with the stamped floral image. I love creating shaped cards so decided on a set of easel cards using a large die cut bloom as a stopper.

I haven’t used my opaque gouache paints in ages so thought I would do something a little different with the colouring and stamp the image onto black card. I love the dramatic effect.


Materials:

  • White, black, blue and teal plain card
  • Paints: opaque gouache (colours mixed: red, blues, teals, pinks) and gold water based paint with mica
  • Spectrum Noir alcohol ink pens (blues, teals, pinks)
  • Black PVA pearls
  • Fine tipped markers: black and white
  • Heart Dies: Tattered Lace Pin Dot Hearts and Pearl Pin Dot Hearts
  • Floral Dies: Tattered Lace Floral Layers (All About The Middle, Leaves 4 and Rose die sets)
  • 3D glue gel


How it was done:

  1. I first cut the largest decorative heart, one in teal and one in black. A plain black heart was cut and glued onto the teal decorative heart. The Flowering Baroque Heart was then stamped directly onto the black card using Versamark. The images were then heat embossed with clear powder.
  2. The images were coloured with the gouache paints, using the gold mica paint to colour the stamens. The outer border of the black decorative pearl heart was also coloured with gouache.
  3. I used the plain heart dies to create the card blanks (in blue and teal) and inner black mats. The card was folded in half and the upper edge of the heart die placed so that it extended above and over the fold (cutting through both layers of card). The front panel was then scored horizontally to create the fold back for the easel. The topper was then glued onto the lower half of the front fold back.
  4. The leaves and flowers were cut from thin white card and coloured with alcohol markers. I like using alcohol markers on 3D shaped items as the ink bleeds through colouring both sides of the card at once. They were shaped with a ball tool and embossing mat. To create the large flowers I snipped the petals to separate them and glued to a small circle of card to create the 5 petalled flowers. The stamens were cut in black card. The smaller petals were used to create the buds.
  5. Fine tipped pens were used to add faux stitching around the hearts. Black PVA pearls were dotted around the pearl heart frame. Glitter glue was applied to the flowers and stamped image for extra sparkle. The flowers were attached using 3D glue gel.


Wednesday, 6 April 2016

Unicorn Decorative Stepper Card (using Tattered Lace dies)

I have mixed & matched die cuts with electronic cuts using the Brother ScanNCut and a Tattered Lace USB stick for this one. I have also used an old wood mounted unicorn rubber stamp from my stash and lovely fern stamp from Chocolate Baroque.

Birthday Card Stepper – Giving Dimension to the Scene
Birthday Card Folded Down

Materials Used:
·         Tattered Lace dies: Decorative Centre Stepper (ETL71), Pin Dot Decorative Rectangles (ETL93), Floral Layers Echinacea (ETL120), Floral Layers All About The Middle (ETL121)
·         Tattered Lace USB Stick No.1 (Flowers and Foliage) for the Brother ScanNCut – Big Fern and Ferns designs. Alternatively use the dies: Big Fern (D379) and Ferns (D5909)
·         A4 thick white card stock to make the shutter card
·         Thick white card suitable for stamping and wet media
·         Thinner white card suitable for the ScanNCut
·         Unicorn rubber stamp (old from my stash – Co-Motion stamps), Fern rubber stamp (Chocolate Baroque – Wild Meadow set), Sentiment clear stamps (Personal Impressions).
·         Dark blue alcohol marker and fine tipped black marker
·         Grey watercolour pen (Spectrum Aqua – Charcoal)
·         Inkpads: Memories (blue), Memento (London Fog), Distress Ink (blues: Broken China and Tumbled Glass; greens: Crushed Olive, Mowed Lawn, Old Paper, Shabby Shutters; Yellow: Mustard Seed, and Orange: Carved Pumpkin)
·         Stickles glitter glue (Diamond)
·         Paint brush and Cut ‘N’ Dry Foam
·         Ball tool and soft mat for flower shaping
·         Acrylic glue and 3D glue gel

Step By Step:
1.    Cut the shutter card in white card.
2.    Cut the side panels and sentiment strip in stamping card using dies from the Shutter Card set, and the central panel using die No. 9 from the Pin Dot Decorative Rectangles.
3.    Keeping the panels within the dies use Cut ‘n’ Dry foam to blend Distress Inks over the background; blues at the top blending into Crushed Olive at the bottom. Outline with the blue alcohol pen to frame. See step 1 picture.
4.    Stamp the three main panels with the fern using Mowed Lawn Distress Ink. See step 1 picture.
5.    Stamp the fern onto the sentiment strip with Peeled Paint Distress Ink. Stamp the Sentiment with Memories Blue ink. See step 1 picture.
6.    Stamp the unicorn onto stamping card with Memento Ink. Use the fine tipped black pen to emphasis the eye, nose and hooves. Colour with the grey watercolour marker, blending out the colour with the brush and water. Finish with a little glitter glue. Cut out with scissors and shape using your fingers. See step 1 picture.
7.    Cut out 6 each of the small Echinacea flower. Colour the flowers with Tumbled Glass Distress ink and then edge using the Blue Memories ink. Shape the petals from the back, turn over and press the ball tool into the centre to give dimension. Layer 2 flowers together offsetting the petals and glue. Add glitter glue to the centres. See step 2 picture.
8.    Cut out 6 each of the small circular stamens. Colour with Mustard Seed Distress Ink and a little Carved Pumpkin Ink. Layer 3 together, glue and press the centres with the ball tool to make them 3D. Add a little glitter glue to the centres. See step 2 picture.
9.    Cut out the ferns on the Brother ScanNCut. Colour with a variety of green Distress Inks. Shape slightly using the ball tool. See step 2 picture.
10. Glue the main mats onto the card with acrylic glue. Use 3D glue for the sentiment mat.
11. Attach the leaves, flowers and unicorn using acrylic glue and 3D glue under raised shaped areas.
Birthday Card Step 1

Birthday Card Step 2