Monday, 26 March 2018

Medieval Chalice created with Powertex


I had fun creating a medieval chalice from an old glass that I have had for years. If you look closely it is actually made from a recycle wine bottle cut in half. The old bottle base is cut off and stuck to the bottle pouring top. The upturned bottle therefore making a new glass. I didn’t make it myself but it was a present from my ex’s daughter and has sentimental value. Now I have a super chalice to fill with cider and enjoy my drink along with good memories.

I wanted to keep the rim of the glass clean as I intend to use it as a drinking glass. I can clean the inside properly and around the rim etc. after use. The outer decoration will be ok with rinsing but obviously will be washed with more care.
For those that of not heard of Powertex – it is a non-toxic environmentally friendly fabric hardener that can be used to treat natural fibres (cotton, wool, silk, wood, MDF etc.) and create items that are weatherproof.
I first stamped some tissue paper (recycled packaging) with Versamark Ink and heat embossed the script image (Butterfly Poppy Collage set from Chocolate Baroque) with metallic gold embossing powder. I also collected some MDF embellishments ready for decorating. The Ankh is from the Pyramid and Ank Trio set, the hares and small cross from the Mini Hieroglyphs set.
As I wanted to keep the glass for functional use I didn’t want to completely cover it with texture and wanted to keep the stem area comfortable to hold. I first painted a band of black ‘all surfaces’ weatherproof glitter paint (Black Diamonds Crystal Glitter) onto the glass to add some interest and texture which will show through the background areas that I wanted to keep fairly smooth. The gold paint that you can see on the base was done some years ago with glass paints – I covered this up in later steps.
Next I tore areas of the script paper and applied them over the glass stem and bowl using Easycoat Mat Decoupage Medium. Tip: I used a water pen to draw around the pieces that I wanted, making it easy to tear shapes in a more controlled way. I sprayed with a little Green Bister just to blend in a little (dabbing off excess dribbles) where the white tissue paper was a little obvious.
Next was true happiness – a fist full of Powertex Clay – tee hee. I mixed some Stone Art with Bronze Powertex (approx. 50:50) with a small addition of Transparent Powertex, working it well into a non-sticky consistency.
Next I cut of square of T shirt fabric to cover the glass base and treated it with Bronze Powertex. I also treated a strip of T-shirt yarn and used it to secure the fabric over the stem base, then wrapped it up around the glass. Snips of textured lace were treated and added around the base plus a strip of treated lace was added to create a border around the top.
A rough slab of clay was rolled out and impressed using the text stamp. This was glued onto the glass front using Powertex. Stems and leaves were moulded by hand and ‘glued’ in place along with the MDF embellishments. Where needed a little Easy Structure Paste was used as a 3D ‘glue’ (painted over with Bronze Powertex to hide the white colour). A faux gem was stuck into the centre of the ankh.
The chalice was then left to dry for a couple of hours.
Next came the fun of dry brushing. I used Rich Gold Colortricx mixed with Easy Varnish first. It looked a little uninteresting in just the one colour so I also dry brushed with some of the new Aqua Metallic Acrylic Ink. Both of these dry very quickly so I just repeated layers of dry brushing until I was happy with the result.
I will leave the vessel for a couple of weeks to fully dry and cure before giving it a final all over coat of Easy Varnish to fully seal it. Et voila! My lovely new drinking vessel. I cannot wait to use it.


Friday, 23 March 2018

Village Street Scene Tutorial created with Chocolate Baroque stamps

Good morning. Today I am sharing a village street scene created with various scene building stamps from Chocolate Baroque. I have included a step by step of how I stamped and masked to build up the scene from the various stamped elements.

Materials:

How to build the scene:
The first thing that I do with scene building stamps is to stamp them all out onto copy paper, trim around and lay them out to decide on placement of the elements.
Once I have chosen which elements I want to use I then carefully trim around the images to create masks. I add just a couple of dots of temporary adhesive onto the back and leave to dry to give a tacky surface to hold down the elements while masking and stamping. If you have masking tissue this is already self-cling/tacky so you don’t need glue.

Next the foreground images are stamped.

Next the foreground images are covered up with the masks and the images that you want to sit behind are stamped.

Further masks are added to cover the stamped images while working backwards through the scene.
Here I left the foreground tree and bush masks in place while stamping the houses. Then I covered the houses while stamping the background. It is not necessary to mask the background silhouette trees as they are solid stamps.
The masks were then removed and a fine tipped marker used to draw in extra elements such as texture on the street and to fill in and extend the solid background trees (i.e. coloured in between the houses).
Extra trees were stamped onto spare card to decoupage onto the foreground.

Wax crayons were used to add a little texture to the roof tops and brickwork. The wax will resist subsequent watercolour.
The scene was then coloured with watercolour pens and a damp brush used to drag out colour and add shading. Extra colour was also painted on by picking up pen colour scribbled onto a craft mat or palette.
The additional trees stamped onto spare card were trimmed and lightly shaped with a ball tool to create foreground bushes and more depth to the scene.


Thursday, 15 March 2018

Quick and Easy New Horizons Scene Card

Good morning. This is a quick and easy make using the Landscape Edges and Steampunkery (sentiment) stamps from Chocolate Baroque.

  1. The background paper was already in my stash and had been created using ink spritzers (purple, yellow and blue with mica), painting and splashing onto wet cartridge paper. Similar could be created with watercolours or Brushos – whatever you have in your stash.
  2. The images were stamped with Versafine. The stamping was touched up with black pen where needed to intensify (note: stamping on textured paper will come out a little grainy).
  3. Brown pencil was used to quickly add shadows and white charcoal (Koh-I-Noor) to add highlights.
Materials:
  • Landscape Edges and Steampunkery stamp sets (Chocolate Baroque)
  • 6 X 6 inch card blank, cartridge paper
  • Ink spritzers (yellow, purple and blue with mica)
  • Versafine (Onyx Black)
  • Fine tipped marker (black)
  • Coloured pencil (brown)
  • Koh-I-Noor Charcoal (White)

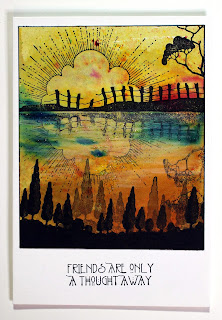
Quick and Easy Friend Card

Good morning. Today I am sharing some quick and easy makes. This one was created with Landscape Edges and Mackintosh Sentiments stamp sets from Chocolate Baroque.

 
The background was painted and spritzed onto cartridge paper with ink spritzers (orange, yellow, red, blue and gold with mica).

 
The images were stamped with Versafine. Distance was created in the foreground by repeat stamping the tree line without re-inking.

The reflection was created by stamping the scene again onto scrap acetate and transferring the wet ink.

White pencil was used to add highlights to the cloud and water. Clear sparkle pen and Stickles were used to add sparkling highlights.

Black marker was used to darken the base tree line and to edge the scene panel (note: stamping onto textured card gives a slightly grainy image).

I used StazOn Ink to stamp my sentiment as my card blank had a slightly shiny coated finish (Versafine would not dry on this). If you have an uncoated card blank then Versafine would work ok.

Materials:

Quick and Easy Love and Happiness Card

Good morning. Today I am sharing some quick and easy makes.


This one was created with Landscape Edges, Sunburst Scenes, Country Views and Birthday Words stamp sets from Chocolate Baroque. It may look complicated but the scene stamps do all the work.
  1. The background was created really quickly by stamping with Versafine onto patterned paper.
  2. The mount board tag was coloured with water based inks and scene images stamped with Versafine. Marker pen was used to draw in the hills and to edge the tag and background panel.
  3. Brown and white pencils were used to quickly add highlights and shadows.
  4. The tag was added to the card with foam mount for added depth. Finished with ribbon flower and PVA pearls.
Materials:

Tuesday, 13 March 2018

My Own Unique Self

Good afternoon. As we have just had International Woman’s Day I thought this one would be appropriate to share this week.

The theme on Simon Says Challenge Blog (Wed) is ‘Girl Power’ – so I have entered this one.

Materials:
  • Tranquility and Artistic Affirmations stamp sets (Chocolate Baroque)
  • 8 X 8 card blank, smooth white stamping card, scrap copy paper (to create masks)
  • Zig 2 way glue pen
  • Shallow tray and shaving foam
  • Ink sprays (green and turquoise)
  • Versafine Inkpad (Onyx Black), Distress Ink (Black Soot)
  • Coloured pencils, glitter pen (gold), sparkle pen (clear)
  • Fine tipped pen (black) and alcohol marker (black)
  • Gilding wax (gold) and glitter glue (gold)
Step by step:
  1. The background paper was created using the shaving foam technique. Inks were dropped and swirled onto a layer of shaving foam and picked up onto the card. Excess foam was then scraped off to reveal the transferred ink pattern. Note: I have found that it can be difficult to add colour on top of these backgrounds. The surface can slightly resist watercolours. However, these monoprints do make fabulous quick backgrounds and I generally create a whole batch at a time to create plenty to keep in my stash for future projects.
  2. The lanterns were stamped onto copy paper and carefully cut out to create masks. A few dots of zig glue were added to the back and left to dry (goes on blue then dries clear to create a tacky temporary glue surface).
  3. The lanterns in the foreground were stamped with Versafine. Working from foreground to background masks were applied over the lanterns to protect them while stamping images behind.
  4. Masks were removed and scene elements added using the fine tipped pen (horizon and water swirls to ground the images).
  5. The image was coloured with pencils and glitter and sparkle pens used to add a bit of bling.
  6. The scene was edged by blending in a little Distress Ink. Black marker and gilding wax was also applied around the edges to frame.
  7. The topper was then mounted onto the card and glitter glue used to add more sparkle to the scene and around the edges.

Saturday, 10 March 2018

Country Cottage Scene created for Chocolate Baroque

Good morning. This is one of my recent show samples with the scene building stamps. I have created a step by step for you, ‘warts & all’ as I made a bit of a mistake with masking! I think that I disguised it reasonably well – tee hee.

Materials:
  • Stamps: Landscape edges (wall and background skyline), Village Life (trees), Townhouses (trees & bushes), English Cottages (cottage, trees & bushes, post box)
  • 8 X 8 inch card blank and stamping card (smooth white)
  • Scrap copy paper (needs to be thin) and temporary glue adhesive (such as zig 2 way glue) or masking tissue
  • Watercolour pens and inks (yellow, orange, brown, turquoise, bright green, olive green, red, pink, grey and black)
  • Fine tipped water resistant pen (black and opaque white)
  • Alcohol marker (black)
  • Versafine (Onyx Black)
  • Pebeo Drawing Gum (masking fluid)
Step by Step:


Planning a rough layout.

The first thing that I do with a set of scene building stamps is to stamp all the elements onto scrap copy paper and roughly cut them out. I then use these to plan a scene, laying them out onto my project to decide on placement. Individual elements that may be needed to create masks (e.g. buildings, trees, bushes etc.) I cut around carefully. Any elements that are silhouette stamps (e.g. solid black trees, branches and foliage) don’t need to be masked so I just cut around roughly. I keep all these cut out elements to use again for future projects.

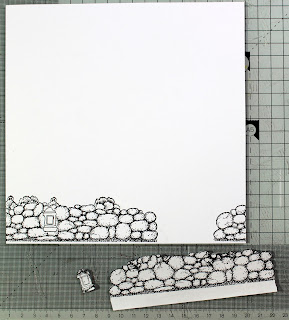
Stamp the post box and cover with the mask before stamping the wall. Using masking you work progressively from foreground to background. Masking ensures that element sits in front of the one behind. Don’t worry too much if you get a few gaps in the image around the masked elements, these are easily corrected with a fine tipped pen.
I put a couple of dots of zig glue onto the back of my masking pieces. It goes on blue and dries clear, and is then a tacky temporary adhesive for holding elements in place while stamping. If you are using masking tissue this already has a tacky backing.

Next stamp foreground trees and bushes. The foreground bush on the left was masked before stamping the ones behind. Cover the trees with masks.

Continue stamping and masking trees and bushes as you work backwards through the scene.

Continue stamping and masking as you work backwards through the scene.

Continue building the scene using masks as needed. Now can you see where I went wrong? I forgot to mask the bushes on the right hand side of the cottage! You can see the base of the house through the bushes. Eeek! I decided to leave it and try and cover up the mistake with the colouring.

Stamp the clouds along the top and the birds into the sky.  Mask the foreground tree and stamp the silhouette tree on the right.
Use the fine tipped pen to draw in elements and extend the background. Try to ‘go with the flow’ and just quickly draw. Rather than solid lines try and be a bit sketchy with light touches, dots & dashes. To give the illusion of perspective draw the path wider as it gets nearer the front of the scene. Draw a letterbox and scribble text onto the post box.

Next cover the cottage and trees using the Drawing Gum. This masking fluid is brilliant. I had always been used to the older stinky rubbery style masking fluid that ruins your brushes. This fluid is fabulous, it paints on easily and washes out instantly with water (treat it as you would an acrylic paint and wash brushes immediately – it will ruin your brush if you let it dry on).
It is not essential to mask before colouring but this makes it much easier to slap colour across the background and leave the elements protected.

Apply ink colours (or watercolour washes) across the background. Work freely working ‘wet in wet’. I used intense coloured inks to create a vibrant scene.

When the background is fully dry rub away the masking fluid.

Now colour the rest of the scene. I used watercolour pens and a damp brush, picking up colour scribbled onto my palette.
Use the fine tipped pen to draw in a few extra details, adding grasses and texture to the path. To keep perspective draw them slightly larger towards the front and reducing in size as you go back. Use the opaque white pen to add a few highlights.
Finally edge the scene with black marker to frame and mount onto the card front.