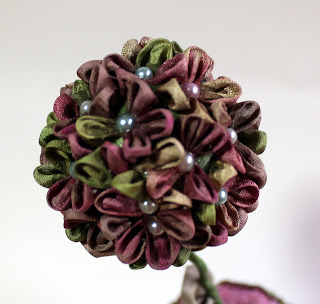
I used Powertex to create a mini vase and to coat a polystyrene ball with silk strips. Powertex is a fabric hardener which stiffens, glues, seals and protects natural fabrics and fibres – great for mixed media work.
I pushed a twisted wire (coated with florist tape) into the base of a small polystyrene ball – gluing with a little Powertex. I then covered the ball with strips of Powertex treated silk and dried before adding the tiny silk petals to build the flowers. I used fast grab PVA to glue them on, and Gemtac Glue to add the centre pearls.
I used larger silk squares to make sepals and a leaf on the stem.
The mini vase was made with the inner card tube from a kitchen foil roll. I built out the shape using pads of kitchen foil and wrapped with masking tape. I then coated it with Powertex and with strips of Powertex treated silk, and secured the wire into the top. I stuffed the middle of the tube with cotton wool to give stability and a bit of weight. I dry brushed over the texture using metallic acrylic paint and then covered with tiny flowers and faux gems.
I painted the little flowers on the vase with transparent Powertex using a small brush. The fine silk soaks it up easily. I left the leaf and pom pom flower untreated as I liked the contrast in feel and texture.
Materials:
- Kanzashi Hydrangea Project Card (Kanzashi Project Card Pack)
- Kanzashi Starch Adhesive
- Transparent Powertex
- Polystyrene ball (approx. 1.5 inch diameter)
- Twisted copper wire wrapped with florist tape (to make stem)
- Recycled sari silk strips (variegated vintage greens, pinks, browns)
- Kitchen foil card inner tube
- Kitchen foil and masking tape (for building out the pot shape)
- Cotton wool (stuffing)
- Faux gems and flat backed pearls (pink, blue, pearl, green)
- Acrylic paint (metallic pink) and PVA glitter glue (green)
- PVA glue (fast grab/tacky glue), Gemtac Glue (sticks glass, plastic or metal gems & beads to fabric)
I used additional tools for making the flowers which are really helpful and make the process easier. They are not essential but you will probably want to get them if you decide that you like this craft.
- Pack of straight and bent fine tweezers – great for manipulating fiddly items such as the small fabric squares while folding. I would say that tweezers of some sort are pretty essential – especially when making these tiny fiddly flowers.
- Kanzashi Flower Making Tool Kit – contains a mini turntable, gluing table and spreader plus a small drying table. Great to have.
- Petal Holders & Medium Drying Table – another useful kit if wanting to make several flowers. Contains 2 sets of petal holders (for small and larger petals) plus a bigger drying table (for more flowers).
- Kanzashi Hanabira Ruler – another great tool for cutting small fabric squares. It can be used with a rotary cutter or to draw cutting lines if you are not comfortable with using a rotary cutter.
- Small rotary cutter and self healing cutting mat. If you are new to using these please take great care as the rotary blade is razor sharp! Always engage the blade safety cover between every cut. Never cut towards yourself, and take care where you place your hands and fingers while cutting.


No comments:
Post a Comment