Wednesday, 5 October 2016

Fragile Seahorse card created for Chocolate Baroque Colour Challenge 27

Good morning. I am loving the sea themed colours for this month’s Chocolate Baroque Challenge. I hope that you like my Fragile Seahorse x.


Materials:
  • Underwater and Mail Art Minis stamp sets
  • 12 X 21cm white card blank, 11 X 20cm watercolour card
  • Ink spritzers (pale blue, mid blue with mica, opaque white)
  • Versamark Inkpad
  • WOW embossing powder (Blueberry)
  • Sea themed or textured stencil (I used Fossil from Andy Skinner)
  • Alcohol marker (dark blue) and fine tipped marker (opaque white)
  • Glitter pen (mid blue)
How it was done:
  1. The card was spritzed with water and the blue inks (I used Mr Huey’s and Lindy’s Stamp Gang spritzers). The stencil was immediately laid on top and the card left to dry naturally. The inks get ‘pulled’ under the stencil surface by capillary action (so you get a negative image).
  2. The card was then spritzed with white ink, the seahorse and sentiment stamped and embossed with blue powder, coloured with glitter and white pens.
  3. The panel and card were then edged with the blue marker to frame the image.

Sunday, 2 October 2016

Style Boutique home decor sample created for Bother ScanNCut

Good morning – I am so excited to have been chosen to join the Brother ScanNCut Design Team. I still cannot believe it. I am so looking forward to creating and sharing my new creative journey with you all.
This is one of my first projects using the lovely set of images and cutting files from the Cutting Craftorium Style Boutique Collection (CD images and SVG files on a USB) recently launched from Tattered Lace on Create & Craft TV.

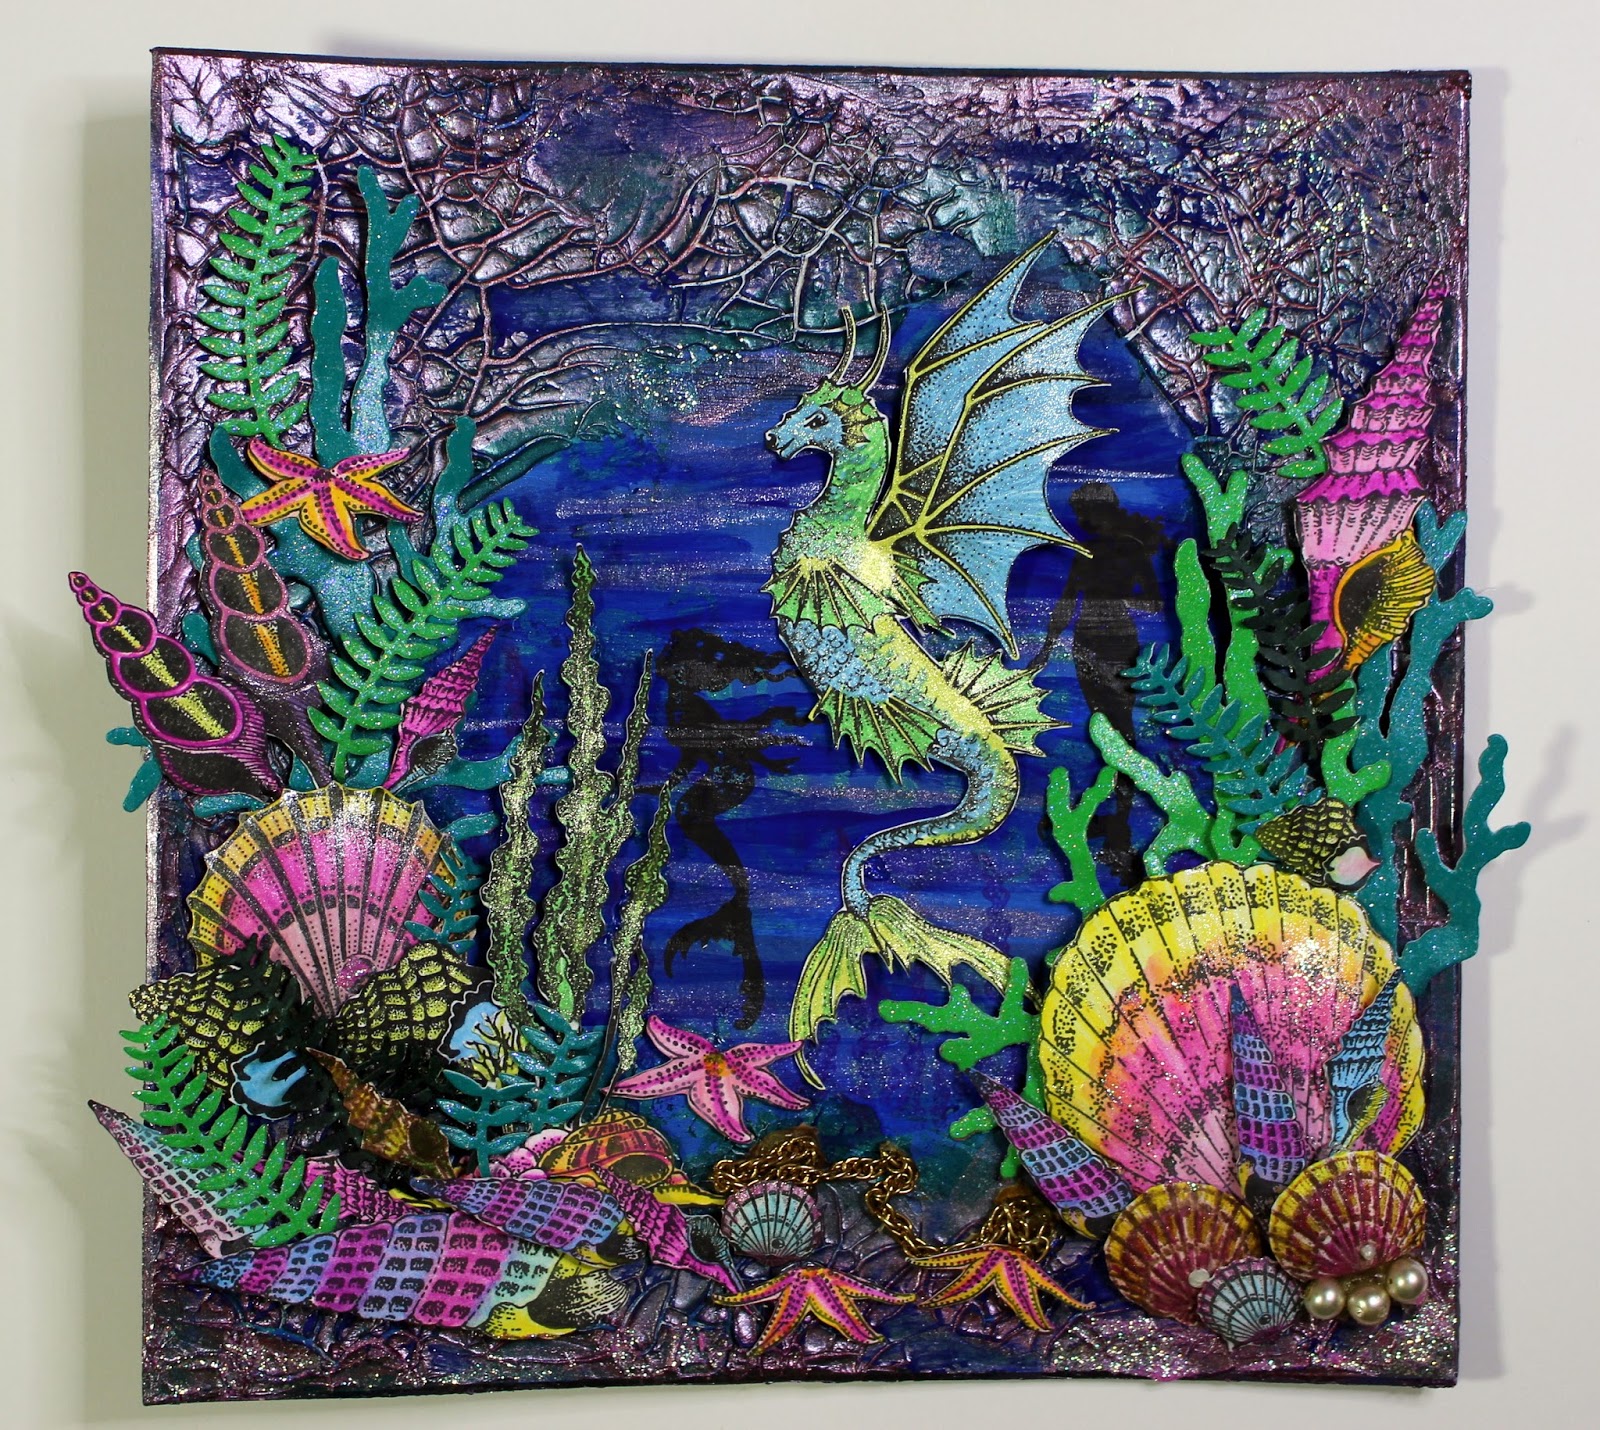
I printed images from the CD and used the ScanNCut to cut out decoupage elements for layering. I hope that you like my mini canvas. I particularly like the sentiment – describes my craft room perfectly! Tee hee.

Anne x

A bit about the Style Boutique Collection:

The CD is packed with wonderful background papers, scenes, ready made toppers, and all the separate images for dressing up some lovely ‘dolls’. Think paper dress up dolls (I used to love playing with those in the 60’s and 70’s). Images include lovely ladies with a range of gorgeous dresses, hair styles, hats, shoes and handbags etc. There is also a young boy and girl doll. There are also templates for A 3D wardrobe and dressing table. Fabulous CD with images designed by Nikki Hall from Polkadoodles.

My Craft Studio Elite software is also included on the CD which enables you to build scenes, resize, recolour etc. This is a great stand alone CD. You can dress the dolls digitally and create projects for printing. Alternatively you could print a sheet of elements to cut out by hand for decoupage or dressing the printed dolls. No need to have a cutting machine.

The USB contains SVG files to cut out the dolls and all the elements which can be directly read by the ScanNCut machine – just insert the USB. SVG files can also be used with many other cutting machines including the Silhouette (with Silhouette Studio Designer Edition software). I also have a Silhouette Cameo and had no problem importing the files into my software. Again this could be used as a stand alone set of images for drawing or cutting – e.g. used pretty patterned papers to cut out the dresses etc. There is also a free SVG download available for drawing the faces on the dolls if you are not confident with drawing them yourself.

Note about My Craft Studio Elite:

I am a complete newbie to My Craft Studio (MCS) software. I generally use Serif Craft Artist for all my digital crafting, importing images and creating digikits as I need. However, as this CD is designed to use alongside that MCS software I simply had to get to grips with it – especially as I wanted to provide project instructions for you all.

Due to the tight deadline for TV show samples I only had one evening to get to grips with the basics! If you have never used it before, don’t be scared. The software really is easy to use and has lots of versatility for advancing and growing with it’s capabilities.

Materials:
Style Boutique CD (image files) and Cutting Craftorium Style Boutique Brother ScanNCut USB (SVG files)
My Craft Studio Elite software (included on the CD)
Photo frame (aperture approx. 11.7 X 16.7cm, to fit 12.7 X 17.7cm mat)
Fine tipped pink glitter pen
Super smooth paper for colour printing (approx. 120gsm)
Card for backing and scrap black card
Standard A4 Colour printer
Brother ScanNCut machine

Summary of how it was done:
Using MCS I loaded a new A4 page and dropped on the Hessian (47) background image. I reduced the opacity to make it paler.

I then dropped on the ready made scene from Lil May’s Wardrobe, centred it and resized it to approx. 15cm high (to fit my frame). I then added a rectangle vignette in pink around the image (to give the effect of inking the edges). Printed the image as shown in the pic below.


I trimmed the printed image and glued to backing card to fit my frame (12.7 X 17.7cm). Note: there is capability of adding shadows in the software and I would add these if I made another. This would give more depth and 3D effect to the image.

Next I added another blank page to my project. I then added individual images from Lily May’s Wardrobe – dropping them onto the scene and resizing them to fit over the elements in the scene. (dresses, shoes, bows, skirt, cat and, T-shirt). Once resized I copied and pasted them to the blank page so that they could be printed out for decoupage.

I copied the dress images (i.e. 2 copies of each for printing). I also added the chair and an extra cat, flipped (tip: right click and select flip – took me ages to work that one out – tee hee) and resized so that they could be used to glue onto the outer frame. I changed the colour of the chair to fit my colour scheme better (green). Finally I added some hearts and flowers in various sizes. See pic below.

As the sentiment was quite small on my project I cropped it from the main image and enlarged it for printing. I trimmed it out and layered onto white card and drew a faux stitched border with pink glitter pen. I glued to the frame (covering the smaller printed sentiment) using 3D glue gel (see pic above).
The cut elements were shaped and glued to the image and frame with 3D glue gel – et voila!


Friday, 30 September 2016

Hydrangea quick and easy cards and tags created for Chocolate Baroque

Good morning. Here is another quick and easy project. Take a look at the Chocolate Baroque DT Blog for more quick and easy project ideas from my Teamies.


Materials:
How to do it:
  1. Stamp the main image and the tag. Trim card and cut out the tag.
  2. Colour quickly by scribbling watercolour pen onto the shaded areas of the stamp. Pull out the colour with a damp brush.
  3. Drag the pen around the outer edges of the card and tag, then use damp foam sponge to blend in from the edges. Also blend in Distress Ink from the edges.
  4. Glue topper to card front and add ribbon to tag. Brush over highlights on the flowers with a little clear sparkle pen.
  5. This quick and easy set is ideal for batch making.

Floribunda quick and easy card created for Chocolate Baroque

Good morning. Here is a quick and easy project using the lovely Floribunda Net stamp from Chocolate Baroque. Check out the Design Team Blog for more quick projects from my Teamies.


Materials:
How to make it:
  1. Stamp the image and sentiment with Distress Ink. Brush over the image with a damp paint brush to add shading and colouring.
  2. Glue and layer onto the blue card and card front. Touch up with glitter glue on the rose petal tips.

Tuesday, 27 September 2016

Mini Indian Canvas created for Chocolate Baroque

Good morning. Today I am sharing a mini canvas for this month’s texture theme.


Materials:
  • Gothics Fragments, Texture Fragments, Indian Elephant, Words of Inspiration stamp sets
  • Mandala Stencil (Martha Stewart) and fossil stencil (Andy Skinner)
  • Mini stretched canvas (21 X 14.5cm), watercolour card (20 X 14cm), scrap stamping card
  • Mod Podge (Matte)
  • WOW embossing powder (Gold detail)
  • Ink sprays with mica – archival type, waterproof when dry (teal, pale pink)
  • Inkpads: archival dye (teal), Versamark
  • Sakura Starlite pens – archival glitter (green, blue, pink, purple)
  • Coloured pencils (greys)
  • Viva Décor Glitter Paste (603 teal)
  • Microbeads (pink multi)
  • Alcohol marker (teal) and fine tipped marker (cerise)
  • Acrylic paint (cerise pearl)
  • Decorative corner punch
  • 3D glue gel
How it was done:
  1. Spritzed the watercolour card with water, teal and pale pink inks. Laid down the fossil stencil while wet and left to dry overnight. The ink gets pulled under the stencil by capillary action giving a negative image.
  2. Randomly stamped the background with the texture stamp and teal archival ink.
  3. Stamped the gothic arch and sentiment with Versamark and heat embossed with the gold powder. Coloured with the glitter pens and fine tipped pink marker.
  4. Applied glitter paste with a palette knife through the mandala stencil. Whilst wet dropped on some microbeads – pressed lightly into surface. Dried overnight.
  5. Stamped elephant with Versamark onto scrap stamping card and heat embossed with gold powder. Coloured with glitter pens and grey pencils, Cut out and shaped slightly. Glued to card with 3D glue gel.
  6. Punched corners and outlined with teal marker.
  7. Coloured outer edges of canvas with acrylic paint.
  8. Glued the card to the canvas with Mod Podge. Also applied over the top to seal the image. Note: I thought that my pink fine liner was archival but it was water soluble! Hence it bled and smeared across the canvas when I applied the Mod Podge – eeeek! However it did add to the texture effect – tee hee.

Sunday, 18 September 2016

Sea Dragon Canvas TV show sample created for Chocolate Baroque

Sea Dragon Canvas - TV show sample created for Chocolate Baroque on The Craft Channel this week.

Materials:
  • Seadragon, Mermaid Queen, Underwater Kingdom, Underwater and Seashell Collage stamp sets
  • White stamping card, teal green glitter card
  • 20cm square canvas board
  • White Gesso
  • Acrylic paints (blues, greens and teal metallic)
  • Viva Décor Croco Crackling Colour (green shimmer -501)
  • Viva Décor Precious Metal Colour (pink)
  • Alcohol pens – for colouring die cuts (greens)
  • Watercolour pencils (pinks, purples, blues, greens, yellow, orange)
  • Versamark Inkpads (Vintage Sepia and Onyx Black)
  • Archival inkpad (dark blue)
  • Watercolour or acrylic transparent shimmer paints (blue, green – for dragon)
  • Recycled jewellery pieces (chains, pearls etc.)
  • PVA pearls
  • Iridescent glitter glue (pink)
  • 3D glue gel
  • Dies to cut seaweed - mixed branches (Heartfelt Creations) and leaves (Couture)
  • Stencils with swirls or water patterns (optional)
How to make it:
  1. Add a coat of white gesso to the canvas. Note: The canvas was already primed but I find that the gesso adds a bit more of a key for adhering acrylic gels etc.
  2. Paint the background with streaks of blue and green acrylics. Add some texture with stencils (if you like).
  3. Stamp some of the weeds etc. with dark blue ink. Stamp the mermaid silhouettes in black ink.
  4. Apply the crackle paste all around the edges using a palette knife and leave to dry overnight. Rub over the crackle texture with some pink metallic paint. Add some sparkly streaks into the water. Rub a little teal metallic in some areas.
  5. Die cut a range of seaweed shapes using dies from plain card (colour with pens) and teal glitter card.
  6. Stamp the dragon, seaweed, shells and starfish onto white stamping card using black ink, and brown ink for some of the shells. Colour with watercolour pencils and a damp brush. Add some shimmer paint to the dragon. Cut out and shape slightly to give them dimension.
  7. Glue on the die cuts and stamped images using 3D glue gel. Add some ‘treasure’ – chain, pearls etc. Add PVA pearls to some of the shells, and extra sparkle with glitter glue.
Finishing your artwork: Optional: Spray the canvas with acrylic varnish. This will protect the canvas, particularly the watercoloured images. I used a Tim Holtz BigZ Easel die to cut a stand from mount board (attached to the back). Alternatively punch some holes and hang with cords.

Sea Dragon card TV show sample created for Chocolate Baroque

Sea Dragon card - TV show sample created for Chocolate Baroque on The Craft Channel this week.
Materials:
  • Seadragon (sea dragon, mermaid, sentiment), Underwater Kingdom (mermaid), Underwater (starfish), Seashell Collage (Wheel and Anchor) stamp sets
  • 6 X 6 inch scalloped card blank, white stamping card
  • Versafine Inkpad (Onyx Black), archival dye ink (blue)
  • Brusho’s (Turquoise, Ultramarine)
  • Metallic paint (silver gold) *
  • Pebeo Drawing Gum
  • Watercolour pencils (yellow, golds, oranges) and brush
  • Alcohol ink marker (black)
  • Decorative Lattice Swirl Die (Heartfelt Creations). If you don’t have these dies, swirly or seaweed like foliage dies would produce a similar result.
* I used Starlight paint (Imagination Crafts) but the Aztec Paints featured in the shows this weekend would be perfect.
How to make it:
  1. Stamp the Sea Dragon with Versafine and mask with the Drawing Gum. Trim to approx. 10 X 14cm and edge with black pen.
  2. Drop Brusho crystals onto the card and spritz with water.
  3. Colour extra card with Brusho’s for die cuts. Cut out the swirly trellis with dies.
  4. Stamp the anchor, starfish and wheel with Versafine onto spare card and cut out. Stamp the sentiment with blue ink, cut out and edge with black marker.
  5. Stamp the silhouette mermaids with blue ink. Remove the masking from the dragon, colour the dragon and starfish with watercolour pencils. Add some shimmer paint to the dragon.
  6. Layer elements and glue to card front.