Thursday, 30 June 2016

Baroque Ornament Palm Fan Silhouette and Teardrop cards created for Chocolate Baroque


Good morning. Today I have 2 cards to share with you using the lovely Baroque Ornament stamps.


Project 1 – Palm Fan Silhouette
Materials:
  • Baroque Ornament Palm Fan Silhouette and Indian Elephant stamp set
  • 7 X 7 inch card blank and approx. 6 inch circle plus a scarp of stamping card
  • Inkpads: dye based (violet), multi-coloured (blue and violet), Versamark
  • Alcohol ink marker (violet)
  • Glitter pens (pink, purple, blue)
  • WOW embossing powder (Blueberry)
  • Glue pen and fine crystal glitter
  • 3D glue gel and foam pads

How to make it:
  1. Stamp the ornament and emboss with blue powder. Colour with glitter pens. Cut out the ornament. Snip into the petals and lift and shape. Using the glue pen ‘colour’ the outer sections and sprinkle with the glitter.
  2. Place the cut out ornament onto the circular mat and mark the outer positions of the image by dotting lightly with a soft pencil. Next draw in lightly cross sections of the circle to create 12 segments in total. This is to help you align for stamping. Stamp the small motif 12 times around the circle using the multi-coloured inkpad. Also stamp in the corners of the card blank.
  3. Edge the circular mat with a little dye based ink. Edge the card blank and circle with the alcohol marker to create a frame.
  4. Mount the ornament onto the circle using 3D glue gel for added dimension. Mount this onto the card blank using 3D foam.
  5. Finish with a little more glitter for extra sparkle. 

Project 2 - Teardrop
Materials:
The materials used were as above except using the Baroque Ornament Teardrop stamp, and with the addition of turquoise PVA pearls.

How to make it:
This one was made in a similar way to the first card. In this case the ornament was stamped twice and the central section cut, offset and layered onto the base one. Turquoise PVA pearls were used to finish.

Wednesday, 29 June 2016

Secrets of the Deep Card created for Chocolate Baroque Colour Challenge 24

Here is another project created for the Chocolate Baroque Colour Challenge 24. I am a little unsure about this one but it is certainly Fairy tale and vibrant. If I made it again I think that I would make the sea colour and the mermaids little paler. This would give a little more depth and less clash.
Materials:
·         Underwater, Underwater Kingdom, Sea Dragon and Mermaid Queen stamp sets.
·         Spectrum Noir Aqua markers, glitter pens.
·         White card, yellow card (for die cuts), glitter card (orange), white stamping card.
·         Zig 2 way glue pen.
·         Pebeo Drawing Gum.
·         Midas touch gold foil (for cold foiling with glue).
·         Inkpads: Versafine (Onyx Black) and dye based (violet).
·         Circular nesting dies, largest 15cm (TODO Basic Circles), branch dies (Heartfelt Creations Leafy Branch), eyelet die (Sizzix Originals Red die – Eyelet Washers #1).
·         3D glue gel and foam pads.

How to make it:
1.    First create a card blank using an A4 sheet of card folded in half. Cut through both layers with a 15cm circular die, overhanging the die at the top folded edge so that an attachment fold for the front and back stays intact. I also cut an extra circle of card to glue to the back and add strength. Trim the base of the card slightly to give a straight edge at the bottom so that the card stands up ok.
2.    Cut a ‘port hole’ frame from glitter card using a 15cm and 11.5cm circular die. I glued another plain card frame to the back to give extra strength.
3.    I used some scrap mount board and the Sizzix BigZ die to cut the thick eyelets. Alternatively you could glue together a few layers of ordinary card to make the ‘chipboard’ eyelets. Apply Zig glue (blue when wet) to the eyelets and leave to dry and go tacky (dries clear). Press foil, shiny side up, onto the tacky surface to add foiling. Glue to the port hole frame with 3D glue gel.
4.    Cut another circle from stamping card. Stamp the foreground scene with Versafine ink and paint with Drawing Gum to mask. Stamp the embellishments onto spare card and cut out.
5.    Colour the scene background with watercolour markers and a water brush. Stamp the background mermaids with dye ink. Dry.
6.    Remove the masking fluid. Colour the scene details and cut out embellishments with watercolour markers.
7.    Cut branches from yellow card. Add a little shading with pens.
8.    Glue the scene flat to the card. Apply the frame with foam pads.
9.    Shape the cut out embellishments slightly with fingers or a ball tool and foam mat. Glue with 3D glue gel. Finally finish with a little glitter glue for added sparkle.

Saturday, 25 June 2016

Take Time mixed media tag screen created for Chocolate Baroque

The last of my recent TV show sample created for Chocolate Baroque on The Craft Channel using the Words of Wisdom, Gothic Fragments and Mini sets.
This is a tricky one to give a full step by step but I will do my best.
Anne x.
Laid flat

Standing Screen

Back showing hinges


Materials:
  • Words of Wisdom, Gothic Fragments , Mail Art, Curiosities and Mini Scripts stamp sets
  • Cream mount board, cream and white stamping card, black card
  • Inkpads: Versamark, Versafine (Black Onyx), Distress Inks (Victorian Velvet and Old Paper)
  • WOW embossing powders (Pomegranate)
  • Spectrum Noir alcohol ink pen (black)
  • Glitter pens (pink, purple and green)
  • Mr Huey’s Color Mist Spritzers (Leaf Green, Sunshine and Blue)
  • Viva Décor Kristall Gel (dark cerise – 501) and acrylic paint (lime)
  • Pebeo Gilding Wax (Silver)
  • Inscribe glitter glue (Mermaid), glitter (blue/green)
  • Heart sequin waste (to use as stencil) and Texturised stencil (Crafters Workshop – Ronda Palazzari)
  • Dies: Pin Dot Hearts (Tattered Lace), Artist Trading Card and Tags #3 (Sizzix BigZ die), Hinges, Latches, Handles and Photo Turns (Sizzix Originals Red die), smaller tags (Trimcraft)
  • 3D glue gel and foam pads
How to make it:
  1. Die cut 5 tags from waste mount board and randomly spritz the backs with inks and paint with acrylic. When dry apply pink Kristall Gel through the sequin waste with a palette knife to cover the backs. Randomly drop some glitter into the wet gel.
  2. Cut hinges from black card and join the tags using 3D glue gel to make a panel. Apply gilding wax to get a metallic effect.
  3. I reinforced the hinges with some silver duct tape across the tag fronts. This was so they will cope with lots of handling while on the shows. It will not be archival so possibly the glue will seep through into the artwork with time. I believe that there are specialist tapes available, used by Scrapbookers for creating albums etc. I would recommend a proper tape when creating something that you want to last over the years.
  4. Cut 5 more tags from cream stamping card. Randomly colour with inks. Dry.
  5. Stamp the poem onto white card with black ink. Cut out the words and phrases and edge with black alcohol pen.
  6. Cut 3 smaller tags decorative tags from cream card. Colour with Distress inks and add texture with the mini crackle texture stamp. Stamp with the mini ‘love’ and ‘dream’ verses and the building.
  7. Cut small hearts with black card. Colour with acrylics, texture gel and gilding wax.
  8. Stamp the mandala from the Gothic Fragments set onto the top of each main tag with Versamark and heat emboss with the pink powder. Stamp the scenes with Versafine. Colour with glitter pens and Distress inks.
  9. Add more texture with the crackle stamp and with the paste and sequin waste. Dry.
  10. Stick down the main tags flat onto the tag screen with acrylic glue. Stick down all the embellishments with 3D glue gel. Finish with glitter glue.

Take Time To Love mixed media canvas created for Chocolate Baroque


This was another of my recent TV show sample created for Chocolate Baroque on The Craft Channel using the Gothic Fragments stamp set. Sorry that it has taken so long to blog the details – never enough hours in a day – tee hee. I had a lot of fun making this one. Anne x.
Materials:
  • Words of Wisdom, Gothic Fragments and Mini Scripts stamp sets
  • Dark green mount board, smaller piece of cream mount board, white stamping card, black card
  • Inkpads: Versamark, Versafine (Black Onyx), Memories dye based (Blue)
  • Fine detail embossing powders (silver, black)
  • Spectrum Noir alcohol ink pen (black)
  • Polychromos pencils (green, white)
  • Mr Huey’s Color Mist Spritzers (Leaf Green and Sunshine)
  • Viva Décor Kristall Gel (dark cerise – 501) and acrylic paint (lime)
  • Pebeo Gilding Wax (Silver)
  • Inscribe glitter glue (Mermaid)
  • Heart sequin waste (to use as stencil) and Texturised stencil (Crafters Workshop – Ronda Palazzari)
  • Dies: Pin Dot Hearts (Tattered Lace), Ornate Gateway (Heartfelt Creations), optional Small Easel (Tim Holtz BigZ die)
  • 3D glue gel and foam pads
How to make it:
  1. Trim the mount board to approx. 22 X 14cm. Using a craft knife score a border around the edge and peel away the top layer of card from the edge.
  2. Stamp the ‘be the change ……’ sentiment around the edges with Versamark and heat emboss with silver powder.
  3. Stamp the verse onto white card with black ink and cut out sections to create the word embellishments. Edge with black pen.
  4. Stamp the arches onto the background panel with Versamark and heat emboss with black powder. Colour with green and white pencils. Apply glitter glue around the edges. Then lightly apply gilding wax around the edges to give a metallic distressed look.
  5. Spritz some cream board with the green and yellow sprays. Use the Mini Scripts stamp to add texture into the wet paints. Once dry stamp again with blue ink. Cut into three strips and edge with black pen.
  6. Die cut hearts from black card. Using a spatula apply paste or acrylic paint through the stencils to create added texture on the background, plus the hearts and smaller panels. Once dry apply more gilding wax.
  7. Die cut decorative ‘toppers’ from black card. Apply gilding wax to pick up texture, and glue to the back of the upper edge border.
  8. Mount the smaller panels with foam pads (to give even depth) and other embellishments with 3D glue gel.
I die cut an easel from scrap mount board to add to the back as a stand. Alternatively it could be made into a hanging.

Let it be Gothic Fragments card created for Chocolate Baroque

This was one of my TV show sample created for Chocolate Baroque on The Craft Channel using the Gothic Fragments stamp set. Sorry that it has taken so long to blog the details – never enough hours in a day – tee hee.
Anne x.

Materials: How to make it:
  1. Colour the yellow card randomly with diluted Brusho colours and spritz with gold mica spray.
  2. Stamp randomly with the texture stamp using darker Brusho colours. Cut out with a tag die.
  3. Stamp the arch with Versamark and heat emboss with gold powder. Stamp the sentiment with black ink and edge the tag with alcohol marker.
  4. Trim a strip of card away from the right hand side of the card front. Stamp the inside edge of the card with Versamark and heat emboss with gold powder. This then creates a border visible on the card outer.
  5. Stamp and heat emboss the card front with the texture stamp.
  6. Attach the tag and embellishment using 3D glue gel. Finish with the sparkly faux gems.
  7. I used a ready-made bead and wire embellishment from my stash, but it would be easy to make from left over 4mm beads and some copper jewellery wire (use 0.6 to 0.8mm thickness for stability – depending on your bead hole size).

Another Quick and Easy Project using stamps from Chocolate Baroque

Here is another quick and easy stamping project for you – make this in under 15 minutes.
I also created this for the recent TV shows with Lesley Wharton on the Craft Channel demonstrating the Punky Flowers stamps.
Materials: How to make it:
  1. Trim the patterned paper slightly to fit the card front and leave a small border. Edge with dark blue pen to frame.
  2. Stamp the sentiment with Versamark and emboss with the blue powder. Mask the lettering with a scrap of paper (to cover) and stamp the flowers. Emboss by sprinkling with blue and yellow powders. Note: keep the excess powder in a separate pot – it makes a nice mix for vintage projects.
  3. Glue to the card front and add the bow.

Saturday, 18 June 2016

Patchwork Bag Created from Vintage Fabric Lyon Silk Samples


I made this bag a little while ago but thought that I would share. A friend gave me a lovely fabric pattern book of samples containing beautiful embroidered vintage silks from Lyon (c 1960’s ?).

Stunning fabric samples but how was I going to use lots of smaller offcuts? I decided to create a patchwork bag. I hope that you like it.


Firstly I cut out 22 X 4.5 inch squares using a quilting ruler and rotary cutter. Every square was a different combination of background and embroidery colour, many with a cream background and others with a variety of pastel colours. The embroidery also varied from pastel shades through to intense browns, greys and purples. I laid them all out to decide how best to combine them together. I also decided to alternate the embroidered flower orientation – just thought it looked better.
Next I joined rows of the squares stitching with a quarter inch seam allowance, creating 4 inch finished patchworked square blocks. I stitched them on my overlocker to ensure that the seams were well finished and edges enclosed. Silk can fray easily and I needed it to be hard wearing for a bag. Many domestic sewing machines will also have a version of an overlock stitch for finishing the seams.
Looking at the picture I joined the top left squares to create a row of 2 blocks. Working down from the top left I then stitched a row of 4 squares, then 2 rows of 5 squares, another row of 4, and finally a row of 2 squares from the bottom right. Next I joined the rows lining up the seams to ensure neat aligned junctions where the points of the squares join.
To make the patchwork fabric more robust and stable to function as a bag I then pinned it to some cotton curtain interlining (think it is called cotton bump) and added quilting. I used a variegated embroidery rayon and quilted swirling contour patterns following the outline shape of the embroidered elements. To achieve this I dropped the feed dogs on my machine and used free machine embroidery/quilting with a fine polyester thread in my bobbin.
On the upper left of the pic is a sneak peak of some other embroidered fabric samples in my stash – I really must make something with them soon.
Quilting around the embroidered elements made them puff up slightly. This then gave me the idea to accentuate this. I made small snips in the backing fabric and stuffed the back of the embroidered flowers with a little polyester stuffing. I then hand stitched the holes with herringbone stitch to hold in the stuffing. Finally I  trimmed away the excess cotton bump from the edges.
I made a quilted lining in cream fabric to match the shape of the front fabric. I added some pockets for the inside.
I sewed small leftover blocks of fabric together to create the handles, 2 inches wide by approx. 20 inches long. Again I quilted these using cotton bump as a backing. I cut strips of lining to match and stitched them together with right sides facing, and turned them through (finished size 1.5 inch X approx. 20 inch).
The construction of the bag is not what you might expect. I got the idea from a lovely book by Sue Hawkins (Heavenly Handmade Bags 2006). Looking at the picture: First join edges A together, again with a quarter inch seam, repeating for each bag side. This forms the base of the bag. The join B to B, and C to C, repeating on each side. Finally join D to D leaving block edge E free. You now have the bag shape.
I constructed my lining shape in a similar way but left one of the A to A sections unstitched. With right sides together and handles in position at the points on the bag top I then stitched the bag and lining together and turned through the gap left in the lining. The gap was then hand sewn using a ladder stitch (so not visible).
I was delighted with my bag and being able to show off those lovely vintage fabrics.


Wednesday, 15 June 2016


I so enjoy the monthly colour Challenges. Looking forward to seeing all the inspiration from my Teamies and of course all of your FAB creations too.
This was also one of my samples for the recent TV shows with Lesley Wharton demonstrating Brusho inks on The Craft Channel.

Anne x.


Materials:

  • Purple A6 card blank and white stamping card
  • Alcohol marker (black) and glitter gel pen (purple)
  • Water based inks (yellow, orange, purple) - Spectrum Noir Aquatints
  • Versamark and dye based inkpad (purple)
  • WOW embossing powder (Detail White)
  • Dishwasher salt


Step By Step:

  1. Trim the stamping card to fit the card front leaving a small border.
  2. Paint the background with the inks. Add a few splatters, drop on some dishwasher salt and leave to dry. This creates an interesting texture. I have used ready mixed vibrant inks but you could use Brusho’s.
  3. Stamp the gears with Versamark and heat emboss with white powder. Colour with the purple glitter pen.
  4. Stamp the sentiment with purple ink. Edge the card with black marker and glue to the card base.

Tuesday, 14 June 2016

Baroque Ornament Palm Fan Silhouette card created for Chocolate Baroque


The Baroque Ornament stamps, new out this month from Chocolate Baroque, are simply gorgeous. Here is my first project using the Palm Fan Silhouette stamp. I combined it with a pretty background paper from Crafty Individuals.
Materials:

Step By Step:
  1. Stamp the ornament onto the centre of the patterned paper with Versamark. Emboss with a mix of the embossing powders to create a vintage effect.
  2. Colour with the aqua pens and cut out. Cut around the central petals and lift to give shape. Glue to another patterned paper sheet.
  3. Colour the outer border with the yellow pen and edge with the black marker.
  4. Stamp the border onto the cad base with the pale ochre ink. Edge the card with the black pen to frame.
  5. Glue to the topper onto the card front.
  6. Add dots of glue around the border and sprinkle with the fine glitter. Add PVA pearls and sprinkle with glitter. Remove excess glitter when dry.
  7. Finally add Glossy Accents to the outer layer of the ornament.

Sunday, 12 June 2016

Quick and Easy stationary set using Punky Flowers stamps from Chocolate Baroque

I have created some tags to go with the quick and easy notelets that I made previously using the Punky Flowers stamp set along with some patterned papers from my stash. If you missed that post I have given step by step for everything here.


To keep the set together I have also created a stationary wallet.  This obviously takes a little time with measuring and scoring but it is really easy. I created myself a paper template first to check that the pieces fitted together ok, but also to keep in my stash for future use.

This is a very simple wallet with an outer sleeve and 2 inner pockets. It could easily be adapted with the addition of a flap closure or possibly made into a pizza style box so that it is all enclosed to keep the notelets safer.

Great quick projects that are ready for those emergency cards and gift tags for any occasion. Why not decorate some envelopes to match too.

This was also sent in as a sample for the recent TV shows on The Craft Channel with Lesley Wharton.


Materials:


Optional for wallet: Gold gilding wax, edger die (Heartfelt Creations – Regal Borders and Pockets) and scoring board with box and lid scoring sides (I have the Ultimate Pro system from Crafters Companion)

Step By Step:

Notelets:

Choose patterned papers with a subtle Baroque style pattern. Trim to 10 X 14.5cm to fit the A6 card front leaving a border. Edge with the black marker to frame.
Stamp with Versafine and heat emboss the image using the clear powder. This makes colouring really quick and easy and adds a bit of textural interest.
Colour with glitter pens choosing a darker colour version to match with the paper.
Attach a ribbon strip and glue to the card front.
Finish with PVA pearls.
Tags:

Trim the patterned papers to fit the die cut tags. These are then stamped and coloured in the same way as the notelets (above).
Notelet Folder:
Take an A4 sheet of Kraft card and trim off approx. 3cm (see template picture).
Find the centre and make 2 score lines 2cm apart (1cm either side of the centre) to create the spine (important – see tip below).

Cut 2 more pieces for the pockets at 17 X 13cm. Score 3 sides at 1 and 2cm depth in from the edge (see template picture). Trim away the square corners.

Mark approx. 5.5cm up from the bottom edge and cut across on a diagonal. Use a trimmer or a decorative edger die. Make the 2 pockets a mirror image of each other (see the open folder picture to see how the pockets are placed). I used one of my decorative edger dies and added a little gilding wax along the edge.
Tip: In order for the pockets to fit inside the outer folder and close neatly the spine needs to be slightly wider than the combined pocket depth. I achieved this on my ‘boxer’ scoring board by using the ‘lid’ side to create the outer spine (actual measurements i.e. 2cm) and the ‘box’ side to score the pockets (which are actually slightly under the 1cm). These score boards are designed to make the base slightly smaller than the lid to accommodate and enable fitting of lids onto boxes. If you do not have one of these then just make the depth of the spine a little over 2cm and it will work for you.
Trim decorative papers to fit on the outside and inner panels of the sleeve. Edge with marker. Stamp the front panel and add ribbon to match the notelets.
Fold in the pocket edges and glue onto the sleeve. If you align the bottom edges of the pockets with the outer sleeve it will stand upright on the desk.


Saturday, 11 June 2016

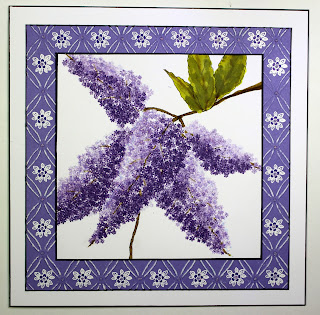
Buddleia Created using the small flower stamps from the Spinney set from Chocolate Baroque


I used the small solid silhouette floral stamps from the Design-A-Tree Spinney stamp set from Chocolate Baroque to create this Buddleia.

Materials:
 Step by step:
  1. Emboss the purple card using the embossing folder. Sand back to reveal the white core. Stamp the small open flower with Versamark and heat emboss with the white powder. Colour with the glitter marker. Add glitter glue dots.
  2. Gently outline the position of the branch and flower heads by drawing with the soft pencil.
  3. Using the small solid flower stamps and Dusty Concord Distress Ink, stamp the flowers following the outline of the drawn flower heads as a guide. Work quickly and repeat stamp without re-inking, placing the strongest ‘first generation’ ink on the lower edges of the flowers, working the ‘second’ and ‘third generation’ stamping across the flower so that the darkest ink is at the base, changing to lighter ink near the top of the flower head. The trick is not to think too hard – just ‘go for it’.
  4. Using the fine tipped pen draw the detail of the leaves and branches. Colour using the brown and green Distress Inks and a damp brush. Dot some of the purple glitter pen onto the lower sections of the flower heads, and some stickles on the upper sections to give sparkly highlights.
  5. Outline the base card, purple mat and topper with black alcohol pen to frame. Glue together. Use foam pads if desired to add further dimension to the layers.

Wednesday, 8 June 2016

Card created for the Chocolate Baroque Colour Challenge 23


I am loving the Colour Challenge this month – just my colours. I have used Brushos for the background and the Gothic Fragments stamp set. I have stamped and cut out the elements, so there is no tricky masking involved. I hope that you like it.

I also sent this one in as one of the TV samples for the recent TV shows on the Craft Channel. Lesley is a fabulous demonstrator – so do look out for the shows and catch up online.
Materials:

Step By Step:
  1. Colour the watercolour card with Brushos. Drop crystals into the wet ink and spray with water to get a mottled effect. Spray randomly with mica spray to add more texture and sparkle. Leave to dry.
  2. Stamp the die cut banner background texture with pale turquoise ink and emboss with the clear powder. Stamp the sentiment in dark turquoise.
  3. Stamp the main images onto smooth card with Versafine. Colour with watercolour pens and cut out.
  4. Trim the watercolour card slightly smaller than the card blank and glue down. Glue on the stamped fragments and sentiment banner.
  5. Edge the card with black marker and add faux stitching around the border with white pen.
  6. Finish with a little glitter glue, PVA pearls, die cuts and organza bow.

Diamante Delights created for Chocolate Baroque Challenge 23


I have so loved the colour challenge this month that I couldn’t stop! Here is another for you. I have also been brave and finally used my Gelli Plate for printing the background. I don’t know what I was scared of – fabulous fun!

I cannot wait to see what you all come up with this month.

Happy stamping, Anne xxx.
Materials:

 Step By Step:
  1. Stamp the gelli plate directly with the texture stamp using pale purple and lime acrylic paints. Leave to dry.
  2. Apply a layer of teal paint with a brayer. Use the stamp to quickly lift off some of the paint, then place down the trellis stencil. Leave to dry.
  3. Lift the stencil and quickly take a print from the plate onto scrap paper. The dry paint will not be removed but the paint under the stencil will lift off leaving behind a dry paint layer with a clear trellis.
  4. Apply the dark purple paint with a brayer and take a print onto the cartridge paper. The whole plate should now print creating the lovely background panel.
  5. When dry further emphasise the trellis by drawing around with the fine tipped marker. Add Glossy Accents to some of the flowers and sprinkle with the fine glitter.
  6. Stamp the texture with lime paint onto another sheet of cartridge paper. Trim to mount onto the card front. Also cut 4 thin strips to apply onto the card front. Trim the Gelli plate print. Edge all card pieces with black marker and glue onto the card front.
  7. Stamp the large flower with memento onto white stamping card. Colour with alcohol markers and cut out. Glue to the card front with 3D foam pads. Add Glossy Accents to create shine on the gems.
  8. Use 3D glue gel to apply the paper clay leaves and flowers. Finish with PVA pearls and Stickles glitter glue.

Wednesday, 1 June 2016

Still Moon created for Chocolate Baroque Colour Challenge 23 and recent TV show


I am loving the Colour Challenge this month – just my colours. I created this one as one of my TV samples for the recent Brusho’s show on the Craft Channel with the Design-A-Tree sets. Wasn’t Lesley brilliant!


Materials:


Step By Step:

  1. Trim the stamping card to approx.14cm square (slightly smaller than the card blank).
  2. Stamp the trees in Vintage Sepia and the sentiment and birds in Onyx Black ink.
  3. Draw a circle in the sky and apply masking fluid.
  4. Prepare Brushos for painting by adding crystals to a little water in a palette. Paint the picture with the inks. Remove the masking fluid and drag some of the colour across the moon.
  5. Spray the moon and central area of the painting sparingly with a little mica spray.
  6. Add a little shading to the trees with the fine tipped marker, extending at the roots to anchor the trees.
  7. Edge the card with black marker and blend Distress Ink in from the edges.
  8. Mount onto the mirror card and glue to the card blank. Finish with a little glitter glue for moonlight sparkle on the branches.