I am an ex medical scientist now self employed in jewellery and textiles. I also enjoy mixed media and card making too and am on the Design Team of a stamp company and a textile trimmings maker, so regularly blog my projects. I really enjoy helping people along on their own creative journey.
A couple of weeks ago I ventured up to Powertex UK HQ to take my Level 1 training. Tracey, Garry and the lovely team were all so welcoming and made me feel instantly at ease. I met some lovely people on the course and we spent a wonderful couple of days creating in Tracey’s studio. There were many wonderful projects on display from Tracey and the Design Team. Amazing talent and such an inspiration.
I managed to catch a pic of myself and Tracey in the garden. Tracey is the attractive one – tee hee.
The course was very intensive and we each created a wide range of projects, ranging from mixed media canvases and journal covers right up to a figurine. We were also given masses of useful guidance and information on setting up workshops for ourselves too. I learned so much and we all had a lot of fun and plenty of laughter along the way.
I have had a busy couple of weeks on my return and still have to put the finishing touches to my Level 1 projects. I will share them soon. In the meantime I thought that I would share my first ever ventures into the world of Powertex, following one of Tracey’s shows on Hochanda.
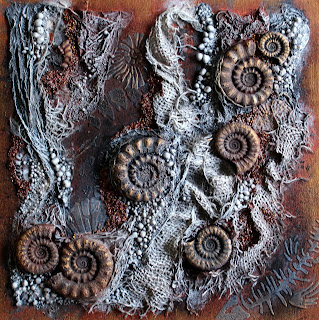
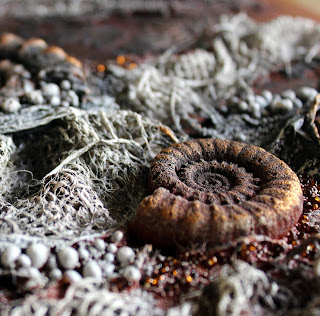
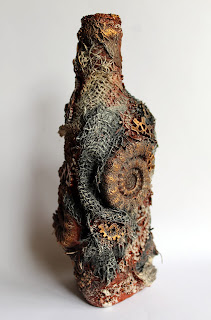
I created a couple of 30 cm square fossil themed canvases and a covered bottle – I hope that you like them. I was really pleased with the natural organic feel. Some of my friends thought that I had used real fossils. Being my first projects I hope that you will see what a beginner can achieve.
Below I have included a materials list and the step by step of techniques used to create the canvases, including some hints and tips to get the best results. The embellished bottle was created in the same way.
Happy crafting, Anne x.
Materials used:
- Powertex Fabric Hardener (Ivory, Terracotta and Lead)
- 12 X 12 inch stretched canvas and 12 X 12 inch canvas board
- Texture Media (3D Sand & Balls)
- Pebeo Gilding Wax (gold)
- Easy Varnish
- Powercolor (white, ochre) and Colortricx (copper)
- Bister (Black)
- Fossilized 30 X 30 cm stencil
- Glass seed beads (gold)
- Recycled potato sacking (hessian/burlap)
- Kitchen paper towel
How they were made:
- The canvases were already primed with gesso so I first gave them a coat of Powertex to colour and create a good surface for adhesion.
- I mixed up some Powertex with sand to make a thick paste. When the canvases were dry to the touch (it doesn’t take long) I applied the paste to the background using a palette knife through the stencil to create fossil textures. I then left them overnight to dry.
- I mixed more sand with Poweretex, this time to make a thicker drier clay. I think that the mix was about 50:50. Basically I gradually added sand until I had a workable clay that wasn’t too wet and sticky. I then pushed the clay into the silicone moulds to create the 3D fossils. I left them to dry for several hours until they could easily be released from the moulds without distorting. Some of the bigger ones needed to be left overnight. I then placed them on a drying tray (old kitchen wire grill tray – so air could get all around) and left them overnight to dry and further harden up. I made the clay up in small manageable batches so as not to waste reagents. Any clay that wasn’t being used straight away was wrapped in cling film to stop it drying out.
- Next I worked the Powertex into rough strips of hessian, and some pulled threads. I did struggle a bit with this at first as I used far too much Powertex. If you overdo it, like I did, grab another strip of fabric and use it to dab and squeeze out the excess. These were then ruched and applied to the canvas using a little extra Powertex as a glue where needed.
- I then applied my fossils using Powertex to glue. In some of the more textured areas I dunked some of the kitchen towel in Powertex to make a 3D glue ‘gel’ in which to embed my fossil embellishments. I also used strips of kitchen paper to create more areas of texture. I found that it was best to separate the paper into a single ply (i.e. split the double layered tissue into 2 sheets) to ensure that it fully coated and soaked up the Powertex more easily.
- Next I drizzled Powertex onto the canvas and sprinkled with texture balls and sand, plus a few glass beads. It is best to apply the largest balls first, then work down to the smaller sizes which fill in the gaps between the larger ones. Oh so much fun. I then left them to dry overnight ready for colouring.
- My canvas board was a cheap cardboard type and I found that it did warp quite a bit. When dry enough I clamped it down on my rigid art board to help straighten it out while drying. A thicker strong board (MDF type) does work better. It needs to take a lot of wet media. This was obviously not an issue when working on the stretched canvas.
- I was then ready to start adding more colour and depth with Bister and coloured varnish. Here is where I did have a slight panic. I first sprayed over my canvases with black Bister. When dry I then used a damp sponge to lift away some of the colour from the top layers. The idea was to emphasis the deep crevices and texture. Eeek – I thought that I had ruined it! The soluble Bister did lift off some areas but it was difficult to remove from others. My texture balls soaked it up and the hessian held onto quite a lot of it too. So where I had planned my colours and light areas got covered in darkness! Oh dear I thought (me swear? Tee hee).
- After I had calmed down, it then came to me. I could go over some of the areas using the Powertex as a paint. In addition I had opaque white Powercolor in my stash so I could use that too at the varnish stage. I over painted some of the areas with the coloured Powertex. I also used the Powertex to dry brush over areas giving more highlights. So all was not lost after all. Some of the Bister dissolved back into the Powertex as I worked giving a lovely natural organic look. Ooooh happy again.
- When the Powertex was touch dry I then dry brushed with the pigments and varnish. This stage takes a little practice. You need to mix just small amounts of varnish with the pigments (just a drop on your craft mat), remove most of it from the brush (brushing off onto tissue), then apply to the top layers lightly and gradually building up the colour. I mixed a tiny bit of ochre into white pigment (so not a harsh white) to dry brush some areas. Other areas I dry brushed with copper colour.
- To fully seal my canvas I mixed a 50:50 mix of varnish and water and sprayed it over the canvas. Spraying enabled me to get it in and around all the crevices and 3D embellishments. I applied several coats (leaving to dry between coats). This then makes the canvas easy to clean as it can simply be run under the tap (where cleaning with a duster or cloth would be tricky). If mounting your piece behind glass this stage would not be needed. Note: Coloured Powertex is weatherproof so complete sealing with varnish is not essential unless you have used Bister (remains soluble so would wash off unless sealed with varnish).
- Finally I added a bit of gilding wax around the edges of my canvases (this could be done with coloured varnish).


No comments:
Post a Comment