Sunday, 31 July 2016

Quick and easy sea themed cards created for Chocolate Baroque


Good morning. Today I am sharing 3 quick makes using Seashell Collage stamps from Chocolate Baroque.
I must got down to the sea
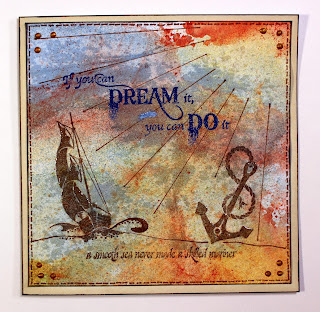
A smooth sea never made a skilled mariner
These first two were stamped onto the same background paper created by randomly spritzing an A4 sheet with blue, red and gold mica sprays.
Seagulls in Italy My third project was stamped onto a patterned paper from Crafty Individuals.
Materials:
  • Seashell Collage and Words of Inspiration stamp sets
  • A4 sheet of thick cartridge or watercolour card, 11 X 14cm cream card blank, 15cm square card blank in cream and white, cream stamping card, Crafty Individuals 6X6 inch backing paper (Travels in Italy)
  • Inkpads: Archival (Coffee), Versamark, Versafine (Onyx Black), Distress Ink (Antique Linen)
  • Mr Huey’s Ink spritzers (blue/grey, red, gold with mica)
  • Alcohol marker (black), fine tipped marker (brown, black)
  • Polychromos pencils (brown, grey, white, black, red, orange)
  • WOW embossing powder (Blueberry)
  • Glossy Accents
  • PVA pearls (gold)
  • Die to fit sentiment panel (Heartfelt Creations Cut, Mat, Create set) or hand cut and use a corner rounder punch.
Step By Step - ‘I must go down to the sea’
  1. Trim the randomly spritzed sheet to fit the card front (11 X 14cm) leaving a small border.
  2. Stamp the gulls with Archival Coffee ink. Edge the topper and card with black pen and glue down.
  3. Stamp the sentiment onto cream card with Coffee ink. Edge with Distress ink and brush over with some of the spritzer ink. Cut out and edge with black ink. Draw faux stitching with fine pen. Stick down with 3D foam.
  4. Finish by adding Glossy Accents to the stamped image (this enhances it and makes it stand out from the background).
Step By Step – ‘A smooth sea never made a skilled mariner’
  1. Trim the randomly spritzed sheet to fit the card front (15cm square) leaving a small border.
  2. Stamp the boat, anchor and small sentiment with Archival Coffee ink. Stamp the inspirational sentiment with Versamark and heat emboss with the powder. Draw in sun rays, and extend the scene, and add faux stitching with fine tipped pen. Edge the topper and card with black pen and glue down.
  3. Finish by adding Glossy Accents to the stamped images, and PVA pearls.
Step By Step – ‘Seagulls in Italy’
  1. Trim the printed sheet slightly to fit the card front (15cm square) leaving a small border. Edge with black marker.
  2. Use Versafine ink and partial stamping to create the scene across the card by leaving ink off parts of the stamp e.g. omitting the seagulls from some of the posts. No complicated masks needed for this but clean the stamp well between stamping to avoid residual ghost images where you don’t want them. Use the fine tipped pen to hand draw missing sections from the top of the posts.
  3. Quickly colour the posts and gulls with pencils. No need for fancy colouring as the stamps already provide shading details.
  4. Stamp the sentiment and glue to the card front.
I hope that you like them.  Anne x.


Friday, 29 July 2016

Four Seasons for Four Ladies created for Chocolate Baroque

Good morning. I am so loving the new Four Seasons Collection of stamps. I love the new Tangled Birch too – will have to make something with that very soon.
Running behind with time to get my post done for you today I thought that I had better make something quick and easy with a clean and simple style (CAS). The stamps are so gorgeous in themselves that they really do not need much adding to them. I started with the gorgeous Summer Fair, simply stamped with Versafine (Onyx Black). I then quickly coloured the flowers and foliage by scribbling with watercolour pencils and brushing over with a water brush. Voila! A lovely CAS quick card – all I had to do was mount her on a card blank.


However …… those of you that know me, know that I struggle a little with this style. I am definitely a ‘more is more’ girl – tee hee. I thought … ‘well I have to do a set of 4 to include all 4 seasons’. Off I went to make the others with Autumn Medley, Spring Awakening and Winter Dawn.
But then I thought … ‘wouldn’t they look good with my Art Nouveaux style die cut frame’. This then involved die cutting, matting and layering. Cutting the oval from the stamped images also required a little bit of care as parts of the image overhung the frame. I have included a pic for those that are new to this technique. You need to snip into the image so that you can leave the overhang free from the die.


But I didn’t stop there! I then thought ….. ‘oooh, wouldn’t they look good with some of my die cut flowers and leaves’. So my quick to make single CAS card turned into a mammoth make. I did have fun though.


I hope that you like them …. And you could always stop at the CAS stage. Anne xxx.

Dies: Art Nouveaux Frames (Tonic), Large leaves (Creata), Acorns (Spellbinders and Sheena Douglass), Poppy (Spellbinders), Aster (Susan’s Garden, Sizzix), Snowflakes (Unknown Brand plus Robert Addams)

Wednesday, 20 July 2016

Mint Chocolate Rose cards created for Chocolate Baroque Anniversary Challenge 25


Good evening my crafting friends. I am running a little late today with showing my projects for the special Anniversary Chocolate Baroque Challenge 25. The theme is chocolate – yum! Check out the blog for more fabulous inspiration from my Teamies, and there is an extra special prize this month too.

I have created 2 projects for you with the theme of Mint Chocolate. I hope that you like them.  The first is an 8X8 twisted easel card where I have made a faux chocolate bar to create the stopper. I also used one of the lovely free digital papers from Challenge 19. The second is a quicker project using the same colour scheme.


Mint Chocolate Easel Card
Card front with decoupage elements.
Faux chocolate bar created using waste die cuts from a window die – they made lovely chocolate squares.
Open easel card with faux chocolate bar stopper.

Materials:
How to make it:
  1. Diagonally score the front of the card from bottom left to top right and fold to the inside to create the easel.
  2. Cut an 8X8 inch panel from the hammered card and colour the edge with mint alcohol pen. Colour the inside panel of the card to match.
  3. Trim 2 sheets of the digital paper to slightly under 8X8 inches. Stamp the rose image with Distress ink onto the right hand top corner. I used a damp brush to drag out some of the ink and add shading to the ‘inner’ sheet. Ink the edges with Distress Ink.
  4. Glue the digital papers to the hammered card panel and inside the card. See the picture to see how to orientate the paper. Draw faux stitching around the edges to frame.
  5. Cut a piece of thick card the same width but slightly longer than the printed ‘chocolat’ panel. Stick gold paper over the ends to imitate gold foil of a chocolate bar. Wrap with the paper, add a little ink to the edges and glue to the card front.
  6. Cut the decorative heart in brown card. Edge with faux stitching. Stamp the sentiment with Versamark and heat emboss with gold powder. Glue on the sweetie bow and add to the card front with 3D glue gel.
  7. Cut some small squares from brown card to imitate chocolate squares. I used waste pieces from a window die. Cut some thick card to create the faux chocolate bar stopper. Glue on the chocolate pieces. Wrap with the digital paper and the ends with the foil, creating a torn opening revealing the ‘chocolate’.
  8. Stamp the rose onto stamping card with Archival ink three times. Cut out one full images and then elements to decoupage up. Colour with alcohol pens. Shape slightly and glue to the card with 3D glue gel.
  9. Apply some glitter glue to a palette or craft mat and thin slightly with water. Paint onto the rose image.
  10. Glue the topper panel to the bottom right hand side card front triangle to create the twisted easel. Glue down the faux chocolate bar to create the stopper. Finish with PVA pearls.
Here is a quicker project using the same Mint Chocolate colours:
Materials: How to make it:
  1. Stamp the rose with Archival Ink and colour with alcohol markers. Trim to approx. 10.5 X 14cm. Blend Distress Ink around the edges and then rough up and distress using the edge of your scissors, and glue to card front.
  2. Stamp the sentiment with Archival Ink.


Monday, 11 July 2016

Twinkle Christmas card created for Tattered Lace


Materials:
  • Twinkle Die set
  • White card blank (14 X 18cm)
  • Black Card (13 X 17cm)
  • White stamping card (suitable for wet media)
  • Spider Web Netting (silver grey)
  • White organza ribbon with silver sparkle thread
  • PVA pearls (black), glitter glue (silver), faux sticker gems (holographic black)
  • Ink sprays (Black, grey and silver with mica)
  • Fine tipped alcohol marker (black)
  • Pinflaire Craft Glaze
  • Wax paper and baking parchment
How to make it:
  1. Cut the frame and oval from wax paper. Transfer the wax onto stamping card by ironing (low to medium setting). Protect your iron with a layer of baking parchment on top of the wax paper.
  2. Spritz the card with ink sprays – the transferred wax acts as a partial resist. Dab with tissue to remove excess ink from the waxed areas.
  3. Cut around the outer frame with scissors. Apply glaze to the outer frame and oval. This darkens and enhances the contrast.
  4. Cut the bauble and leaves. Spray with inks to colour – slightly lighter than the background colour.
  5. Lay the bauble into the oval and draw around with the alcohol marker. Apply glaze to the area behind the bauble to enhance. Also use the pen to draw around the inside of the oval, and to edge the outer frame, to give the appearance of added depth. Glue down the bauble and leaves.
  6. Glue the black mat onto the card. Cover with a layer of Spider Web and trim to fit. Tip attach with tape under the topper panel. Apply the topper panel with 3D foam.
  7. Apply the bow, faux gems, PVA pearls and glitter glue to finish.

Christmas Stockings and Christmas Lights Washing Lines cards created for Tattered Lace

Here is a quick look at the projects that I created with the Christmas Stockings and Christmas Lights Washing Line dies from Tattered Lace.- available on Create & Craft TV today.
I will blog some instructions soon, Anne x.


The Christmas Lights die doesn't just have to be for Christmas


Cute Penguin Christmas Place Setting created for Tattered Lace

Good evening. I am sharing some instructions for some of my TV show samples today. This one is using the Penguin die from the Christmas Cuties range.

A special Christmas Cuties Multibuy bundle is still available on the Create & Craft website. Materials:
  • Christmas Cuties Penguin die
  • Decorative Centre Stepper – for the little branch and mini tag dies
  • Black and white card
  • Sentiment stamp from my stash
  • Versafine inkpad (Onyx Black), alcohol markers (black and yellow), Stickles glitter glue (Diamond), PVA pearls (black)
  • Organza ribbon
  • Sentiment for tag printed on a laser printer
  • Optional: Holographic silver toner transfer foil (such as Midas Touch) and Minc Foiling machine (or laminator)
How to make it: The procedure is a little complex to explain in words but hopefully it will become clear as you try it. If you are unsure then try it out using some cheaper card or paper first.
  1. Cut the Penguin in white card. Score the card along the line of the small edge cuts from the die and fold. To create the table place setting trim to approx. 3.5cm high X 11cm using a craft knife.
  2. Where the Penguin has cut from the back there will be a hole. Cut another piece of card to cover the back (3.5 X 11cm). Place the bottom part of the Penguin onto the top edge positioning to correspond with the cut Penguin on the place card. This is done so that the base card will not show through the lacy tummy of the penguin on the finished card. Glue to the back.
  3. Cut the Penguin in black card. Snip away sections (eyes, beak, tummy, feet) and glue down onto the white Penguin. Colour the beak and feet with alcohol pen.
  4. Stamp the sentiment and edge the place card with black pen.
  5. Cut the little branches in black card.
  6. Cut the printed sentiment with the tag die. I has used a laser printer and foiled my sentiment with toner foil. Alternatively use a plain printed or stamped sentiment.
  7. Outline the tag with black marker and add ribbon. Glue the tag and branches onto the place setting. Finish with touches of glitter glue and black PVA pearls.
Happy crafting, Anne x

Cute Penguin Rocker Card created for Tattered Lace


Good afternoon. I am sharing some instructions for some of my TV show samples today. This one is using the Penguin die from the Christmas Cuties range.

A special Christmas Cuties Multibuy bundle is still available on the Create & Craft website.
Materials: How to make it:
The procedure is a little complex to explain in words but hopefully it will become clear as you try it. If you are unsure then try it out using some cheaper card or paper first.
  1. Cut the largest plain circle in heavy white card. Score down the centre and fold in half to create the rocker card.
  2. Place the bottom part of the Penguin onto the folded card aligning the small protruding edges just above the fold. Cut through both layers to remove this section. You may need scissors or a craft knife to completely remove the section if your card is very thick and it doesn’t cut completely through the front and back layers. This is done so that the base card will not show through the lacy tummy of the penguin on the finished card.
  3. Cut the decorative circle in blue card and cut in half. As above, cut away the Penguin base from the top edge of the semi circle. Align the blue half circle onto the card front to help you align the die to cut away the corresponding section. Use the white pen to draw faux stitching along the edge.
  4. Cut the Penguin in white and blue card and snip the penguin free. Snip away the tummy, eyes and beak sections from the blue card and glue onto the white Penguin.
  5. Cut the Penguin again in white card. Using a ruler extend the small edge cuts made by the die, and cut away the background from the top half. I used a steel rule and craft knife. Alternatively mark the line with a pencil and cut with scissors.
  6. Use the torn edge circle die to cut the bottom half into a semi circle, leaving the Penguin intact on the top edge. Tip: Lay the blue half circle onto the die cut Penguin aligning the bottom of the Penguin and top straight edge. Now lay the torn edge circle die on top to align it into the desired position. Carefully ease the blue card away and tape down the die. Ensure that the top half of the Penguin is sitting over the die, and not under the cutting edge. You will end up with an embossed edge from the die across the Penguin but this will be covered up.
  7. Glue the semi circles onto the card front. Glue the separate blue and white Penguin onto the white edger Penguin. The Penguin will be nice and strong ready for repeated ‘rocking’.
  8. Cut the twigs, flower centre and petals in blue and white card. The small poinsettia is made up from 2 sets of the smallest petals. The large poinsettia is made by cutting the largest twin petals 3 times in blue and white. One petal is snipped away to create the 5 petalled flower. Shape the flowers to add dimension. I used a ball tool and embossing mat.
  9. Stamp the sentiment with blue ink. Glue on the flowers. Finish with sparkly glitter glue.
I hope that I haven’t given you a headache with the instructions – it really is easier than it sounds. Happy crafting, Anne x

Wednesday, 6 July 2016

Wild Meadow Dream Card created for Chocolate Baroque Colour Challenge 24

Here is a quick and easy project that I created for the Chocolate Baroque Colour Challenge 24. Loving the vibrant colour scheme this month. Materials: How to make it:
  1. Lightly spritz the card with water and paint with inks, blending yellow into orange and violet. Dry.
  2. Sponge water onto the texture stamp and randomly stamp over the background. Repeat stamping will pick up and transfer some of the underlying ink. Blot with tissue. Dry.
  3. Stamp the thistle with violet ink. Repeat stamp to give paler background impressions (second generation ink stamping).
  4. Partially ink the sentiment stamp to create the sentiment and ‘background’ text.
  5. Outline the panel and card blank with the alcohol marker to frame. Glue down the panel

Saturday, 2 July 2016

Magical Winter Dawn card created for Chocolate Baroque


Good morning. Here is my first project with the lovely new Winter Dawn stamp from Chocolate Baroque. It is also my first go at parchment craft. It took a bit of getting used to using an embossing tool to add white highlights rather than adding shading for the colouring, like working in negative. Her eyes turned out to be a little scary but I was fairly pleased with the results. It gave my lady a very magical ethereal look. I hope that you like her.
Anne x. Materials:
  • Winter Dawn stamp
  • Pearlescent white card, blue card and parchment
  • Pergamano Tinta Ink (white)
  • Alcohol ink pen (mid grey)
  • Fine tipped white acrylic pen
  • Stickles glitter glue (Diamond)
  • Embossing mat and fine tipped embossing ball tools
  • Needle tool and brass stencil for piercing
  • Small poinsettia and snowflake dies, decorative layering dies
How it was made:
  1. I created the card blank from an A4 sheet of pearl card folded in half. The largest die was placed on top such that it overhung the top edge to leave an opening hinge, then cut through both layers. The same die was used to cut a mat to glue onto the front and hide the flat top. The bottom was trimmed slightly so the card would stand without rocking.
  2. A blue mat and white frame were then cut. I cut the parchment to fit inside the frame with a small border for gluing. I used the Tinta ink to stamp the image onto the parchment. Being new to parchment I really wasn’t sure what ink would work and I knew that this is designed for parchment. However, it is really designed to work with a dip pen. It did sort of work but the results weren’t the best and it was difficult to see the stamped image, especially from the back. I will have to research this. Maybe StazOn ink would work better?
  3. I then used embossing tools to gently stroke the parchment on the reverse side to create the white ‘colouring’. Intermittently I let the parchment rest before further enhancing and whitening with the tools.
  4. My poor lady ended up with very weird white eyes and eyebrows! I used the grey alcohol marker on the back to try and rescue her and add some shading. I also used alcohol blender to eliminate harsh lines drawn with the pen. I used the white pen to add the dots onto her pupils. I quite liked the shading and added some to her hair too.
  5. The delicate snowflakes were a bit impossible to see from the back. So I simple used them as a guide for embossing the lines. I used a needle tool to punch through a brass stencil and add a little texture onto the background.
  6. I glued the parchment to the inside edge of the white frame and mounted it onto the blue mat. Note: I don’t have the proper glue or snipping tools for parchment so it was a little tricky to work out how to attach it without the glue showing through. I used normal acrylic glue, hiding it under the edge of the frame and placed tiny dots behind the snowflakes where they would not be obvious. There are specialist parchment glues that are designed to dry clear and be hardly visible.
  7. Finally I added the small die cut embellishments and added some glitter glue for sparkle.
I think I quite like this parchment stuff …. Oh dear …. Another addiction?