Thursday, 31 March 2016

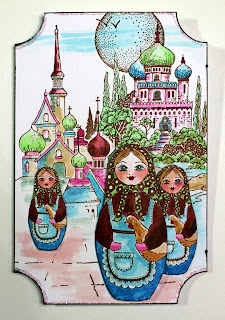
Another Babushka Scene Created for Chocolate Baroque


Good morning. I have created another scene using the lovely Babushka Russian Dolls. I did a bit of masking to create the background but stamped, shaped and cut out the dolls to layer onto the scene.


Happy crafting, Anne x.

Materials used:


How it was done:

  1. Stamped the background buildings using masks to cover the foreground images – straight onto the card front.
  2. Stamped the dolls and cut out.
  3. Used a marker to finish the scene and to edge (frame) the card.
  4. Coloured  the scene and dolls with watercolour pens.
  5. Shaped and glued the dolls onto the scene with 3D glue gel.
  6. Finished with a little glitter glue for sparkle.

Monday, 28 March 2016

Friendship card created for Chocolate Baroque using Lace Fragments stamps


This was one of my TV show samples created with the lovely Lace Fragments stamps from Chocolate Baroque which were demonstrated on the Craft Channel TV show by Lesley Wharton.


More recently Dawn Bibby also demonstrated these stamps. I decided to recolour my sample to give it a bit more impact for the new shows.


Materials:

  • Lace Fragments and Mackintosh Sentiments stamp sets
  • 19cm square cream card blank, white and cream card
  • Ranger Archival Inkpad (Coffee)
  • Marker pen (brown)
  • 2mm fine satin ribbon (brown)
  • Adhesive and sticky foam pads
  • Dies to cut trellis and sentiment topper (Tonic – Deco Trellis Base), and leafy sprigs (Heartfelt Creations – Cut Mat Create sets)


How to make it:

1.    Die cut a trellis topper from cream card and back with white. Thread with brown ribbon.

2.    Cut a sentiment topper in white card, and an 18cm mat in white, edge both with brown marker. Also edge the card blank.

3.    Stamp the floral corners and sentiment with Archival Ink.

4.    Mount the trellis and sentiment topper, decorate with die cut leafy vines.


How I revamped and recoloured it:

I masked the outer part of the card design and spritzed the central mat and die cuts with green and gold. The leaves and flowers were further coloured with watercolour pens (Spectrum Aqua).

The Lace Fragment floral corners were then also coloured with watercolour pens and the card edges inked with Shabby Shutters Distress Ink.


I like both versions of the card but I am definitely not a ‘less is more girl’ – more colour, more layers and more die cuts is ‘more’ me. Tee hee.

Anne ;0)

Card created for Chocolate Baroque using Babushka stamps


I have been playing with the new Babushka stamp set. This set is so much fun and really different. I also love the Russian buildings that are included too – great for scene building.


Materials:


How it was done:

  1. I created masks for the buildings by stamping onto copy paper and cutting them out. The buildings were stamped with Versafine, covered with the masks and I then stamped with the background silhouette buildings with Distress Ink.
  2. The images were coloured with watercolour pens. Some colour was applied directly, and some by picking up colour from a pallet using a damp brush. I then finished with touches of sparkle pen and glitter glue.

My Project for Chocolate Baroque Colour Challenge 21


This is my project for the Chocolate Baroque Colour Challenge 21. Love this colour scheme.


This project was also created as one of the samples for the recent TV shows with Dawn Bibby on The Craft Channel using the Haberdashery stamp set. Some great shows and demos from Dawn featuring Chocolate Baroque stamps.

Materials:

  • Scalloped white card blank (6 X 6 inch), Core’dinations card (dark teal), white stamping card
  • Inkpads: Versafine(Onyx Black), dye based (purple, light turquoise)
  • Spectrum Aqua watercolour pens (Crafters Companion)
  • Hexagonal design embossing folder (Embossalicious)
  • Trellis die (Tonic)
  • Pale purple ribbon, sanding block, adhesive


How to make it:

  1. Emboss the teal card and sand it back to highlight the texture. Trim and glue to the card front.
  2. Overstamp the die cut trellis randomly using the button stamps with purple and turquoise inkpads. Glue to the card front.
  3. Stamp the haberdashery elements with Versafine. Cut out and colour with watercolour pens. Glue to the card front. Finish with a small bow.

Note: To add more dimension the cut out elements could be shaped and mounted with 3D glue. To keep the card thickness to a minimum for posting I flat glued with PVA in my design.


My project using the free digital paper from Chocolate Baroque


What a beautiful digital paper we have to play with this month. I decided to create a framed decoupage piece with mine. Available from the Chocolate Baroque Challenge Blog.


Materials:

  • Cacti Postcard Digital Paper printed onto A4 paper
  • 31cm square mount board in cream and dark green, plus backing card
  • Crafters Workshop 6X6 stencil (Cell Theory) and swirly branches stencils
  • Pearlescent acrylic modelling paste
  • Acrylic paints (blue and pearlescent pale aqua)
  • Polychromos Pencils (blue/grey and grey)
  • Stickles glitter glue (Diamond)
  • Pearlescent spray varnish
  • PVA glue and 3D glue gel


How it was done:

  1. Printed the image six times and cut around the cacti and flower image building up layers onto the background. Shaped and glued with 3D gel.  Note: Keep the leftovers for other projects, they will be great for cutting out with punches or dies.
  2. When dry I added a little shading using the pencils.
  3. Mixed some blue acrylic with the modelling paste and applied through the Cell Theory stencil with a pallet knife to create a border around the image.
  4. I cut an approx. 20cm aperture from the cream mount board. The dark green was cut approx. 4mm smaller and glued behind the cream frame.
  5. Stencilled pearlescent pale aqua paint through swirly branches stencil to create added texture to the frame.
  6. Glued together, backing with thick card. Sprayed with varnish to protect.
  7. It could be further mounted into a 3D box frame, behind glass, for added durability.
  8. Tip: If you want to create a long lasting home décor project it is very important to use acid free paper, card and glues. I have a printer with archival pigment inks which are much more fade resistant than dye based standard inks.

Woven bangles created for Beads Direct using the new Bangle Weaver Tool from Beadalon


I have had so much fun playing with the new Bangle Weaver Tool designed by Kleshna for Beadalon. I simply love it and my mind is bursting with ideas. It can be used to create so many different styles of bangle, from structured wire weaves to Boho and ethnic styles using fabric strips. Why not try recycling old T shirts, bedding or carrier bags.
Beads Direct asked me to create a few designs for their blog – they took some lovely pics too. Do check the Beads Direct Blog for lots of great projects from the Design Team.


The instructions included are very easy to follow, and it can be used to weave so many different types of materials, for example:

·         Beading cable (e.g. 7 Strand beading wire)or monofilament (e.g. Supplemax)

·         Recycled sari silk yarns or ribbons

·         Shamballa (e.g. waxed nylon cord), cotton (e.g. waxed cotton) or rattail cords (e.g. satin)

·         Leather (e.g. round cord) or suede cords (e.g. flat cord)

The possibilities are simply endless.

I find that Kumihimo bobbins are invaluable for keeping cords or ribbons manageable, or Spool Tamers  if you are weaving beading wires. Bead stoppers are also handy for temporarily holding beaded cables or ribbons in place. You will also need blunt ended needles with a large eye to replace the warp. The bodkin set recommended by Kleshna is very good. However, when warping ribbon or fabric strip weaves I found that an extra-long bodkin (e.g. elastic threader available from haberdashery stores) was much easier to use. Note: The warp pegs are quite sharp so I would not recommend the tool for young children, and do protect you table top from scratches by using with a mat.

Woven Bangle Designs

I have created a few designs for you using Recycled Sari Silk Ribbons and 0.6mm Supplemax Monofilament along with various beads from my stash. I hope that they inspire you to get started with your own designs. I followed the basic instructions included with the tool for setting up, weaving and warping.  I just love this fabulous tool.

Happy beading, Anne x.

Materials used:


·         Lucite Flower Bead Mix (BO435)

·         Peridot and Lemon Toho Seed Beads Size 11 (11TR27 and 11TR902)

·         Turquoise Toho Seed Beads Size 8 (8TR55)


·         Silver Plated Crimp Beads #2 (F317)


·         Co-ordinating Nymo or KO beading threads (for sewing)

·         Silver Plated Headpins (F0043)


Floral Trellis Bangle


I used 0.6mm Supplemax, the vintage pink bead mix and a few flowers to create this bangle. I love the way that the beads appear to be suspended on the transparent woven trellis.


Unwind and cut off approximately 4m from the spool and thread with 231 beads from the pink mix. Wind onto a Kumihimo bobbin. I used a Bead Stopper to clamp the monofilament while weaving (you could crimp them together at this stage).

Weave 7 rows with one plain and one beaded strand, moving up 3 beads to the front per ‘wrap’ with the beaded strand. The weave holds the beads in place.

Unwind approximately 1.5m off from the plain spool before cutting. Pass one of the strands down through the warp to the other side to give the 2 warping strands.  Warp the bangle according to the included instructions and secure using crimp beads. I adjusted the tension by pulling in the warp threads to give a bangle width of approx. 1.5 inches as I worked around.

Next stitch on flowers using the thinner 0.25mm Supplemax. Tie on the thread, pass up through the flower, add on a small lemon seed bead, pass back down the flower and tie/knot back onto the trellis. Weave the thread through the trellis between the flowers.

Spring Garden Bangle


I used strips of the silk ribbon in yellows/creams and greens for the weave and 0.6mm Supplemax for the warp, then embellished with beads.


Join the silk ribbon strips by stitching them together (just a couple of small stitches to anchor) using beading thread. Prepare approximately 1.5 to 2m each of yellows/creams and greens. Twist the strips and wind onto Kumihimo bobbins for weaving.  Twisting the strips gives added strength and structure to the weave. After weaving 7 rows secure the silk strips with a few stitches.

Use approximately 2m of the 0.6mm Supplemax to warp, adjusting the bangle width to approx. 1.5 inches by gently pulling on both the warps as you work around. I generally prefer to tighten and adjust the warp as I work on silk weaves, rather than after the warp pegs have been removed.

Use crimps to secure the ends. Once removed from the warp pegs neaten the cut ends of the silk by stitching them down, hiding them on the inside of the bangle.

I found the use of an extra long bodkin really useful for pulling the warp strands though the channels of the ribbon weave. Tip: Push the eye of the bodkin through the channel, thread with the monofilament, and then pull through. Unthread and repeat pulling the cables through from each side.

Then use 0.6mm Supplemax to add small green beads (from the Glam Green Vintage Mix) along the top and bottom edges. Simply weave the cable through, following the pattern of the silk weave, adding 11 groups of 3 beads on each edge (i.e. you will need 66 beads in total). Secure with crimps, hiding them by burying into the silk weave.

Further embellish the bangle by stitching on groups of green beads, along with purple and white flowers, using co-ordinating beading thread. Use peridot seed beads to attach the green beads and flowers, and to create little beaded leaves. The leaves are made by threading 9 beads, passing back down the eighth bead, adding 6 beads and finally passing back through the first bead. Ensure that groups of beads are anchored well by stitching into the silk. Stitch through the back of the bangle when moving between beaded sections.

Blue Lagoon Bangle


This bangle was woven in the same way as the Spring Garden Bangle. A random mix of blue and green silk ribbons were used but they were not twisted before weaving. I tightened up the warp tension after removing the warp pegs (as described in the instruction booklet). The resultant weave is softer and less structured than when using twisted strips. It is also more difficult to get an even tension. However, I was very pleased with the results, giving the design a more organic feel.


To embellish, first attach groups of 2 or 3 beads onto headpins. Anchor these onto the warp (buried in the silk weave) for stability, attaching them with wrapped loops. Further embellish by stitching on clusters of beads from the Glam Green Vintage mix, plus green and turquoise flowers, along with turquoise and peridot seed beads.

Tooty Fruity Bangle


In this design I added beads (from the Pink Vintage Mix) onto the warp to create a border along the edges of the bangle. I also included a cross grain ribbon in the weave to give added texture.

Prepare approximately 1.5 to 2m each of bright pink and dark purple silk strips, twist and wind them onto Kumihimo bobbins. The bangle is woven in the same way as the Spring Garden Bangle but weaving with one pink strand, and combining a pink cross grain ribbon along with the purple strand.

Warp using approximately 3m of 0.6mm Supplemax and add a bead onto each warp strand before passing them back down the channel. Note: when adding beads to the outer warp edges they need to be fairly large when using silk weave. Smaller beads just disappear down into the channels.

Finally embellish by stitching sets of 3 beads in rows around the weave. You will need a total of 66 beads (11 groups of 3 per row).

Indian Rose Bangle


I chose 6 different silk ribbon colours to weave this one. They were woven in the same way as the Spring Garden bangle but the colour combination was changed every 3 rows: green and purple for the first 3 rows, yellow and pink for the next 3 rows, cream and cerise for the top 3 rows. The bangle was warped using approximately 2m of the 0.6mm Supplemax.


Use the silk ribbons to create a flower and embellish using beads from the Pink Vintage Mix:

Create 5 small cerise petals from 1.5 inch squares. First fold the square in half, then fold the outer edges to the centre and down to create a small folded triangle with raw edges along the base. Use small running stitches along the base to gather the petal.

Create 5 large turquoise petals using 4 X 1.5 inch strips. First fold the strips in half and round off the corners on the raw edges. Use small running stitches along the raw edges and pull up to gather the petal.

Arrange the petals and stitch them onto the bangle. Add beads to cover the centre and raw edges.

Encrusted Treasure Bangle


This bangle was woven using knotted silk strands along with a strand of beaded 0.6mm Supplemax (Classic White Mix). I just love the textures on this one.

Prepare approximately 1.5 to 2m each of turquoise/teal and mixed red strips, stitching lengths together with a few stitches to hold, and then knot over the join. Next knot the silk strips at intervals of approximately 2 inches right along the length. Don’t pull too hard or the silk will tear. Loosely twist the teal and red strands together and wind onto a Kumihimo bobbin.

Keeping the 0.6mm Supplemax on the reel, thread a length of approximately 1m with a random mix of the white beads. Weave the bangle in a similar way as the Floral Trellis, pushing up 3-5 beads to the front per ‘wrap’ with the beaded strand. The weave holds the beads in place.

Warp using approximately 3m of 0.6mm Supplemax and secure with crimps.
I have been playing with the new bangle weaver tool created by Kleshna for Beadalon


I have been playing with the new Bangle Weaver Tool and have had so much fun. I simply love it and my mind is bursting with ideas.


To create your design you need:

·         Something strong/stiff for the warp (to hold shape)

·         Something to weave

·         Something to further embellish (optional)

The instructions included are very easy to follow. There are 3 positions for setting up the warp pegs, allowing 3 sizes of bangle to be created. The tool is so versatile and can be used to weave so many different types of materials:

·         Beading cable (e.g. 7 Strand beading wire)or monofilament (e.g. Supplemax)

·         Recycled sari silk yarns or ribbons

·         Shamballa (e.g. waxed nylon cord), cotton (e.g. waxed cotton) or rattail cords (e.g. satin)

·         Leather (e.g. round cord) or suede cords (e.g. flat cord)

 Weaving is very quick and easy. Beads can be incorporated into the weave by adding them to your cable or cord length before weaving. I find that Kumihimo bobbins are invaluable for keeping cords or ribbons manageable, or Spool Tamers  if you are using beading wires. Bead stoppers are also handy for temporarily holding beaded cables or ribbons in place.

Replacing the warp can be a bit fiddly and takes longer than you might think. You will need blunt ended needles with a large eye to pull the warp through. The bodkin set recommended by Kleshna is very good. However, when warping ribbon or fabric strip weaves I found that an extra-long bodkin (e.g. elastic threader available from haberdashery stores) was much easier to use.

Beads can also be added to the warp. They can be placed between sections of weave or on the outer edges to create pretty beaded borders. Finally you can further embellish your bangle with beads, charms, silk flowers etc. There are just so many possibilities.

The warp pegs are quite sharp so I would not recommend the tool for young children, and do protect you table top from scratches by using with a mat.

I just love this tool. It can be used to create so many different styles of bangle, from structured wire weaves to Boho and ethnic styles using textiles. Why not try recycling old T shirts, bedding or carrier bags. The possibilities are endless.

I am currently weaving with silk ribbons and embellishing with beads. I will be sharing some of my designs with you all very soon. I hope that you will love this tool as much as I do.

Happy beading, Anne x.

Thursday, 24 March 2016

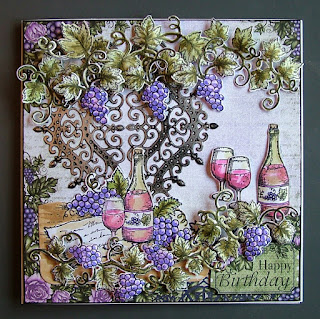
I have been playing with the Italiana Riviera Collection from Heartfelt Creations


I have been playing with the Italiana Riviera Collection from Heartfelt Creations. I love this set of stamps, dies and co-ordinating papers.


Materials from Heartfelt Creations:

  • Italiana Riviera 12 X 12 Paper Pad (for background papers and images)
  • Cut, Mat, Create 12 X 12 Paper Pad (for the wedding card sentiment)
  • Decorative Window Scene Die (HCD708)
  • Ornate Gateway Die Set (HCD737)
  • Italiana Grape Clusters Die and Stamp Sets (HCD1773 and HCPC3697)
  • Italiana Grapevines Die and Stamp Sets (HCD1772 and HCPC3696)


Other Materials:

  • Plain card blanks – A6 in purple and 6 X 6 in white
  • White stamping card (Sheena Douglass)
  • Waste black card (recycled packaging)
  • Happy Birthday sentiment stamp
  • Spectrum Aqua watercolour pens (Crafters Companion): Browns (Fawn, Dessert), Purples (Heather, Orchid, Purple), Reds (Crimson, Burgundy)
  • Inkpads: Versafine (Black Onyx), Distress Ink (Gathered Twigs), and purple dye based
  • Pebeo Gilding Wax (Silver)
  • PVA and 3D glue gel


How it was all put together:

Backing papers were trimmed from the decorative paper pad.  Images were stamped with waterproof ink, cut out and then coloured with watercolour pens. They were then shaped with a ball tool and soft mat to give them dimension. The gate and window decorative elements were cut and embossed from black card. Gilding wax was applied sparingly to give a metallic effect.

I have taken a quick pic on my phone to show you the elements that I used on each card.
Variation 1 - small A6 card:

Variation 2 - 6X6 Birthday card:


Variation 3 - 6X6 Birthday card:


Variations 4 and 5 - 6X6 Birthday and Wedding cards:


Monday, 21 March 2016

Babushka Scene Card Created for Chocolate Baroque


Good morning, I am just loving the new Babushka stamps. Hope that you like my quick scene. To avoid worrying about masking I chose to cut out the dolls and layer them onto the scene.


Materials:

  • A6 purple card blank and white stamping card (suitable for wet media)
  • Versafine Inkpad (Black Onyx)
  • Alcohol Marker (black)
  • Watercolour markers (purple, lime green and turquoise)
  • Adhesive and 3D glue gel
  • Turquoise PVA pearls and fine crystal glitter


How to do it:

  1. Stamp the Fountain Scene and Babushka dolls using Versafine. Trim the scene to fit the card front and edge with black marker. Cut out the dolls.
  2. Colour the image and dolls with watercolour markers.
  3. Mount the image onto the card front and glue on the dolls with 3D glue gel.
  4. Finish with PVA pearls and drop on glitter while the PVA is still wet.


Wednesday, 2 March 2016

MDF Bookstand decorated for Chocolate Baroque Challenge 20

I had so much fun using this month’s hot colours to decorate this book stand for my desk. The colours just said ‘Indian Theme’ to me. I used acrylic paints and mixed and matched stamps from several different stamp sets. The design could easily be adapted to create a wall hanging or small canvas.


Good luck everyone with the Challenge – some wonderful projects on there already this month.

Anne xxx.

Materials:


·         MDF book stand (Creative Expressions Kit)

·         White gesso and acrylic paints (pink, pearl pink, dark red, orange and yellow)

·         StazOn Inkpad (Jet Black)

·         Zig 2 Way Glue Pen

·         Fine tipped alcohol markers (black, pink, dark red and orange)

·         Polychromos pencils (pink, dark red, orange and yellow)

·         Cut-N-Dry Foam

·         Gold gilding wax (Pebeo Renaissance Gold)

·         Iridescent spray varnish (Crafters Companion Pearl Diamond)

·         Scrap paper for planning and masking plus dye based black inkpad


Step By Step:

I first sealed and primed the MDF stand with white gesso. Tip: When painting MDF items it is often best to paint them after constructing as the MDF can expand slightly making it difficult to fit the joints together afterwards.

The sides were painted with pink acrylic. The back and front panels were painted using orange and yellow acrylics. I painted from the outside edges working inward and blending the orange into the yellow in the centre.

The sides were randomly stamped with the paisley motif (Indian Elephant set) using StazOn. A bit of colouring was added using pencils.

I cut a piece of scrap paper the same size as the front panel in order to plan out the stamping. I have included a picture of my sketchbook page. I then worked out the order of stamping and which images needed masking. You will need to protect (mask) the foreground stamped images while building up the scene.
 

I stamped the lettering, elephants and border (Exquisite Edges set) with dye ink onto copy paper and cut around them to create masks. I added a few dots of Zig 2 Way Glue to the back and left to fully dry. This then acts as a temporary tacky adhesive to hold the masks in place while stamping.

It is tricky to stamp some areas on a ready-made item. The stamps need to be positioned on the stamping block to enable stamping into corners etc. It is also easy to slip when you are stamping at an angle on a 3D item. Tip: You could paint a piece of card to fit the area, stamp onto that instead, and then glue this onto your project afterwards.

I first stamped the sentiment, elephants and lower border with StazOn Ink. I then covered with the masks as shown in the picture.
 

Next I stamped the background arches (Gothic Fragments set) with a mix of pearl pink and red acrylic paints using Cut-N-Dry Foam to apply the paint to the stamps. Tip: Squeeze some acrylic paint directly onto the sponge and work it into the surface using a palette knife. This saves washing up of palettes and it wastes less paint. Place the coloured sponges face down on a craft mat and the paint stays workable without drying out for ages. Apply to your stamp with a dabbing motion. Clean your stamps quickly after use with warm water. A soft toothbrush can be useful to remove paint from the stamp crevices.

Next the tall stylised flower (Punky Flowers set) was stamped with dark red acrylic. The top of the stamp was then stamped with StazOn along the base. Masks were then removed.

A bit of colouring was added using marker pens and pencils. The pencils gave a nice textured effect to the elephants. I then outlined elements of the tall floral stamp using a fine tipped black marker. This brought the images further forward and created a nice frame up the sides of the scene.

I then sprayed with pearlescent varnish to protect and finished by adding gold gilding wax to the edges.