Monday, 31 October 2016

Halloween Canvas using the Day Of The Dead Collection from Sheena Douglass


Oooh I do love Halloween. I so enjoy making spooky projects. I created this canvas for a couple of my friends. I used Sheena Douglass ‘Day Of The Dead’ stamps and dies, and I coloured the image so it looked like them. I also used Sheena’s Festive Ivy and Christmas Foliage dies to decorate.

Materials:
  • Stretched canvas approx. A4 size
  • A4 sheet white stamping card (Sheena Douglass)
  • Black, white and green card
  • Brother ScanNCut CM300 machine
  • Silhouette Cameo machine
  • Die cutting machine (EBosser)
  • Sheena Douglass Day Of The Dead Collection (Eternal Love stamp and Dancing Skeleton, and Pawprint memories dies)
  • Sheena Douglass dies (Festive Ivy and Christmas Foliage)
  • Other dies: acorn (Spellbinders) and leaves (Tattered Lace)
  • ScanNCut files: built in designs for the ‘Happy’ and ‘Halloween’ text
  • Silhouette files: JM Rush for spiders (Spider Web Lantern), Bats Flying and Spooky Banner
  • Gesso (black)
  • Inkpads: Versafine (Tuxedo Black), Distress (Gathered Twigs and Tea Dye)
  • Spray and Sparkle (Crafters Companion Diamond Pearl)
  • Pebeo Gilding Wax (King Gold)
  • Spectrum Aqua watercolour pens (pinks, oranges, greens, teals, turquoises, greys, yellows and reds)
  • Brown pencil (to colour bats)
  • Black fine tipped marker (to enhance shading & detail to stamped image)
  • Stickles glitter glue (Crystal)

Cemetery Halloween Lantern created on the Silhouette Cameo


I created this Halloween lantern using my Silhouette Cameo and files from Carina Gardner (from the Silhouette store).

I had so much fun creating these and they are a quick make (compared to the other lanterns – see my posts below).

Carina has a range of spooky candle holders in the Silhouette Store . All are easy to construct, so great for last minute makes to decorate on Halloween Eve.

Materials:
  • Silhouette Files: Cemetery Candle Holder by Carina Gardner (downloaded from the Silhouette store)
  • Silhouette Cameo cutting machine
  • 1 X A4 (approx 8.25 X 11.75 inch) sheet black card
  • 1 X A4 sheet vellum for each (yellow)
  • Stickles glitter glue (Crystal)
  • Battery operated tea light or candle (flameless)
How to make it:

Cut the lantern in black card and the liner from coloured vellum. It is very easy to make as there is just one piece each for outer and inner liner. Construct by applying glue to the tabs.
Finish with glitter glue on the trees for a bit of sparkle.

Sail Away quick and easy card created for Chocolate Baroque


Good morning – I love stamping directly onto pretty background papers to produce quick and easy cards – great if you need to put something together in a hurry.

I stamped elements from the Seashell Collage and flying gulls from the Landscape Edges stamp sets using Archival Ink (Coffee) onto one of the pretty background papers from Crafty Individuals (Book 5 – Travels in Italy). The sentiment is from the Steampunk Travel set, and was heat embossed with white powder. I added a few details with a fine liner pen and quickly coloured some areas with brown pencil. I also blended a little pink dye ink around the edges and over the sentiment to make it stand out – the white embossing resists the ink colour.

Materials:
How to make it:
  1. Trim the paper down slightly (approx. 14.5cm square) and stamp the scene using Archival Coffee Ink. Add some quick colouring to the gulls and wooden posts using brown pencil.
  2. Stamp the sentiment with Versamark Ink and heat emboss with the white powder.
  3. Draw in some faux stitching around the sentiment to extend the scene (just add a few wavy lines) using the fine tipped pen.
  4. Blend pink ink in from the corners and over the sentiment to make it stand out more (the white embossing will resist the ink).
  5. Use the marker to outline and frame the edges and glue to the card front.

Lone Tree quick and easy card created for Chocolate Baroque


Good morning – I love stamping directly onto pretty background papers to produce quick and easy cards – great if you need to put something together in a hurry.

I stamped the tree from the Spinney Design-A-Tree stamp set and heat embossed with sparkly powder onto one of the pretty background papers from Crafty Individuals (Book 5 – Travels in Italy). I then added a ribbon and bow and PVA pearls – all done in a jiffy.

Materials:
How to make it:
  1. Trim the paper down slightly (approx. 14.5cm square) and stamp the tree using Versamark. Heat emboss with the sparkly powder.
  2. Use the marker to outline and frame the edges.
  3. Add the ribbon and bow (use tape to fix to the back of the paper) and glue to the card front.
  4. Finish with PVA pearls.

Saturday, 29 October 2016

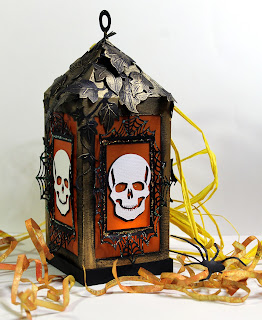
Skull and Spider Web Tea Light Lanterns created on the Silhouette Cameo


I created these Halloween lanterns using my Silhouette Cameo and files from Jennifer Rush Designs (from the Silhouette store). I also used the Festive Ivy die from Sheena Douglass to decorate.
I had so much fun creating these. Off to get some more spooky projects finished.
Materials:
  • Silhouette Files: Spider Web Lantern and Skull Lantern from JM Rush Designs (downloaded from the Silhouette store)
  • Silhouette Cameo cutting machine
  • 4 X A4 (approx 8.25 X 11.75 inch) sheets black card for each lantern
  • 1 X A4 sheet white card (for skulls)
  • 1 X A4 sheet vellum for each (orange or yellow)
  • Festive Ivy die (Sheena Douglass)
  • Stickles glitter glue (Crystal and Icicle)
  • Pebeo gilding wax (King Gold, Empire Gold and Silver)
How to make them:
  1. Cut the lanterns and web layers from black card. Cut the windows from coloured vellum. Cut the skulls from white card. Construct following the instructions on Jennifer’s tutorial blog posts (links in the materials list above).
  2. Rub gilding wax over the lanterns, buff up when dry to give them a metallic effect. You may find this easier to do before adding the web frames.
  3. Die cut and emboss the ivy from black card. Rub over sparingly with gold gilding wax to give a metallic effect. Shape with a ball tool and glue in place to decorate the lanterns.
  4. Finish with glitter glue for a bit of sparkle.

Halloween pumpkin tea light holder created on the Brother ScanNCut


I created this pumpkin lantern using my Brother ScanNCut and the Jack O’ Lantern SVG files from the Haunted Forest Collection (SVG Cuts). I used oriental papers and the Festive Ivy die from Sheena Douglass to decorate.

I had so much fun creating this. It looks lovely with the flickering electric tea light (no flame) glowing from inside. It would also work well if filled with sweeties for Trick or Treat callers.

I love this collection of SVG files and think that I will create the magnificent Haunted House next.


Materials:

SVG cutting files – Jack O’ Lantern from the Haunted Forest Collection (SVG Cuts)

Brother ScanNCut CM300 cutting machine

2 sheets 12 X 12 inch card (1X black, 1X orange - Tonic)

1 X A4 (8.25 X 11.75 inches) black paper

Patterned papers (thin card): 2X A4 double sided pattern for pumpkin and flowers, 1 X A4 for hat panels (Sheena Douglass Oriental Collection)

Festive Ivy die (Sheena Douglass)

Stickles glitter glue (Crystal)

Pebeo gilding wax (King Gold)


How to make it:

Cut the pumpkin from orange card.

Cut the flowers and the pumpkin panels from decorative card.

Cut the hat from black card and hat panels from contrasting patterned card.

There is a fabulous video on YouTube by SVG cuts on how to construct all the elements for this collection (SVG Cuts Haunted Forest Tutorial Video). Construct and glue together following the tutorial. I used a ball tool and embossing mat to shape my floral elements.

Die cut and emboss the ivy from black paper (I used 4 layers of paper in one pass). Rub over with gilding wax to give a metallic effect.  Shape with a ball tool and glue in place to decorate the hat.

Finish with glitter glue for a bit of sparkle.

Halloween Tea Light Holders cut on my Silhouette Cameo and Brother ScanNCut


I have been making some Halloween electric tea light holders using my cutting machines. The skull and spider lanterns were cut on my Silhouette Cameo using files from JM Rush (from the Silhouette store), the pumpkin lantern was cut on my Brother ScanNCut with files from SVG cuts (Haunted Forest Collection). I used some oriental papers and the Festive Ivy die from Sheena Douglass to decorate.

Working on some more spooky projects today.

Will be blogging later if anyone wants more info and links to the files and details of materials used etc. xxx