Monday, 5 September 2016
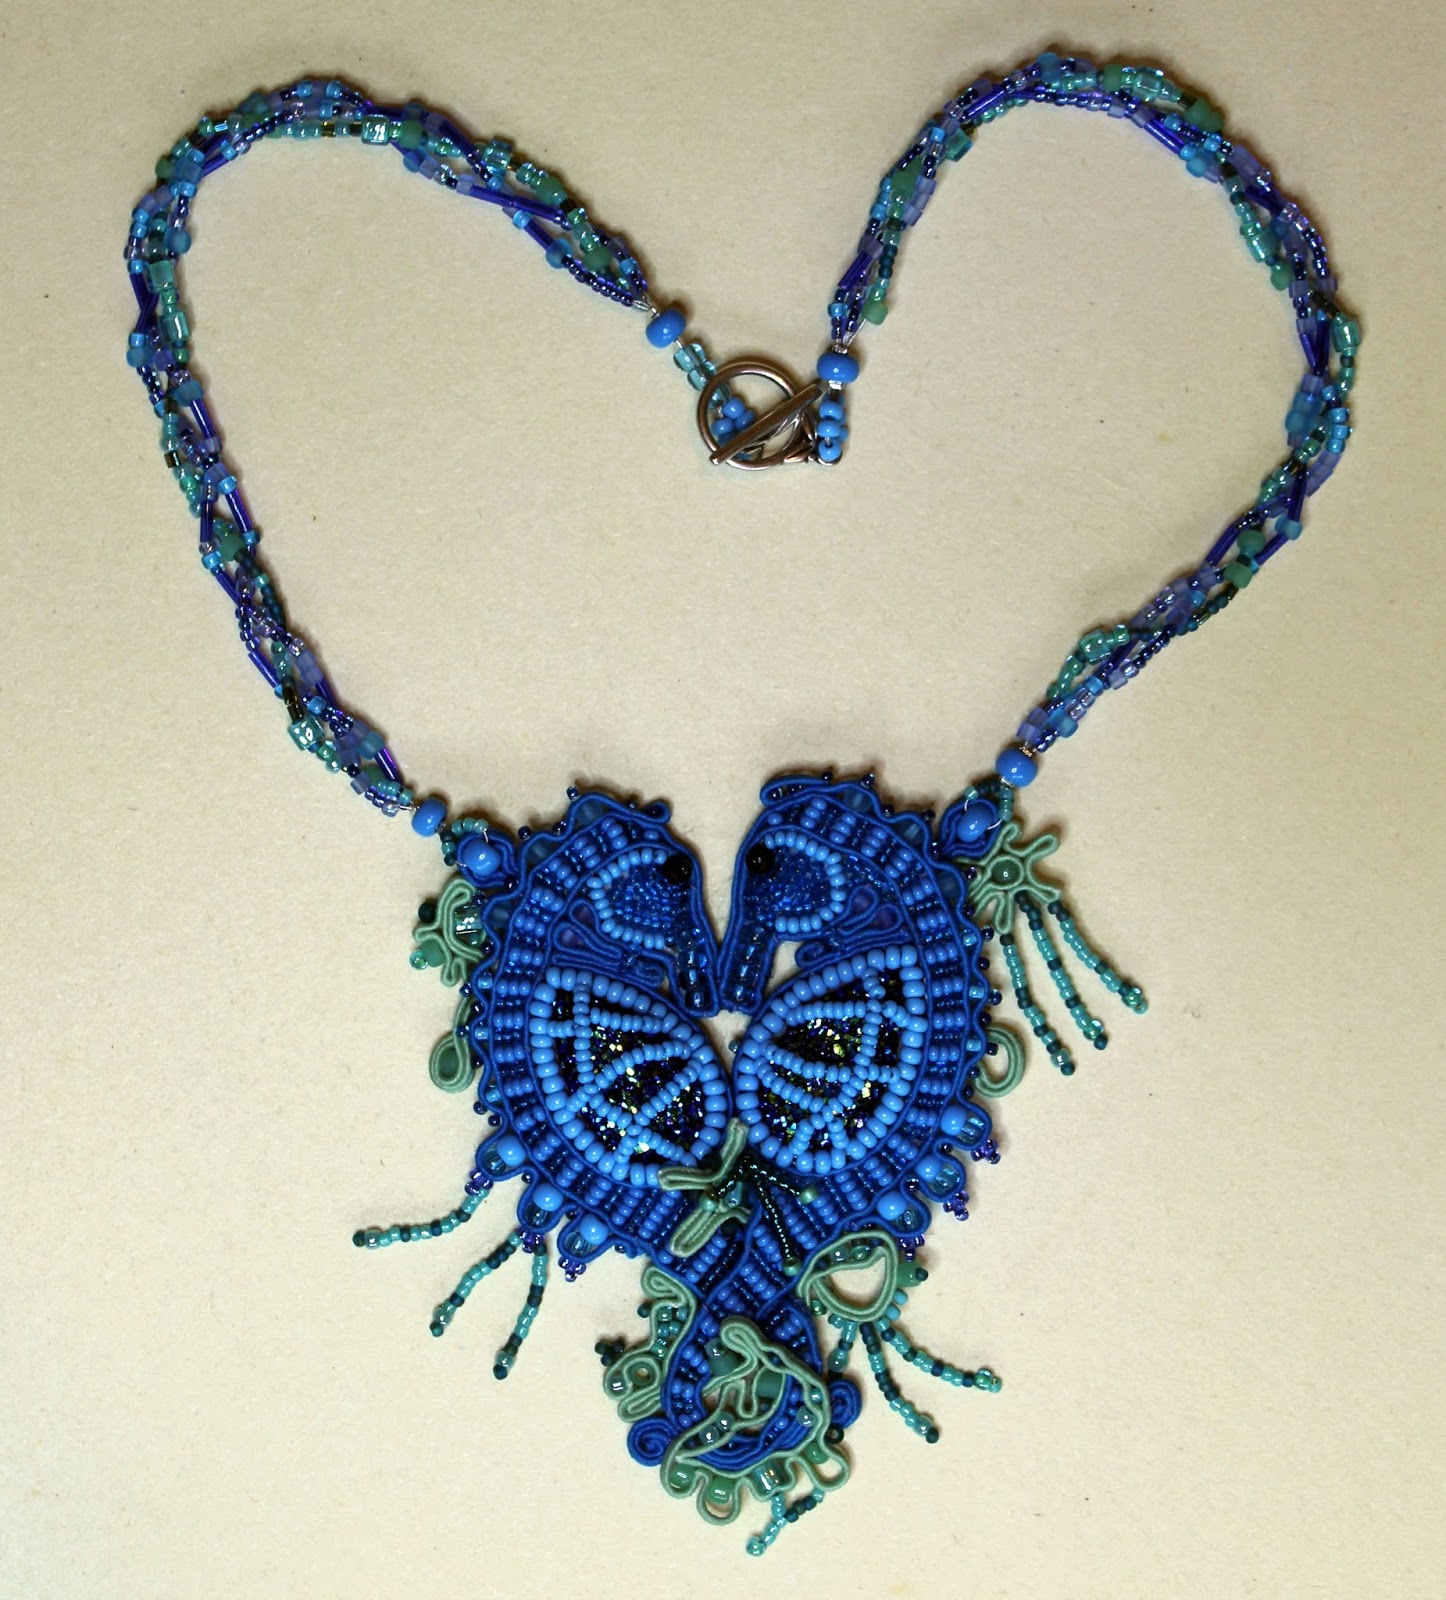
Summer Love Seahorses Necklace created for Beads Direct
This is what I have been busy working on for the past few weeks. I hope that you
like my Summer Love Seahorses. Full step by step and materials lists are on the
Beads Direct blog.

Sunday, 4 September 2016
Textured Book Covers using the Tangled Birch from Chocolate Baroque
I hope that you like my texture project for the blog today. I got the idea
from one of Lesley Wharton’s demos on The Craft Channel where she used Brushos
to make lovely background papers and book covers.


Materials:


Materials:
- Tangled Birch stamp
- A6 (approx. 10.5 X 15cm) hard backed note books, scrap acetate, kitchen towel and cartridge paper
- Brusho’s and Ink Sprays (pinks and blues, some with mica)
- Starlight paints (with crushed gilding flakes) or metallic acrylic (gold and pink)
- White Gesso
- Mod Podge (Matte finish)
- Tacky acrylic glue
- Glitter glue (pink and gold)
- Alcohol marker (black or dark grey)
- StazOn Inkpad (Black)
- Microbeads (pink and turquoise mixes)
- The blue textured paper was created from waste kitchen towel initially used to mop up waste diluted Brushos from my craft mat. I spritzed on a bit more colour. When dry the towel was scrunched up and the layers separated.
- The pink textured paper was created with thin cartridge sketching paper and ink spritzers, some with mica.
- The papers were applied to the book covers using Matte Mod Podge. The wrinkles created a lovely texture. I sealed the blue tissue with Mod Podge on the outside too, and used both layers as it was quite translucent with just one layer. I left the pink textured paper unsealed.
- When dry I rubbed over the surface with metallic acrylics to pick up and highlight the textures (using a little on my finger).
- The Tangled Birch was stamped onto acetate with StazOn Ink. The back was then coloured with metallic acrylics.
- When dry I added a layer of white Gesso. This made the translucent acrylic more solid and opaque. The image was cut out and glued to the book front with tacky glue.
- Glitter glue was added to the image front. I used Pinflair glitter wands which work well on acetate. You may want to test this as some glitter glues may not stick well to acetate.
- Microbeads were dropped into a thick layer of tacky glue for added texture.
Thursday, 1 September 2016
Christmas Canvas created for Chocolate Baroque Colour Challenge 26
I couldn’t resist making something for Christmas using this month’s colours –
for the golden orange I substituted metallic gold. Check out the Chocolate
Baroque Challenge Blog for more lovely projects from my Teamies.


Looking forward to seeing your entries this month x.
Materials:
- Christmas Decorations stamp set. Sentiment from Words of Inspiration, reindeer from Sparkling Trees and Lantern from Christmas Candlelight stamp sets.
- 25 X 20cm primed canvas board, white stamping card, black card, and scrap acetate.
- Embossing folder with Baroque style design (EBosser Regency).
- Snowflake stencil (Claritystamp).
- Inkpads: Distress Ink (Mustard Seed), Versamark, StazOn (Jet Black).
- Embossing powder (black sparkle glitter).
- Gesso (black) and acrylic paints (black, green).
- Viva Décor Croco Crackling Colour (Teal green) and Kristall Gel (clear holographic glitter gel).
- Glitter pens (red, green, yellow, gold).
- Glitter glue (red, green, gold).
- Glossy Accents, chunky gold glitter, PVA pearls (gold).
- Pebeo Gilding Wax (Renaissance Gold).
- Purchased berries and twigs, recycled gold chain and red organza ribbon.
- Embossed black card with folder and rubbed over with gilding wax. Trimmed to make background panel.
- Brushed the canvas with black acrylic leaving some background canvas texture showing through, and dried. Sponged Distress Ink into the spaces.
- Applied crackle paste in corners and around the edges and left to dry overnight. Brushed over the top with green acrylic (the paste was not quite the right green). I dropped on some chunky gold glitter into the wet paint.
- Glued down the embossed background panel. Stamped the sentiment with gold acrylic and outlined with green glitter pen. Applied Glossy Accents.
- Stamped the bauble diamond 9 times onto white card with Versamark and heat embossed with the black sparkle powder. Coloured the card with Distress Ink. Coloured the baubles with glitter pens. Cut out and glued to canvas with 3D glue gel. Added Glossy Accents to enhance the baubles.
- Applied Kristall Gel to the canvas through the stencil. Also applied to scrap acetate, dried overnight and cut out.
- Stamped the lantern and reindeer onto white card. Coloured with Distress Ink and glitter pens. Cut out and glued to canvas. Added Glossy Accents.
- Stamped the gem decorations onto acetate with StazOn. Coloured the back with glitter glues. Left to fry overnight. Painted the back with black gesso, cut out and glued to canvas. Added gold hanging chains and gold glitter glue to finials.
- Glued down the berries and twigs. They were already decorated with fake snow. Added a bit more sparkle with gold glitter glue.
- Finally glued down the acetate snowflakes. Added PVA pearls and dropped on gold glitter.
Sunday, 28 August 2016
Another quick and easy card created for Chocolate Baroque
Good morning. Today I have another quick and easy card to share – made in
under 15 minutes. I had to make a couple of samples in a last minute hurry for
Lesley Wharton’s recent TV shows on The
Craft Channel. I hope that you like it.

On the Chocolate Baroque DT Blog are more quick makes from my Teamies today.

On the Chocolate Baroque DT Blog are more quick makes from my Teamies today.
Materials:
- Flora Musica stamp
- 14.5 X 17cm white card blank, white stamping card, dark pink card
- Distress Inkpad (Black Soot)
- Watercolour pencil (dark pink)
- Watercolour brush
- Decorative oval layering dies (Tonic Elegant Oval)
- Organza ribbon (pink)
- Black alcohol marker (Spectrum Noir)
- Glitter glue (silver)
- Stamp the image with Distress Ink. Using the pink pencil scribble some colour onto the flowers and leaves. Brush over the image with a damp brush to shade and colour.
- Cut out the image using the decorative oval. Edge with Distress Ink and with the black marker. Glue onto pink card and cut around to create a mat. Again edge with black pen.
- Glue a strip of pink card and ribbons onto the card blank. Glue on the topper. Finish with a little glitter glue in the flower centres.
Quick and Easy Floral card created for Chocolate Baroque
Good morning. Today I have a quick and easy card to share – made in under 15
minutes. I had to make a couple of samples in a last minute hurry for Lesley
Wharton’s recent TV shows on the Craft Channel. I hope that you like it.

On the Chocolate Baroque DT Blog are more quick makes from my Teamies today.

On the Chocolate Baroque DT Blog are more quick makes from my Teamies today.
Materials:
- Harlequin Bouquet stamp
- 14 X 17 cm white card blank, 11.5 X 14.5cm black card for mounting, 10 X 13cm white stamping card
- Versamark Inkpad
- WOW embossing powder (Black Glint)
- Black alcohol marker (Spectrum Noir)
- Spectrum Noir Aquatints (orange, yellow and purple)
- Glitter pens (red, green, yellow) and white gel pen
- Talc or antistatic pad
- Colour the stamping card quickly with aquatints (or use Brusho’s, watercolours or spritzer inks) dropping colours on ‘wet in wet’. Blot off excess with kitchen towel and dry with a heat gun.
- Dust the surface with talc, antistatic powder or corn flour. This stops the embossing powder sticking where you don’t want it. Stamp the image with Versamark. Heat emboss with the black sparkle powder.
- Colour parts of the image quickly with the glitter pens and add highlights with the white pen (just ‘scribble’ quickly around the flower petal edges).
- Outline the card with black marker, glue and mount to the card front.
Tuesday, 16 August 2016
Summer T-Shirt decorated using Tattered Lace dies to create stamps and stencils
Good evening. I hope that you like my summer themed project. You may of seen
my stamped and decorated summer top in my last posting. This time I have created
a variation using dies to create the stamps.
I designed this to showcase how dies can be used to create stamps by cutting from funky foam. Stencils can also be created by cutting acetate or plastic stencil sheet.
Use the coordinating stamps or stencils to complement die cuts on cards, or use them to decorate fabrics for sewing projects, or to decorate ready made items.

Front

Back

Decorated tag to match
Materials:
Note: If you want to stamp onto a darker coloured fabric you will need to use opaque fabric paints specially formulated for dark fabric. IMPORTANT NOTE: I was assured that the Pinflair glitter wand was suitable and fixable on fabric (after heat fixing) but mine has just washed out - eek! I will find another glitter glue suitable and let you know when I find an alternative.
How to do it:
Prewash the shirt in plain soap to remove any fabric treatments or conditioners (I use ordinary dish washing liquid). Dry and iron to give a smooth stamping surface.

Load the paints onto the CutNDry foam and work in well with a palette knife. Place them sponge side down onto a palette (I used a piece of waste packaging) and lightly spritz with water to keep them damp. While not using I also place a damp cloth over the top. This keeps the paints useable while working on your project. I have found this to be the best method for getting nice crisp stamping without paint clumping or drying out. They will even keep overnight if placed in a plastic bag.

Use the dies to cut funky foam shapes. Apply Zig 2 Way glue and leave to go tacky (this glue is blue on application and dries clear to give a repositionable tacky surface). Mount stamps onto acrylic blocks for stamping.
Cut the butterflies from waste acetate and use the apertures as a stencil.
Stamp the butterflies onto copy paper and cut around the outer edge to create masks for stamping.
Wash stamps immediately after use (or place face down on a wet cloth until ready to clean).

Lay some plastic sheeting inside the shirt to protect any paint from seeping through layers (i.e. front to back) while stamping. I placed my glass mat inside the shirt while working. Stencil the butterfly silhouettes with multi colours. Dry. A hair dryer is useful to help speed up the drying process while working (the paints do dry quite quickly).
Stamp the butterfly details over the top of the silhouettes using black paint.
Stamp the foliage using paper masks to protect the butterfly images.
Finally add glitter glue to the butterflies on the shirt front.
Leave overnight for the paints to fully cure and then iron fix the paints on the reverse to make them permanent and washable.
- Tattered Lace Dies from: Zig Zag Cascade 1 (Foliage 1 and 2), Zig Zag Cascade 2 (Foliage 1, 2, 3 and 5; Flower 1, 2, 3, 4, 6 and 7) – ETL274, Oval Shutter ETL124 (Leaf 1 and 3) and Trio of Butterflies D1099.
- Iron fix fabric paints (green, lime, metallic turquoise, pink, violet, blue, black) and glitter glue for fabric (green/gold)*
- Light coloured smooth knit T-shirt (turquoise)
- Thin funky foam, waste acetate and copy paper
- CutNDry foam, water spritzer bottle
- Zig 2 Way glue and acrylic blocks for mounting stamps
Note: If you want to stamp onto a darker coloured fabric you will need to use opaque fabric paints specially formulated for dark fabric. IMPORTANT NOTE: I was assured that the Pinflair glitter wand was suitable and fixable on fabric (after heat fixing) but mine has just washed out - eek! I will find another glitter glue suitable and let you know when I find an alternative.
How to do it:
Prewash the shirt in plain soap to remove any fabric treatments or conditioners (I use ordinary dish washing liquid). Dry and iron to give a smooth stamping surface.

Load the paints onto the CutNDry foam and work in well with a palette knife. Place them sponge side down onto a palette (I used a piece of waste packaging) and lightly spritz with water to keep them damp. While not using I also place a damp cloth over the top. This keeps the paints useable while working on your project. I have found this to be the best method for getting nice crisp stamping without paint clumping or drying out. They will even keep overnight if placed in a plastic bag.

Use the dies to cut funky foam shapes. Apply Zig 2 Way glue and leave to go tacky (this glue is blue on application and dries clear to give a repositionable tacky surface). Mount stamps onto acrylic blocks for stamping.
Cut the butterflies from waste acetate and use the apertures as a stencil.
Stamp the butterflies onto copy paper and cut around the outer edge to create masks for stamping.
Wash stamps immediately after use (or place face down on a wet cloth until ready to clean).

Lay some plastic sheeting inside the shirt to protect any paint from seeping through layers (i.e. front to back) while stamping. I placed my glass mat inside the shirt while working. Stencil the butterfly silhouettes with multi colours. Dry. A hair dryer is useful to help speed up the drying process while working (the paints do dry quite quickly).
Stamp the butterfly details over the top of the silhouettes using black paint.
Stamp the foliage using paper masks to protect the butterfly images.
Finally add glitter glue to the butterflies on the shirt front.
Leave overnight for the paints to fully cure and then iron fix the paints on the reverse to make them permanent and washable.
Monday, 15 August 2016
Summer T-Shirt created for Chocolate Baroque
Good morning. I hope that you like my summer themed project.
I decided to revamp a plain T shirt top with foliage and butterflies.

Front

Back

Close up
- Wild Meadow, Butterfly Blush and Just Butterflies stamp sets
- Iron fix fabric paints (green, lime, metallic turquoise, pink, violet, blue, black) and glitter glue for fabric (green/gold)*
- Light coloured smooth knit T-shirt (turquoise)
- CutNDry foam, water spritzer bottle
- Waste copy paper
I used Vallejo fabric paints (Green, Metallic Turquoise, Bengali Rose, Parma Violet, Blue and Black) plus Martha Stewart Multi Surface paint (Spring Pasture) and Pinflair Glitter Wand. IMPORTANT NOTE: I was assured that the Pinflair glitter wand was suitable and fixable on fabric (after heat fixing) but mine has just washed out - eek! I will find another glitter glue suitable and let you know when I find an alternative.
How to do it:
Prewash the shirt in plain soap to remove any fabric treatments or conditioners (I use ordinary dish washing liquid). Dry and iron to give a smooth stamping surface.

Load the paints onto the CutNDry foam and work in well with a palette knife. Place them sponge side down onto a palette (I used a piece of waste packaging) and lightly spritz with water to keep them damp. While not using I also place a damp cloth over the top. This keeps the paints useable while working on your project. I have found this to be the best method for getting nice crisp stamping without paint clumping or drying out. They will even keep overnight if placed in a plastic bag.
Stamp the butterfly silhouettes onto copy paper and cut out to create masks for stamping. Wash stamps immediately after use.
Lay some plastic sheeting inside the shirt to protect any paint from seeping through layers (i.e. front to back) while stamping. I placed my glass mat inside the shirt while working. Stamp the butterfly silhouettes with multi colours. Dry. A hair dryer is useful to help speed up the drying process while working (the paints do dry quite quickly).
Stamp the butterfly details over the top of the silhouettes using black paint.


Stamp the foliage using paper masks
to protect the butterfly images.
Leave overnight for the paints to
fully cure and then iron fix the paints on the reverse to make them permanent
and washable.
Subscribe to:
Posts (Atom)