Tuesday, 19 March 2019

Heart Shaped Wedding Pillow decorated with Ribbon Ruched Flowers


Good morning. Gina Barrett (Gina-B Silkworks) had some great shows on Hochanda TV on Sunday (17th March 2019). The first show was with the FAB ribbon flower ruching tools. If you missed it they do keep the video up online (https://www.hochanda.com/) for a couple of weeks (go to TV schedule, select Sun 17th Mar – click watch button next to show listing).

These are fantastic tools for quickly marking out ribbon with a variety of ruching patterns. Simply stitch along the marked lines and gather to create gorgeous ruched trims and flowers. Gina has also put up a Flower Comb instructional video on her YouTube Channel so you can see how the Flower Combs work.

The combs can also be used to mark out stitching guide lines for quilting, pleating and smocking designs too.

I have had so much fun creating samples for the show and have lots to share over the next few days.


Heart Shaped  Wedding Pillow decorated with Ribbon Ruched Flowers
I used instructions from Gina’s Ribbonwork Flowers Book plus the Leaf and Bud Comb set, along with the Rococo Flower Comb set, to create the satin ribbon flowers, buds and leaves used to embellish the pillow. 
I made this heart shaped pillow using recycled curtain lining and a pale pink gold foiled organza gift bag that I couldn’t bear to throw away. I love to recycle. Even the stuffing was taken from an old bed pillow that had lost its shape. Everything was well laundered and no-one would ever know that this was made mainly from scraps and junk.
First I made a heart template from scrap computer paper taped together to make a sheet approx 12 X 12 inches square. I folded the paper in half and drew a half heart, then opened out. This ensures that the heart is equal on both sides. The heart template measured approx 11.5 inches at it’s widest X 9.5 inches deep. 
I used the template to cut X 2 each of cream cotton curtain lining and organza plus recycled curtain interling to provide extra stability and padding (cotton interlining is like a thin wadding/batting). I stitched around the heart using a 1/2 inch seam attaching a ribbon hanger to the top and leaving an opening in the side for turning through. I left a wide enough gap to pass my fingers through and make stitching on embellishments easier. The seam edges of the opening were folded in and tacked (basted) to hold the layers together and help stop them fraying while working on the next stages.
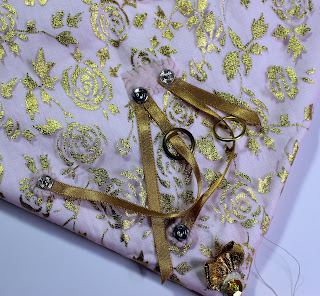
Next I created a couple of ribbon hangers to hold the wedding rings (brass curtain rings in the pic). I used thin gold satin ribbon and attached using small snap fasteners, so that the rings could be easily attached and removed. 
I used some little pink pads cut from felt to reinforce the fastener attachments. I traced the circle shapes from the Leaves and Buds Comb sets directly onto the felt using a soft pencil, then cut out. Circles are always tricky to cut neatly just by eye. These will be hidden under the floral embellishments so stitching did not have to be perfect. Functionality was more important.
I created an array of overlap and doucet leaves following instructions from the book and Comb 36 (Leaves and Buds set). The green leaves were made from ribbon and the gold leaves from scrap pieces of gold foiled organza (from the recycled gift bag).
Flowers  were made using  gold and cream satin ribbons, wrapping the gathered strips around flower stamens and stitching into a cone shape (Combs 1 and 3 – Rococo Set).
Leaf shapes were also created with pink organza ribbon to create buds. These were stitched in place building out from the pillow centre and disguising the snap fasteners.
Extra ribbons were also stitched in place to create little swags.
I continued building from the centre outward.
I created a hand made tassel to finish off the design. The tassel head was created with rolled paper strips using templates printed from Gina’s Paper Lathe CD. A brilliant pattern resource for making hundreds of different shaped tassel moulds and for rolled paper beads too.
I painted the tassel head with gold acrylic. The tassel was made with short strands of cream Cotton Broder left over from another project (most would of thrown these away but I can never waste anything –tee hee). I loved the effect of the varied lengths. Knotting the thread ends added extra interest. I created the loop hanger using macramé.
The cushion was then stuffed and the opening closed (stitching up by hand).
I hope that you like my wedding pillow made mostly from rubbish.

Off to write up blogs for my other samples. 
Back soon, Anne xxx.


Floral Bangle created with Ribbon Ruching Flower Combs


Good morning. Gina Barrett (Gina-B Silkworks) had some great shows on Hochanda TV on Sunday (17th March 2019). The first show was with the FAB ribbon flower ruching tools. If you missed it they do keep the video up online (https://www.hochanda.com/) for a couple of weeks (go to TV schedule, select Sun 17th Mar – click watch button next to show listing).

These are fantastic tools for quickly marking out ribbon with a variety of ruching patterns. Simply stitch along the marked lines and gather to create gorgeous ruched trims and flowers. Gina has also put up a Flower Comb instructional video on her YouTube Channel so you can see how the Flower Combs work.

The combs can also be used to mark out stitching guide lines for quilting, pleating and smocking designs too.

I have had so much fun creating samples for the show and have lots to share over the next few days.

Woven Floral Bangle with Ribbon Ruched Flower

To create the woven bangle I used the Beadalon Bangle Weaver Tool (Beads Direct), recycled sari silk strips, monofilament and a few beads.
I used the Rococo Flower Comb set (Gina B Silkworks) to create the satin ribbon flower embellishment; ribbons varying in width from 15mm to 3.5cm. The flower centre was finished with microbeads and a pearl cabochon, glued in place with Fevicryl (glue designed to stick beads and gems to fabric).
Off to write up blogs for my other samples. Back soon xxx.

Monday, 11 March 2019

Flower Girl Figurine Garden Sculpture with Powertex


This is my first attempt at a figurine. She took me a long time to finally get finished, having started her over a year ago at my Level 1 Powertex Tutor Training! Now that she is finally done I love my Flower Girl – and I call her ‘Bestower of Beauty’.
She stands approx. 49cm high.

Materials used:
How it was done:
The body was shaped over the wooden pole using the card inner tube stuffed and wrapped with foil and covered with masking tape. The plaster head was taped onto the top.
T shirt yarn was then wound tightly around the torso and down to the base of the pole. I made a bit of a decorative wrap over the torso to create the dress bodice. The whole thing was then given a coat of Bronze Powertex, working it well into the fabric.


Fabrics were then coated with Powertex and draped over the body to create the clothing. I used a knitted fabric (Stockinette) to create the illusion of arms by allowing the knit to curl around on itself to give dimension.
A small amount of Power Cotton was added to make small hair plaits draped over her shoulder, and fine lace added to make a headdress. Another piece of T shirt yarn was used to create a tie belt and helped to hold the skirt securely in place. The crochet skirt was draped down and over the base.
During the training course I started the dry brushing technique, mixing pigments into Easy Varnish, to add some colour and bring out the different textures. I used Bronze Colortricx to colour the face, shoulders and hair, plus to add colour around the base. Blue and green Powercolors were used (mixed with a little white) to dry brush and highlight clothing texture.
I was delighted with what I had achieved but came home with my figurine always intending to add more colour (you know how I LOVE colour) and floral embellishments to turn her into a gorgeous flower girl. Sadly she sat in the corner for around a year before I finally pulled her back onto my work bench!

I began by adding much more colour, intense in places, to colour her clothing using the new colours from The Secret Art Loft. I tried to keep most of this colour to the top layers of texture so as to keep depth in the fabric folds. I also added more colour to her face and lips, plus a little shading over the eye lids.

Flower and leaf embellishments were created using Art Stone mixed with Powertex to make a clay which was pressed into silicone moulds. When dry they were coloured with Secret Art Loft Pigments mixed with Easy Varnish and glued in place with Powertex. I also created a suggestion of arms and hands using Stone Art clay. The bad modelling was disguised by carefully placing the bouquet of flowers in her arms – ha ha.


The flowers were also applied onto her dress and down around the base. More texture was added to the base by sprinkling 3D Sand & Balls into wet Powertex.

I spiralled the flowers down and around the hem of her skirt.

Here you can see lots of textures in her outfit, and pretty coloured flowers in her hair.

Another view showing her back.

She looks beautiful standing in the garden. Although she is weather proof I would definitely have to add extra weight (e.g. a concrete base) or add a small garden spike to the base, as she is very vulnerable to toppling over in the wind. I am going to be keeping her indoors so she will be ok as she is.

However, she does look gorgeous alongside my unicorn! I might change my mind and adapt the base for outdoors – sure that I have a bit of broken paving slab somewhere – that would do the trick.
 I hope that you like my ‘Bestower of Beauty’.
 Bye for now, Anne x.

Sunday, 3 February 2019

Tropical Art Doll Mixed Media with Powertex


I have never tried making an Art Doll before and I had so much fun making this. I wanted to make her really bright and cheerful with a tropical feel – the fabulous zingy cocktail colours from The Secret Art Loft Pigments, Inks, and Acrylics range were perfect.

Materials Used
Extras used on the canvas: A4 canvas board, White Paper Decoration, 3D Sand and Balls, Assorted Lace Strips, dried beech nut outer shells and pine cone, small paper clay flowers, old key, gold glitter plus mix blue & green seed beads.
 
How it was done:
First all the MDF components were popped out of the sheet and coated with Ivory or Bronze Powertex Fabric Hardener and left to dry. The box frame was constructed and hanger section attached (the Powertex acts as a glue too). I also coated one of the ‘waste pieces’ which I thought would make a great bird shape to insert into the box frame.
A background panel for the box frame was cut from the FAB images on the packaging sheet and glued in place using Easycoat decoupage medium. Acrylic Inks were used to add a tint of colour.
Easy Structure paste was applied through a texture stencil onto the large background panel and to sections of the frame. The Art Quotes Stencil was used to apply text to the frame, and to apply random sections of text to the wings.
When dry, translucent inks were used to tint the text on the frame. The outer background panel was coloured with Lemon Meringue and Orange Marmalade acrylics, then brushed over with a little Metallic Golden Ink to highlight the texture, before sticking down the box frame.
The birdy shaped waste MDF piece was coloured with acrylic paints and layered into the box using Transparent Powertex to glue. The metallic embellishment was coated with Ivory Powertex and stuck down. The beak coated with Bronze Powertex, and eyes created with seed beads (dark centres created with Bronze Powertex, drizzled into the bead hole with a cocktail stick).
Transparent Powertex was used to coat the fabric flowers and massaged into the aqua cotton fibres. It was also drizzled around the sides to embed the seed beads. A little sand was mixed with Transparent Powertex to make a 3D glue paste to help hold the flower stems in place.
More acrylic paints were used to colour, and to brush over textured surfaces. Easy Varnish was used to stick down sequins, and to embed glitter which was brushed over sections for extra sparkle. Pearl Pigments in Varnish were also applied with dry brushing to add shimmer. I just love a bit of bling.
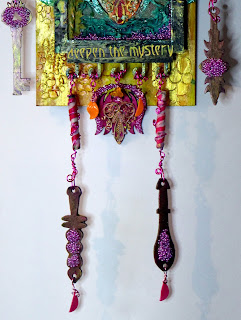
The headdress and face were dry brushed with Pink Flamingo and Limoncello Gold Pigments mixed with Easy Varnish. Sequins and beads were added for more texture and bling. 1mm wire was used to make a hanging loop.
The wings were coloured with Acrylic Paints and Gold Ink and …  yes I had to add some glitter sparkle too.
Fabric strips and ribbon were treated with Transparent Powertex and used to wrap sections of plastic tubing to create beads for the upper arms and legs. The upper arms were attached with 1mm wire, through the holes in the box frame, in such a way that they were held in place (i.e. not dangling). This enabled the lower arm dangles to hang each side of the body.
The upper leg sections were attached so that they hung freely at the base giving movement. The lower arm and leg shapes were dry brushed with Varnish and Pearl Pigments, and beads stuck down with Transparent Powertex. These were hung from the upper arm and leg beads using wire loops so they dangled freely. Leaf and flower bead dangles were also added to the frame base and legs using 0.8mm wire (1mm was too thick to fit the bead holes).
The floral MDF shape was painted with acrylics, embellished with a metal filigree shapes and seed beads before gluing to the main background panel.
My finished Art Doll just makes me so happy. I love her bright happy colours. Plenty of bling and dangles too – cannot help but smile.
After using all the provided shapes to create her I looked at the pile of waste MDF bits left behind – they inspired me to create a canvas. I never waste anything – ha ha.
I coloured the background canvas with Bronze Powertex. Texture and the text was then applied using Easy Structure paste through the stencils. I just love this sentiment from the Art Quotes Stencil.
All the waste bits were coated with Ivory Powertex and applied down. I tried not to think about it too much – as I can spend hours procrastinating on positioning stuff! I just wanted to be free and ‘go for it’ and see what happened.
I then started coating some of the embellishments and building up the scene. Sand & Balls were added into wet Powertex and then coloured with inks and by dropping in some pigment powders.
I built up a sort of tree on the left hand side using Paper Decoration and lace, adding the Beech nuts and pine cone to embellish. 
More acrylic colour was added, and beads added by embedding in we Transparent Powertex. Pearl Pigments were added to varnish for dry brushing over some of the textures. Finally I just couldn’t help myself but had to add some gold glitter mixed into the varnish. More yummy bling.
The finished piece is fairly crazy and abstract but I was pleased with it. I thought that it looked like a foreground beach with water, sand and trees, then rising up in the background were buildings positioned up a hillside. A kind of tropical paradise I thought. You may see something completely different. That is the joy of abstract art. I had to pop in the key to ‘unlock the mystery’. I hope that you like my mad idea for using up all the scrap MDF bits.
Bye for now, Anne x.


Sunday, 2 December 2018

Mixed Media Floral Canvas


Hi all. Today I am sharing a floral mixed media canvas. I started it just over a year ago and it had been sitting as a ‘UFO’ ever since. I usually continue with a project until it is finished, but must admit that if it gets put away before finishing I find it very difficult to get it back on track. So pleased that I dug it back out and got inspired to complete it.
I started working on this at Powertex Headquarters as part of my Level 1 training. I have to say that it was a fabulous couple of days where Tracey took us through a whole host of fabulous techniques.
Black Powertex was used to coat a 12 X 12 primed and stretched canvas. Various fabrics, pieces of lace, kitchen paper and Paper Decoration (White) were coated with Powertex and laid onto the canvas. Small polycarbonate test tubes were covered in cling film (to protect) and incorporated into the canvas. The layers were left to dry before working on the next stages. I also coated the little wooden canvas stretchers to make am area for maybe adding text.

Various pigment colours were mixed and applied with Easy Varnish (Powercolor: Burgundy, Ultramarine, White; Colortricx: Rich Gold and Powerpearl). Initially I was unhappy with the results as everything appeared too dark. I am definitely a colour girl. After some thought I drizzled on some Green Powercolor in Varnish diluted with a little water to make more of a wash. Oooh – much happier.
This was the stage at which it was almost finished but I still wasn’t happy with it – hence it sat in the cupboard for a year. I really thought that it needed more decoration and building up with embellishments. I collected together some MDF cogs (already treated with Black Powertex and rubbed over with gold gilding wax), die cut birds, silk flowers and air dry clay flowers created with silicone moulds from my stash. I also had a stash of moulded flowers created with pearlescent acrylic modelling paste (I put some turquoise glitter in the moulds while making these – yay bling).

I added more colour to the canvas using the new Metallic Inks from the Secret Art Loft (Aqua and Golden).
The paper clay and card embellishments were coated with Black Powertex before sticking down. Where needed I used Easy Structure Paste tinted with Powertex to make a 3D glue for sticking down.
The sentiment (from Chocolate Baroque) was stamped onto card with Versamark (Onyx Black) and applied with Easycoat Matt Medium to glue and seal. The pine cones were treated with Bronze Powertex and rubbed over with gold gilding wax. Beginning to love it now.

I continued building layers of embellishments and also added some created with yellow tinted clay and treated with Transparent Powertex. I liked the pop of complimentary colour. More colour was also added to Varnish and dry brushed over the textural surfaces. I really love the new Secret Art Loft Pigments (Interference Lilac, Limoncello Gold, Violet Valentine), they are so vibrant over dark backgrounds.
The silk flowers were treated with Black Powertex and dry brushed with Violet Valentine and Interference Lilac Pigments. Clear varnish was applied over the yellow flowers and the acrylic embellishments to seal. A little Glossy Accents was applied over the sentiment to emphasise.
I was really chuffed with the final piece. I hope that you like it too.

The great thing about this canvas is that the faux flowers can be removed and replaced with real ones (the tubes are removable and can be filled with a little water). I was initially planning to hang the canvas at an angle but I rather like this orientation with the flowers going at 45 degrees.

Well that’s all for today. Back with more creations soon, Anne x.

Thursday, 29 November 2018

Mixed Media Floral Candle Bowl


Hi All. Today I am sharing a couple of upcycling projects. I have revamped an old chipped crackle glass bowl into a gorgeous faux candle holder and my old egg timer, over 20 years old and really looking very shabby. I love to revamp and upcycle items that otherwise may have been fit only for the bin.
Here is my finished bowl – I just love it now. I didn’t want to completely cover the pretty crackle glass and I thought a faux electric candle would be a perfect shimmering through.

I gathered together some recycled old cotton bedding, tore it into strips and treated with Black Powertex to make the textured side panels. 3D Sand and Balls were applied into the wet Powertex for more texture.

A recycled T shirt was cut into strips and stretched to create cords (it forms a cord when pulled). These were then Powertex treated and coiled around the rim to add strength and to cover up the chipped edge. Any drips on the glass panels were removed with a damp cloth to keep them clear.

I had several large flowers and leaves in my stash that had been created with air dry clay and silicone moulds. These were coated with Black Powertex and applied around the rim of the bowl. I used some Easy Structure paste tinted with Powertex as a 3D glue to apply them onto the uneven shaped surface.
Then came the colouring fun. I used Silver Colortricx and several of the new colours from the Secret Art Loft (Interference Blue, Interference Lilac and Mojito Lime). I mixed them with Easy Varnish and applied by dry brushing to pick up and emphasise the textures. I just love these new colours and they work fabulously on dark backgrounds.

This is my poor old egg timer. Definitely seen better days and it was coming to pieces a little too.

I took it completely apart for revamping so that I could get everything well stuck down and access all the parts for painting.

I painted all the components with a couple of layers of Black Powertex, along with a couple of air dry clay flowers. I chose a flower shape with a fairly flat top so that they could be placed on each end and not fall over.

Ta da. I love my new egg timer. Should be good for another 20 years now. I added a little dry brushing with Colortricx Silver and Interference Violet Pigments to add shimmer and bring out the texture.
Bye for now. Hope to have more to share soon, Anne x.

Thursday, 22 November 2018

Unicorn Blessings


Hi all, today I am sharing one of my projects created during the Powertex Garden Party in July. It was an amazing weekend and I went along with my ex’s lovely daughter Marie. Living far apart we rarely get the chance to be together – so it was extra special to have a whole weekend creating together.
Others also came along with friends or family but many came along on their own. Some were familiar with Powertex and some, like Marie, were completely new to the medium. Whether experienced or not, travelling with friends or alone, the Team at Powertex were wonderfully inviting and everyone soon felt relaxed and eager to get started. Tracey gave us all fabulous instructions to help us along the way. It was a wonderfully relaxed weekend and we made many new friends.

One of the projects was to create a Unicorn (or pony if preferred). We were taken through the process and instructed on the appropriate media to create a fully weatherproof piece that could be used as a garden ornament.
We were all give a Metal Base with attached MDF Unicorn Template which had already been wrapped with masking tape ready for working.
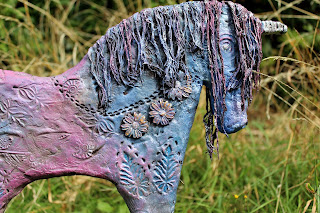
The first step was to paint the whole with a base layer of Bronze Powertex. Then layers of Powertex clay (created with Powertex and Stone Art) were built onto the surface and texturised using wooden print blocks and various tools. The Team had kindly mixed up the clay ready for us to use.
We then had a choice of floral silicone moulds to use to make pretty clay embellishments. I chose the lovely Daisy Moulds.
Next we treated Powercotton fibres with Powertex to create the mane and tail. Pigment colours were used to add colour. I chose to blend a mix of Ultramarine and Titanium White, plus Burgundy and Titanium White Powercolors, mixed with Easy Varnish and a little water to create a blended colour wash.
Next we dry brushed more colour over the surface to pick up and emphasise the texture. I used Colortricx in Silver.
When I got home I added a bit more colouring by dry brushing with Rich Gold Colortricx and Interference Violet (Secret Art Loft Pigment). 
If you know me you will know that I cannot resist a bit of bling. I just had to try adding glitter to the varnish and painted this onto the tail and mane. I used a holographic silvery glitter designed to be added to household paint. In theory it should be weatherproof when embedded in the Easy Varnish (will see how it holds up after she is installed in the garden). Oooooh I love her.
Note: There is a Unicorn Dreams Project Pack available which contains everything needed to create your own magical Unicorn - includes metal base, MDF Unicorn, Powertex, Art Stone, Flower Mould, Pigments, Varnish and instructions.
I also decided to add a little more texture to the base. I added a rough layer of clay and pressed in a crackle textured rubber stamp. I also added 3D Sand and Balls. Finally I treated a few stiff hessian threads with Powertex and pushed them into the clay to create grassy fronds. Various colours were dry brushed over the surface to blend in the base colours with the rest of the project.
Here is Marie’s amazing Unicorn. Truly fantastic.
We all had so much fun and between us created an amazing array of very different takes on this theme. All wonderful.
Sending Unicorn Blessings, Anne x.