Tuesday, 24 November 2015

Cheerful Flowerhead Top Designed for Chocolate Baroque

Good morning. Today I am sharing a stamped and coloured T shirt top using the gorgeous Flowerhead stamps  from Chocolate Baroque, and alcohol ink pens to colour. I had ruined this top while cooking a curry and couldn’t get rid of tiny yellow stains splashed across the front. Now you would never know that they are there.

I hope that you like this fun project. We need some summery florals to brighten up these darker winter days.

AW Floral T Shirt

AW Floral Tshirt 2

Materials:

  • Flowerhead stamps (Mesh Centre, Daisy Ring and Dotty Centre), Leaf from Tall Trees stamp set
  • Dye based inkpads suitable for fabric (black and dark blue)
  • Alcohol ink pens (citrus greens, yellow, pinks, orange, greenish blues and turquoise)

How to do it:

  1. Wash and dry the item thoroughly and do not use conditioner.
  2. Place some scrap paper under the shirt to absorb any ink that may bleed through. Stamp the Flowerheads with black ink and the leaves in blue ink.
  3. Colour the images with alcohol ink pens. Note: it is not possible to get controlled colouring and blending as the ink instantly sucks into the fabric. I used absorbent cartridge paper underneath to take up the excess ink (keep the stained paper to create backgrounds on your cards – it looks quite pretty). I used the lighter more transparent colours for the main colour fill (so as not to obscure the stamp detail), then added accent shading with the darker colours.
  4. Leave overnight for the inks to ‘set’ into the fabric. Iron fix with a dry iron (at the hottest setting that your fabric will tolerate) to make the images and colouring permanent and washable.

Anne x.

Sunday, 15 November 2015

Crystal Plume Necklace and Earrings Set Designed for Beads Direct

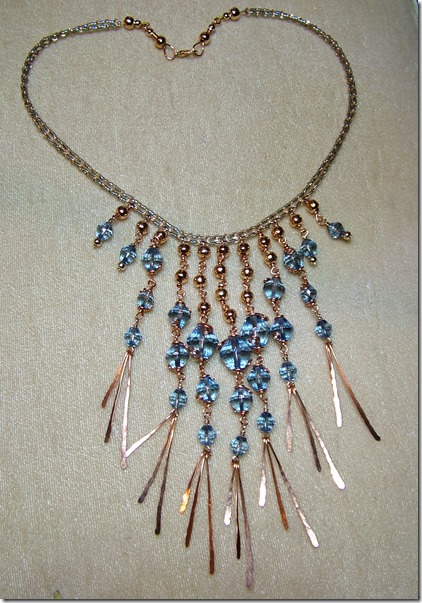
AW Bicone Challenge - Step 6AW Bicone Challenge - Step 8


AW Bicone Challenge Drop - step14

The Challenge

I have really enjoyed my first Design Team Challenge for Beads Direct. I was provided with the beautiful quality bicones from Preciosa in grey-blue colourway. The remit was to design something to fully showcase the beads, combining them with additional materials of my choice (within a given budget). 

They are so gorgeous and need very little embellishing. I chose to combine them with copper and rose gold which really makes the grey-blue colour sing out. They would also look equally good with silvers for a cooler more subtle effect.

I have come up with two versions of a sparkly drop necklace for you. A real show stopper party piece for special nights out and a more delicate version for everyday wear; along with earrings to match. Great for the festive season.

You can make all three pieces with the materials listed. I have also given details of materials for each piece individually to help you with your shopping list.

Note: If you use the lengths of 0.8mm wire that I have indicated in the step by step you will have sufficient from one 6m pack to create all three designs with approx. 0.5 to 1m extra to remake any looped components that don’t quite work out.

Happy Beading, Anne x.


Equipment Needed

Note: You will need a Whammer Hammer to create the copper tassels. It is possible to adjust the design by adding beaded or cord tassels, or omit the tassels and just add a metal spacer bead to the base of the drops. However, if you want to work with wire in your designs I can highly recommend this tool; it is well worth the investment.


Materials

Click here for a quick link to the shopping list from Beads Direct.


Step By Step Guide

Step 1 (out of 14)

AW Bicone Challenge - Step 1

Making the Copper Tassels:

  • Cut 3 lengths of 0.8mm copper wire measuring 3, 4 and 5cm for each tassel.
  • Leaving the top 1cm free, flatten the wire using the Whammer Hammer. Start lightly with a stroking motion and gradually increase the pressure towards the base. Try to keep the wire straight as you flatten. Stop and ease into shape as you go if needed.
  • Make a ‘P’ curled loop on the top using round nosed pliers.
  • Add the drops onto an eyepin to create a graduated tassel drop orientating the ‘P’ loops all to the back.

Step 2 (out of 14)

The Earrings:

Materials: 14mm, 10mm and 8mm bicones X 2 of each and approx. 80cm of 0.8mm copper wire. From the Findings Kit: 4mm spacer bead X 2, eyepins X 2, and earring hooks X 2.

AW Bicone Challenge - Step 2

  • Make 2 sets of copper wire tassels as given in step 1. Align the drops so that they make a mirror image pair.
  • Add a 4mm spacer and an 8mm bicone and top with a simple wrapped loop. Orientate the top loop at 90 degrees to the base loop.

Note: The eyepins are quite stiff and beginners may find them tricky to make wrapped loops. Being a harder wire they will maintain their shape well, so a standard loop would be ok here.

Step 3 (out of 14)

AW Bicone Challenge - Step 3

  • Cut two 10 cm lengths of 0.8mm wire. Place one of the 10mm bicones half way along the wire and make a loop. Attach the loop to the tassel and make a wrap to hold.

Step 4 (out of 14)

AW Bicone Challenge - Step 4

  • Place the 10mm bicone onto the tassel drop and make a wrapped loop at the top of the bead at right angles to the bottom loop. Wrap the wire around the bead top to create a coiled cap, leaving approx. 2cm of wire free for decoration.
  • Place the pliers flush with the wire end and curl in the opposite direction to create a decorative curl. Press down so it sits flat onto the bead.
  • Wrap and finish the bottom of the bead in the same way.

Step 5 (out of 14)
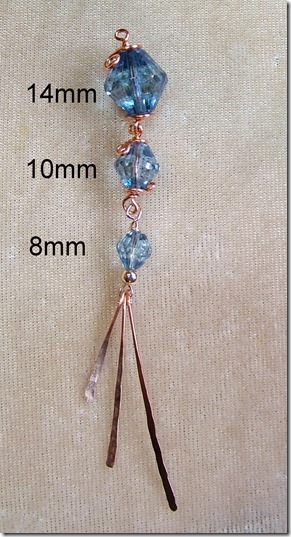
AW Bicone Challenge - Step 5

  • Cut two 14cm lengths of 0.8mm wire. Use to wrap, decorate and attach the 14mm beads as given in steps 3 and 4.

Step 6 (out of 14)

  • Finally attach the earring wires.

AW Bicone Challenge - Step 6

Note: These earrings are opulent shoulder dusters (approx. 11cm long). They can easily be adapted by using fewer beads, or by omitting the copper tassels, if you prefer.

Step 7 (out of 14)

The Single Plume Necklace:

  • Materials: 14mm bicone X 1, 10mm bicone X1, 8mm bicones X9, Preciosa Twins approx. 5g, Miyuki Delicas approx. 2g, 0.8mm copper wire approx. 50cm. From the Findings Kit: 4mm spacer beads X9, headpins X 8, eyepin X 1, 2mm crimp beads X 4, clasp, jump rings X 2, calottes X 2, beading cable approx. 60cm.

AW Bicone Challenge - Step 7

  • Make one tasselled drop in the same way as the earrings steps 1-5.
  • Thread 8 headpins with a 4mm spacer and an 8mm bicone and make wrapped loops.

Step 8 (out of 14)

  • Cut a length of bead cable, approx. 60cm, and thread with the Preciosa twins and Delicas, alternating one twin bead and two Delicas along the length until you have approx. 33 twins along the strand. Use a stopper bead or crimp to prevent the beads sliding off, but do not add permanent fixings yet.
  • Now start adding the drops. Continue the same sequence with the seed beads, spacing the drops with 2 twins between each drop loop. Note: The loops of the drops will slide over and sit on the top of the small Delicas.
  • Continue adding the seed beads up the other side, matching the left and right sides.
  • Test the necklace length and add or remove a few seed beads from each side until happy with the length. Note: Allow approx. 4cm for the clasp fixings in your adjustments.
  • Add a crimp bead and a 4mm spacer bead, pass the cable through a calotte. Add another crimp and pass the cable back down and through the bead and first crimp plus a couple of the twins. Adjust the cable and tighten the crimp beads to secure. Close the calotte to hide the crimp and trim the cable close. Repeat on both sides.
  • Curl the calotte loops enclosing a jump ring. Open one of the jump rings and add the clasp to one side. Note: When turning the calotte loop curl it right back and in on itself to make it more secure.
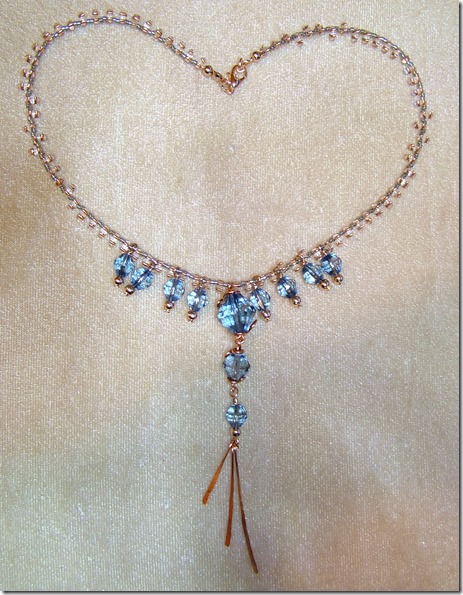
AW Bicone Challenge - Step 8

In this version I have not utilised the second hole on the twin beads. I rather like the texture, sparkle and movement that they give.

Step 9 (out of 14)

The Multidrop Necklace:

  • Materials: 14mm bicones X 3, 10mm bicones X 9, 8mm bicones X 13, Preciosa Twins approx. 5g, Miyuki Delicas approx. 2g, 0.8mm copper wire approx. 4m. From the Findings Kit: 6mm spacer bead X 24, 4mm spacer bead X 8, headpins X 4, eyepins X 7, 2mm crimp beads X 4, clasp X 1, beading cable approx. 1.2m.

AW Bicone Challenge - Step 9

  • Make 7 sets of copper wire tassels as given in step 1.
  • Add an 8mm bicone and make a wrapped loop. Orientate the top loop at 90 degrees to the base loop. Note: The eyepins are quite stiff and beginners may find them tricky to make wrapped loops. Being a harder wire they will maintain their shape well, so a standard loop would be ok here.
  • Thread 4 headpins with a 4mm spacer and an 8mm bicone and make wrapped loops. Note: Wrapped loops are more secure in this instance as they will be sitting on the fine bead cable which is more likely to slip through any small gaps.

Step 10 (out of 14)

AW Bicone Challenge Drop - step 10

  • Cut 2 X 8cm 0.8mm copper wire, attach and make decorative wraps with 2 X 8mm bicones as given in steps 3 and 4.
  • Cut 5 X 10cm 0.8mm copper wire, attach and make decorative wraps with 5 X 10mm bicones in the same way.

Step 11 (out of 14)

AW Bicone Challenge Drop - step 11

  • Cut 4 X 10cm 0.8mm copper wire, attach and make decorative wraps with 4 X 10mm bicones as given in steps 3 and 4.
  • Cut 3 X 14cm 0.8mm copper wire, attach and make decorative wraps with 3 X 14mm bicones in the same way.

Step 12 (out of 14)

AW Bicone Challenge Drop - step 12

  • Cut 20 X 5.5 cm 0.8mm copper wire. Use to make simple wrapped loops and join the 6mm spacer beads to the drops. Add X 4 to the centre drop, X 3 to the next pair of drops, then X 2 to the next pair and finally X 1 to the three outer pairs.

Step 13 (out of 14)

Note: As this is a ‘gem heavy’ piece jump rings are not really strong enough for securing the clasp as they are likely to pull open. I have created simple but strong clasp fixings using the 0.8mm copper wire. If you are a beginner you could add split rings instead but they can be a bit tight to fit onto the lobster clasp.

AW Bicone Challenge Drop - step 13

  • Cut 2 X 14cm of 0.8mm copper wire. Make a simple wrapped loop at one end.
  • Add a 4mm and 6mm spacer bead. Ease the wire back though the 6mm spacer. Take time, stroking the wire and gently bending into a loop as you go. Use pliers to help pull it back through the bead. Leave a little space between the 4 and 6mm beads and use this to coil wrap and finish the wire. Add the clasp to one side before passing back the wire. Lightly Whammer the loop to work harden (this step is not essential if you don’t have the hammer).

Step 14 (out of 14)

AW Bicone Challenge Drop - step14

  • Cut 2 lengths of bead cable, approx. 60cm, and thread one strand with the Preciosa twins and Delicas as given in step 8, adding approx. 26 twins on each side of the drops section.
  • Test the necklace length and add or remove a few seed beads from each side until happy with the length. Note: Allow approx. 9cm for the clasp fixings in your adjustments.
  • Thread the second strand of cable through the second hole in the twin beads, adding in 2 Delicas between the twins (i.e. to make a double strand). In the central section between the middle 5 drops add only 1 Delica. This will make the necklace curve nicely at the front. Take care not to go through the wire loops of the drops sitting on the first strand.
  • Finally, pass both bead cables though a crimp, a 6mm spacer, another crimp and then a 4mm spacer. Attach the clasp fixings and loop the cables back through all the spacers and crimps, plus through a couple of the twins. Adjust, secure the crimps and trim close.

I hope that you like my first designs for Beads Direct.

Happy beading, Anne x.

Saturday, 14 November 2015

Decorated Candles using the Flowerheads Stamps from Chocolate Baroque

Morning all. I so love these big floral stamps. This time I have used all six of the fabulous new Flowerhead stamps to jazz up some candles. I hope that you like them.

AW Floral Candles 1

WARNING: The method involves melting the wax with a heat gun to embed stamped tissue paper onto the candle surface. Please take care. Wax is flammable. It may be an idea to have a wet tea towel by your side to smother the candle should a mishap occur and the wax ignites. This has never happened to me yet – but please be vigilant. This is not a project for the children.

I don’t intend to burn these candles but am having them simply as decoration. I have safely burned these in the past without any problem. If you do burn them there is a possibility of the tissue catching fire and acting as a wick. Again, please take care.

I hope I haven’t scared you all! They are really fun to make and look lovely.

Materials:

  • Flowerhead stamps (Daisy Centre, Swirl Centre, Mesh Centre, Daisy Ring Centre, Circle Centre and Dotty Centre) and Nature Fragments set
  • Inkpads – Dye inks (green, turquoise and purple), Memento (Tuxedo Black)
  • White tissue paper and baking parchment
  • Alcohol ink pens (lime greens, turquoises, pinks and purples)
  • Fine tipped marker (black)

Method:

  1. Stamp the flowers onto tissue paper with black ink, colour with alcohol pens and emphasis some of the outlines with fine black marker. Cut out.
  2. Stamp the texture stamp using random mix of the coloured dye inks. Tear into small patches.
  3. Working with one stamped image at a time, place onto the candle and hold in place using the baking parchment. Grip the parchment so that it sits tightly and smoothly over the stamped image. Heat the stamped area using a heat gun. As soon as you see the wax begin to melt move the gun slowly across the image (in a similar manner to melting embossing powder). Do not keep the heat in one spot for too long. The wax melts almost instantly and the tissue becomes embedded into the surface.

Hope that you all have a great weekend.

Anne x.

Wednesday, 11 November 2015

Project using the Free Digital Paper from Chocolate Baroque

There is a new free digital paper on the Chocolate Baroque Challenge blog for you to download and use in your creations. This is what I created with mine. I hope that you like it.

AW Newsprint Fruit 2


Materials:

  • A Little Bird Told Me stamp set
  • Newsprint Fruit Free Digital paper
  • 21cm white card blank
  • Orange card (to frame/mat) and white paper
  • Inkpads: Versamark, Ranger Archival (Coffee), Distress Ink (Peeled Paint)
  • Fine detail embossing powder (gold)
  • White gel pen
  • Alcohol ink pens (Golden yellows, reds, pinks, purples, greens, turquoise)
  • Hand made die cut flower coloured with alcohol pens
  • PVA pearls (gold)
  • Adhesive and 3D glue gel

How it was made:

  1. Stamped the bird and cages onto the digital paper with Versamark and embossed with gold. [Tip: need to work quickly on digital print paper as the Versamark ink sinks into the coating quickly making embossing tricky]. The smaller background cage was stamped with archival ink (masking the foreground cage). The tail of the bird on the right was created by combining two of the bird stamps and masking (to extend the tail feathers).
  2. The sentiments were stamped on white paper and embossed, cut out and glued on.
  3. The images were coloured with alcohol pens and the paper edges enhanced with Distress Ink.
  4. The paper was mounted onto orange card to frame, and then glued to the card front. Finally embellished with the flower and PVA pearls.

Saturday, 7 November 2015

Thread Wrapped and Embroidered Buttons

I had some time today to make some thread wrapped and embroidered buttons. I need a little practice with the embroidery but love them.

Gina buttons 1


I used instructions (Original Snowflake Button Designs) and 25mm MDF button blanks available from Gina-B Silkworks . I love the textile kits available from the talented Gina Barrett – do take a look at her website.

I am making myself a little sewing box and will use these to decorate it – will share when I have finished.

Anne x.

Friday, 6 November 2015

Quirky Scene Created for Chocolate Baroque Challenge 16


I enjoyed making this quirky landscape with the little house stamped on a slant. Thought that it would be a nice card to send and bring a smile to a friend going through a difficult time.

I created it using this months Colour Challenge colours.

AW Challenge 16 scene 2

The stamps (Country Views and Sunburst Scenes) were featured on the recent TV show with Lesley Wharton on The Craft Channel.

Materials:

How it was made:

  1. Stamp the scene with Memento ink. Some of the foreground elements, such as the trees, will need to be stamped first and masked before stamping the images behind.
  2. Use black detail pen to draw and ‘join up’ the landscape. Colour with alcohol ink pens. Finish by adding highlights with the opaque white gel pen.
  3. Trim to fit the card front and edge with distress ink and finally black pen to create a frame.
  4. Stamp the sentiment ‘Just to say’ onto a die cut topper and glue on the printed sentiment. Edge with distress ink and black marker. Stick to the card with foam pads.
  5. Finish with a little glitter sparkle on the sun and roof tops, and PVA pearls on the sentiment plaque.

I hope that you like my project. I am looking forward to seeing your entries for the Challenge this month.

Anne x.

Sunday, 1 November 2015

Flowerhead Aperture Card created for Chocolate Baroque

WOW! I just love the new Flowerhead stamps. They are fabulous when mixed & matched together, but just one single stamp is enough to make a stunning project on its own. I hope that you like my first project with these stamps. AW Flower Apeture Card Materials:
  • Circle Centre Flowerhead stamp and Mackintosh Sentiments set
  • White card blank 14.5cm square, purple card and smooth white stamping card
  • Inkpads: Memento Dew Drop (Bahama Blue, Grape Jelly, Pear Tart) and Versamark
  • Alcohol pens (turquoise, blue, purple, pink and black)
  • White acrylic pen
  • Clear glitter glue
  • Embossing powder (white with silver glitter)
  • Dies or circle cutter
How to make it:
  1. Cut a circular aperture approx. 9cm diameter into the card front. Cut a 10cm circle from the stamping card. Cut the purple card to approx. 13.5cm square and cut a circle aperture approx. 10cm diameter.
  2. Stamp the flower onto the circular mat using graduated ink colours; green in the centre, then turquoise and then purple for the outer edge of the stamp. Colour with alcohol pens and mount inside the card aligning with the aperture on the card front. I have coloured the background surrounding the stamp with purple alcohol ink, but you could colour and cut out your flower and mount onto a purple background.
  3. Stamp the sentiment onto the purple front mat with Versamark and heat emboss. Draw a wiggly line with white pen to create the frame. Stick to the card front.
  4. Finally, finish with a bit of glitter glue in the flower centre for added sparkle.
Happy crafting, Anne x.