Showing posts with label Jewellery. Show all posts

Wednesday, 6 June 2018

Simple Feather Jewellery created with stamps from Chocolate Baroque


Good morning. Today I am sharing a couple of jewellery pieces created with the ‘I Shall Be Your Wings’ stamp set from Chocolate Baroque.
My first project is a pair of sparkly feather earrings and presentation card.

Materials
  • I Shall Be Your Wings stamp set
  • Decorative card blank approx. 16 X 11cm (white inkable card)
  • Inkpads: Archival (Jet Black) and dye based multi-coloured (Kaleidoscope Caribbean Sea)
  • Stickles (Crystal) and cerise pink glitter glue (Pinflair - suitable for multi surfaces)
  • Alcohol ink pen (pale pink)
  • Organza ribbon and ready-made ribbon rose (pink)
  • Set of silver plated earring hooks and fine cord end crimps
  • Angelina Fibre mix (greens and blues) and Angelina Film
  • Faux gems (green) and Gemtac glue
  • Domestic or craft iron (warm setting) and baking parchment
  • Jewellery making pliers (flat or snipe nosed)
Making the presentation card
  1. The card blank was coloured by blending multi-coloured ink in from the edges with a sponge. The surface was then lightly spritzed with water and blotted with tissue to create texture.
  2. The feathers were then stamped with rainbow ink and the sentiment with Archival. A little clear glitter glue was added for sparkle. The sentiment was coloured with alcohol ink pen.
  3. Two small holes were punched to hold earrings. Finished with ribbon and fabric rose.

Making the Earrings
  1. The feather stamp was inked with Archival ink. A sandwich of Angelina Film and Fibres (2 sheets of film with fibre between) was laid onto the inked stamp. This was covered with a sheet of baking parchment and a warm iron was pressed down onto the sandwich to fuse. When cool the fused sparkly sheet was peeled away from the stamp surface and the feathers cut out.
  2. Small crimps were used to attach the feathers to earring hooks.
  3. Faux gems were glued in place with Gemtac glue (formulated for sticking gems or beads to fabrics) and extra sparkle added with cerise glitter glue.


My second project is a pretty feather pendant on a long chain.

Materials
  • I Shall Be Your Wings stamp set
  • Semi translucent shrink plastic
  • Archival Inkpad (Jet Black)
  • Alcohol markers (green and pink)
  • Pebeo Gilding Wax (Silver)
  • Heat gun and non-stick mat
  • Recycled necklace chain and Celtic pendant dropper (from my stash)
  • Silver plated jump rings
  • Jewellery making pliers (flat or snipe nosed)
Making the feather pendant
  1. The feathers were stamped onto shrink plastic with Archival Ink and cut out. A small hole was punched into the tops for hanging. The backs were coloured with alcohol ink pens.
  2. The feathers were then shrunk using a heat gun.
  3. The colouring on the feather backs looked a bit messy. Being a longer pendant the back is likely to show so I coated the backs with silver gilding wax to finish.
  4. The feathers were then added to the decorative pendant dropper using jump rings and the pendant hung on a long chain.

I really enjoyed making these simple jewellery pieces. Happy stamping, Anne x.

Sunday, 7 January 2018

Pretty Owl Necklace created for Chocolate Baroque

Good morning. This was one of my show samples using the Bold Blooms stamp set from Chocolate Baroque. I decorated an MDF owl and added it to some recycled chain and bead strings to make a pretty necklace. I made a little gift tag to match.


Materials:
  • Bold Blooms stamp set
  • Gesso (white) and acrylic paint (turquoise)
  • Inkpads: Versamark, Stazon (Jet Black)
  • Coloured pens (Pentel – pink and turquoise)
  • Glitter Glue (clear)
  • Ultra thick embossing powder (UTEE - Clear and Clear with mica)
  • Recycled chain and bead strings, clasp findings and jump rings
  • MDF owl and mini tag
How it was made:
  1. The MDF owl was coated with gesso (primer) then acrylic paint. The image was stamped with StazOn and coloured with pens. A little glitter glue was added for sparkle.
  2. When fully dry the piece was coated with Versamark and coated with pearlescent clear UTEE. Two more layers of clear UTEE were added to give a sealed shiny finish.
  3. The pendant was attached to the recycled bead and chain to make a necklace, A little gift tag was stamped and coloured to match.

Sunday, 24 December 2017

New Year, New Beginnings, Sculpey Polymer Clay Butterfly Necklace Set


Good morning. I had only ever tried out polymer clay once several years ago to make some beads but experienced absolute disaster as I scorched most of them on baking. The majority were consigned to the bin and I never got around to trying it out again! I would just look in envy at the gorgeous projects others were making with this medium.

I have since used various air dry clays and had been meaning to give polymer clay another try for ages, particularly for making beads and jewellery. However, I wasn’t feeling all that confident with my ability, or with my very old gas oven which varies so much in temperature (front to back and top to bottom).

I was immensely flattered when renowned polymer clay artist Debbie Bulford asked if I would like to take part in this month’s Sculpey polymer clay challenge. Oh gosh! I really wanted to get the process right this time. I needed a challenge like this to push me into giving it another try.

The theme was ‘New Year Celebrations’ and could be interpreted how I liked to make any item with Sculpey Polymer Clay. I thought that ‘New Beginnings’ would be an apt title for my creation. New year, and evolving myself with new techniques and challenges. What better than the metamorphosis of caterpillar into butterfly. So here it is – my ‘New Beginnings’. I am going to enjoy wearing this over Christmas.
Before starting on this piece I knew that I had to research and learn more about the properties of the clay. I also wanted to ensure that the baking was done under more controlled conditions. I put my scientist head on first this time. I read around, watched lots of YouTube videos and carried out several baking trials before I started on my piece. My baking times are longer than many others use but I have based them on my trials with my particular baking conditions. Renowned polymer clay tutor Cindy Lietz is also an advocate of longer baking. I am going to blog all my findings and trials in another posting after Christmas. I hope that others just starting out will find it useful to help them begin with their own creations.
Materials:
  • Von Chef table top oven with raised silicone baking mat and oven thermometer (see pic below)
  • Scrap card to sit items on for baking
  • Sculpey Premo Polymer Clay (57g packs): Black (2 packs), Antique Gold (1/2 pack), White (1/4 pack),Wisteria (1/4 pack), Blue Glitter (1/8 pack)
  • Sculpey Bake & Bond
  • Antique bronze coloured copper wire (1mm and 0.6mm), plain copper wire (0.8mm and 0.6mm)
  • Mica powders (Jaquard – Super Bronze, Aztec Gold, True Blue, Flamingo Pink)
  • Clay extruder with petal and circle discs plus an adaptor to make hollow tubes
  • Acrylic roller, glass mat, Teflon mat, various clay shaping tools
  • Leaf shaped push cutters (3 sizes – 5cm to 3cm length range)
  • Pasta rolling machine
  • Ready made antique bronze leaf toggle clasp and earring hook findings
Step by Step – how it was made:
I first tested my oven to achieve even temperature without big fluctuations – 125 to 130 degrees centigrade. The important thing is to have the oven hot enough but without it getting too hot and causing scorching. I used a raised silicone baking mat to raise my baked pieces away from the hot surface (the temperature fluctuates immensely right next to the base as the thermostat clicks on and off)
Note: The clay will give off a slight plastic smell while baking but if you get an acrid smell it is too hot (ventilate the room well if this happens). I have given baking times for my pieces based on my experiments – different ovens may give different optimal baking times. Thicker pieces will need longer than thinner (more about all this will be included in my blog after Christmas along with how I tested my optimal baking times etc.).


Clay was conditioned by hand kneading and by passing repeatedly through the pasta roller. Black clay was extruded using a circle disc and adaptor to make a long tube of clay (approx. 6-7mm wide). Different coloured micas were applied to the surface to give shimmer. This was then baked in a lightly curled up state to set a slight curve into the tube (40 mins). The baked clay was then sliced to make beads approx. 2-2.5cm long.
The beads were then threaded with 1mm antique bronze wire.  At one end the wire was looped and pushed into the end of the bead to close the opening. A loop was created at the other end with  extra twirls and coils added for an organic look. A little space was allowed at the bead ends for wrapping clay to cover the open bead ends and loops were aligned in a horizontal orientation (see next step).
Thin ‘cords’ of black clay were created with the extruder and wrapped randomly around the beads using Bake & Bond to ‘glue’. The open ends of the beads were covered to hide the holes and ‘set’ the wires in place.
The bead ends covered and wires anchored with clay coils.

The leaf/petal shaped disc was used and the extruded ‘cane’ sliced to make little leaf shapes. These were squished, shaped and attached onto the beads. A little Bake & Bond was used where needed (i.e. if attaching to the prebaked clay areas). I designed the slightly curved beads to fit around the neck so they had a front and back side. Leaves were added to the front so they would not be lumpy and sticking into the skin (particularly as the pendant section is quite heavy). The fresh clay embellishments were dusted with mica powders then baked for a further 60 minutes (10 beads for the necklace and 2 for earrings).
Beads, extruded ‘cords’ and ‘leaf cane’ created with extruder discs.

Leaves added and mica powder applied ready to bake.

Finished beads after baking.
The beads were joined together with 1mm wire using random swirly joining loops (5 beads each side of the clasp). Note the slightly curved beads were orientated so that they would fit the curve around the neck. I tried connecting with double jump rings but they gave too structured a finish. The random swirly loops gave the more organic look that I was after.

The front branch was created next. I estimated the size by holding up the beaded section onto my neck and estimating the width and depth that I wanted. I created a shallow ‘V’shaped branch approx. 10cm across and 5cm deep using 1mm wire as an armature for the clay (to give it extra strength). Attachment loops were created at the apex and tips.
2 ‘sausages’ of black clay were slit and wrapped around the wire armature to create an organic branch shape. Extruded ‘cords’ of black and gold clay mix were wrapped and twisted around the branch to give added texture. Mica was brushed over to colour (see pics below).
Next the leaf embellishments were created using a blend of black and gold clays and push cutters (rough Skinner Blend to get colour variations – see below). The clay was put through the pasta roller to create sheets of approx. 1.5mm thick. The push cutters were used to cut and emboss the shapes at the same time. Leaf fronts were cut from the blended colour sheets and the backs cut with black clay.
0.6mm copper wire armatures were added for extra strength and to help with shaping (which also held the shape while baking).
The leaves were arranged onto the branch and wires pushed into the clay to hold. Mica powders added extra colour variation. The branch was then baked for 40 mins.
Note some wire ends were left protruding on the left and right sides to aid attachment of embellishments later.
The branch back.
0.8mm copper wire was used to make an armature for the caterpillar. Black clay was rolled and cut into slices to make disc shaped beads which were thread onto the wire and pushed together. A small amount of white clay was extruded with a small circle disc and sliced to make little circles for eyes. Shaping tools were used to add texture details and a little mica powder added extra colour. The caterpillar was attached to the branch using Bake & Bond and baked for 30 minutes.
Several Skinner Blend mixes were created to makes canes which were wrapped with black clay and joined together to make a butterfly cane. There are lots of video tutorials out there about making blends. Triangles of glitter blue or Wisteria clay were blended with white by repeatedly passing through the clay roller.
The long blended strips were then folded concertina style and eased into a sausage shape. I didn’t worry too much about getting it perfect as it was not really essential for this project. A thin layer of black clay was then wrapped around the outside to make a Bulls Eye cane with a colour gradient across the middle.
I then started combining these canes to build up my butterfly cane. I really struggled with this bit.  However, I did manage to get some pretty canes. I definitely need a little practice at this!
Some of my attempts at butterfly cane – oh dear! One of my distorted canes was however perfect for creating the newly emerged butterfly wings and I was really pleased with how it looked. I again used a 1mm bronze wire armature to add strength and to create an attachment loop (baked for 1 hour).
I persisted and made another butterfly cane. I really struggled with reducing it so made it close to the size that I wanted. However, where I wanted a delicate butterfly look it turned out to be more of a moth look instead! Again I used a wire armature (0.8mm copper) to add strength and to hold the shape while baking. The butterfly was attached to the branch using Bake & Bond and the piece was baked for another hour.
The newly emerged butterfly was attached at the base using double jump rings created with 1mm wire. The branch was attached to the necklace beaded section using 1mm wire and ‘organic’ loops.
One of my ‘reject’ butterfly canes also made some lovely earrings to coordinate. I made a couple of delicate slices and added holes using a ball tool. Baked for 1 hour.
The butterfly wings were attached to the beads using jump rings created with 1mm bronze coloured wire. Ready made hooks were attached to the bead tops.
I have loved my first big adventures with polymer clay and I know that I will enjoy wearing this one. A definite statement piece! Here’s to new beginnings x.

Hopefully there are not too many typos or errors in my post – rushing around to get ready for Christmas – tee hee. Wishing you all Happy Holidays and a fabulous New Year, Anne xxx.


Thursday, 21 December 2017

Easy Christmas Earrings


Good morning. These Christmas earrings are a really easy make and don’t take too long. Great for blinging up a Christmas outfit. I made them with earring clips for friends without pierced ears but they could be attached to stud & loop fittings or earring hooks too.

I used ready made wire hoop earring findings and simply wrapped then with lovely tinsel thread (Madeira Glissen Gloss). I used high tac fabric glue to attach tiny star sequins and to add a little fine polyester glitter for extra sparkle. I attached a simple beaded drop for extra dangle and movement.


Monday, 30 November 2015

Tile Necklace Pendant Created for Chocolate Baroque

Here is another of my designs created for the recent TV shows on the Craft Channel for Chocolate Baroque - using the Lace Fragments stamp set.

AW Lace Frag necklace 2

Materials:

How it was made:

  1. Stamped the tile with archival ink and coloured the flowers with watercolour pens. With a pokey tool I then scratched back the surface to create fine detailed highlights. The edges were inked with Distress Ink.
  2. The tile was then sealed with 3 layers of embossing powder applied with Versamark Ink. NOTE: The embossed layer did tend to crack and easily chips off the Stampbord. I think that I will try doming resin next time.
  3. A wire loop was made from the headpin, glued to the back and covered with felt. The pendant was then hung from a decorative toggle clasp loop and attached to the necklace.

My first experiment with Stampbord – me likey.

Anne x.


Sunday, 15 November 2015

Crystal Plume Necklace and Earrings Set Designed for Beads Direct

AW Bicone Challenge - Step 6AW Bicone Challenge - Step 8


AW Bicone Challenge Drop - step14

The Challenge

I have really enjoyed my first Design Team Challenge for Beads Direct. I was provided with the beautiful quality bicones from Preciosa in grey-blue colourway. The remit was to design something to fully showcase the beads, combining them with additional materials of my choice (within a given budget). 

They are so gorgeous and need very little embellishing. I chose to combine them with copper and rose gold which really makes the grey-blue colour sing out. They would also look equally good with silvers for a cooler more subtle effect.

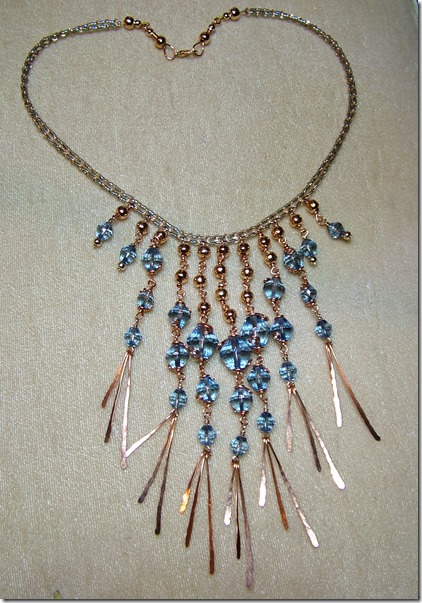
I have come up with two versions of a sparkly drop necklace for you. A real show stopper party piece for special nights out and a more delicate version for everyday wear; along with earrings to match. Great for the festive season.

You can make all three pieces with the materials listed. I have also given details of materials for each piece individually to help you with your shopping list.

Note: If you use the lengths of 0.8mm wire that I have indicated in the step by step you will have sufficient from one 6m pack to create all three designs with approx. 0.5 to 1m extra to remake any looped components that don’t quite work out.

Happy Beading, Anne x.


Equipment Needed

Note: You will need a Whammer Hammer to create the copper tassels. It is possible to adjust the design by adding beaded or cord tassels, or omit the tassels and just add a metal spacer bead to the base of the drops. However, if you want to work with wire in your designs I can highly recommend this tool; it is well worth the investment.


Materials

Click here for a quick link to the shopping list from Beads Direct.


Step By Step Guide

Step 1 (out of 14)

AW Bicone Challenge - Step 1

Making the Copper Tassels:

  • Cut 3 lengths of 0.8mm copper wire measuring 3, 4 and 5cm for each tassel.
  • Leaving the top 1cm free, flatten the wire using the Whammer Hammer. Start lightly with a stroking motion and gradually increase the pressure towards the base. Try to keep the wire straight as you flatten. Stop and ease into shape as you go if needed.
  • Make a ‘P’ curled loop on the top using round nosed pliers.
  • Add the drops onto an eyepin to create a graduated tassel drop orientating the ‘P’ loops all to the back.

Step 2 (out of 14)

The Earrings:

Materials: 14mm, 10mm and 8mm bicones X 2 of each and approx. 80cm of 0.8mm copper wire. From the Findings Kit: 4mm spacer bead X 2, eyepins X 2, and earring hooks X 2.

AW Bicone Challenge - Step 2

  • Make 2 sets of copper wire tassels as given in step 1. Align the drops so that they make a mirror image pair.
  • Add a 4mm spacer and an 8mm bicone and top with a simple wrapped loop. Orientate the top loop at 90 degrees to the base loop.

Note: The eyepins are quite stiff and beginners may find them tricky to make wrapped loops. Being a harder wire they will maintain their shape well, so a standard loop would be ok here.

Step 3 (out of 14)

AW Bicone Challenge - Step 3

  • Cut two 10 cm lengths of 0.8mm wire. Place one of the 10mm bicones half way along the wire and make a loop. Attach the loop to the tassel and make a wrap to hold.

Step 4 (out of 14)

AW Bicone Challenge - Step 4

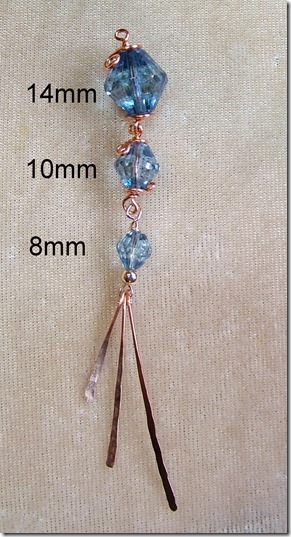
  • Place the 10mm bicone onto the tassel drop and make a wrapped loop at the top of the bead at right angles to the bottom loop. Wrap the wire around the bead top to create a coiled cap, leaving approx. 2cm of wire free for decoration.
  • Place the pliers flush with the wire end and curl in the opposite direction to create a decorative curl. Press down so it sits flat onto the bead.
  • Wrap and finish the bottom of the bead in the same way.

Step 5 (out of 14)
AW Bicone Challenge - Step 5

  • Cut two 14cm lengths of 0.8mm wire. Use to wrap, decorate and attach the 14mm beads as given in steps 3 and 4.

Step 6 (out of 14)

  • Finally attach the earring wires.

AW Bicone Challenge - Step 6

Note: These earrings are opulent shoulder dusters (approx. 11cm long). They can easily be adapted by using fewer beads, or by omitting the copper tassels, if you prefer.

Step 7 (out of 14)

The Single Plume Necklace:

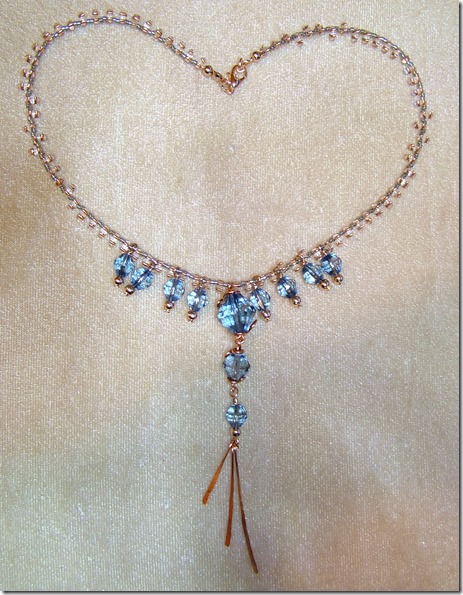
  • Materials: 14mm bicone X 1, 10mm bicone X1, 8mm bicones X9, Preciosa Twins approx. 5g, Miyuki Delicas approx. 2g, 0.8mm copper wire approx. 50cm. From the Findings Kit: 4mm spacer beads X9, headpins X 8, eyepin X 1, 2mm crimp beads X 4, clasp, jump rings X 2, calottes X 2, beading cable approx. 60cm.

AW Bicone Challenge - Step 7

  • Make one tasselled drop in the same way as the earrings steps 1-5.
  • Thread 8 headpins with a 4mm spacer and an 8mm bicone and make wrapped loops.

Step 8 (out of 14)

  • Cut a length of bead cable, approx. 60cm, and thread with the Preciosa twins and Delicas, alternating one twin bead and two Delicas along the length until you have approx. 33 twins along the strand. Use a stopper bead or crimp to prevent the beads sliding off, but do not add permanent fixings yet.
  • Now start adding the drops. Continue the same sequence with the seed beads, spacing the drops with 2 twins between each drop loop. Note: The loops of the drops will slide over and sit on the top of the small Delicas.
  • Continue adding the seed beads up the other side, matching the left and right sides.
  • Test the necklace length and add or remove a few seed beads from each side until happy with the length. Note: Allow approx. 4cm for the clasp fixings in your adjustments.
  • Add a crimp bead and a 4mm spacer bead, pass the cable through a calotte. Add another crimp and pass the cable back down and through the bead and first crimp plus a couple of the twins. Adjust the cable and tighten the crimp beads to secure. Close the calotte to hide the crimp and trim the cable close. Repeat on both sides.
  • Curl the calotte loops enclosing a jump ring. Open one of the jump rings and add the clasp to one side. Note: When turning the calotte loop curl it right back and in on itself to make it more secure.
AW Bicone Challenge - Step 8

In this version I have not utilised the second hole on the twin beads. I rather like the texture, sparkle and movement that they give.

Step 9 (out of 14)

The Multidrop Necklace:

  • Materials: 14mm bicones X 3, 10mm bicones X 9, 8mm bicones X 13, Preciosa Twins approx. 5g, Miyuki Delicas approx. 2g, 0.8mm copper wire approx. 4m. From the Findings Kit: 6mm spacer bead X 24, 4mm spacer bead X 8, headpins X 4, eyepins X 7, 2mm crimp beads X 4, clasp X 1, beading cable approx. 1.2m.

AW Bicone Challenge - Step 9

  • Make 7 sets of copper wire tassels as given in step 1.
  • Add an 8mm bicone and make a wrapped loop. Orientate the top loop at 90 degrees to the base loop. Note: The eyepins are quite stiff and beginners may find them tricky to make wrapped loops. Being a harder wire they will maintain their shape well, so a standard loop would be ok here.
  • Thread 4 headpins with a 4mm spacer and an 8mm bicone and make wrapped loops. Note: Wrapped loops are more secure in this instance as they will be sitting on the fine bead cable which is more likely to slip through any small gaps.

Step 10 (out of 14)

AW Bicone Challenge Drop - step 10

  • Cut 2 X 8cm 0.8mm copper wire, attach and make decorative wraps with 2 X 8mm bicones as given in steps 3 and 4.
  • Cut 5 X 10cm 0.8mm copper wire, attach and make decorative wraps with 5 X 10mm bicones in the same way.

Step 11 (out of 14)

AW Bicone Challenge Drop - step 11

  • Cut 4 X 10cm 0.8mm copper wire, attach and make decorative wraps with 4 X 10mm bicones as given in steps 3 and 4.
  • Cut 3 X 14cm 0.8mm copper wire, attach and make decorative wraps with 3 X 14mm bicones in the same way.

Step 12 (out of 14)

AW Bicone Challenge Drop - step 12

  • Cut 20 X 5.5 cm 0.8mm copper wire. Use to make simple wrapped loops and join the 6mm spacer beads to the drops. Add X 4 to the centre drop, X 3 to the next pair of drops, then X 2 to the next pair and finally X 1 to the three outer pairs.

Step 13 (out of 14)

Note: As this is a ‘gem heavy’ piece jump rings are not really strong enough for securing the clasp as they are likely to pull open. I have created simple but strong clasp fixings using the 0.8mm copper wire. If you are a beginner you could add split rings instead but they can be a bit tight to fit onto the lobster clasp.

AW Bicone Challenge Drop - step 13

  • Cut 2 X 14cm of 0.8mm copper wire. Make a simple wrapped loop at one end.
  • Add a 4mm and 6mm spacer bead. Ease the wire back though the 6mm spacer. Take time, stroking the wire and gently bending into a loop as you go. Use pliers to help pull it back through the bead. Leave a little space between the 4 and 6mm beads and use this to coil wrap and finish the wire. Add the clasp to one side before passing back the wire. Lightly Whammer the loop to work harden (this step is not essential if you don’t have the hammer).

Step 14 (out of 14)

AW Bicone Challenge Drop - step14

  • Cut 2 lengths of bead cable, approx. 60cm, and thread one strand with the Preciosa twins and Delicas as given in step 8, adding approx. 26 twins on each side of the drops section.
  • Test the necklace length and add or remove a few seed beads from each side until happy with the length. Note: Allow approx. 9cm for the clasp fixings in your adjustments.
  • Thread the second strand of cable through the second hole in the twin beads, adding in 2 Delicas between the twins (i.e. to make a double strand). In the central section between the middle 5 drops add only 1 Delica. This will make the necklace curve nicely at the front. Take care not to go through the wire loops of the drops sitting on the first strand.
  • Finally, pass both bead cables though a crimp, a 6mm spacer, another crimp and then a 4mm spacer. Attach the clasp fixings and loop the cables back through all the spacers and crimps, plus through a couple of the twins. Adjust, secure the crimps and trim close.

I hope that you like my first designs for Beads Direct.

Happy beading, Anne x.