Saturday, 26 May 2018

Surreal Dreamy Tree Landscapes created with stamps from Chocolate Baroque

Good morning. Today I am sharing a couple of projects using the Rose Tree and Essence of Nature stamp sets from Chocolate Baroque.

My first is a surreal dreamlike scene using the pretty rose tree as the main focal point.


The theme of this week’s Simon Says Stamp Challenge (Wed) is ‘use more than one stamp’ – so I have entered this one.

Materials:
  • Rose Tree and Essence of Nature stamp sets
  • 19.5cm X 14.5cm card blank, black card, white card (for backing), acetate (recycled packaging) and waste copy paper (to create masks)
  • Clear double sided sticky sheet
  • StazOn Inkpad (Jet Black)
  • Alcohol ink pens and opaque white marker
  • Bulb spritzer attachment to spray ink pen (similar to Ranger Distress Marker Spritzer)
  • Nail varnish remover
  • Glitters (green, gold and crystal)
  • Viva Décor Kristall Gel (Holographic)
  • Hexagon dies (Tonic)
How it was done:
  1. The scene was stamped onto the acetate using StazOn ink.
  2. Colouring was added to the reverse using alcohol ink pens. Strips of copy paper were used as a mask and alcohol ink spritzed using a bulb attachment for pens. Basically air is blown across the pen tip by squeezing the bulb, creating a spray. Some colour was dabbed away from the sky area using nail varnish remover.
  3. Double sided sticky sheet was then placed on the back and coloured glitters were dropped onto the scene, burnishing into the sticky sheet using a finger.
  4. A die was then used to cut out a hexagon shape from the centre of the scene. A little Kristall Gel was applied to the background panel for added texture and sparkle.
  5. White card was trimmed and glued to the back to make the images stand out. These were then backed with black card to create a border around the background and hexagon cut shape. White faux stitching was added to frame the images.

My second project uses the lovely butterfly tree as the main focus to create another dreamy scene.


Materials:
  • Essence of Nature stamp set
  • 15cm square card blank, cartridge paper, metallic satin card (blue/silver), pink vellum
  • Versamark Inkpad and pen
  • Embossing powders (aqua sparkle and detail white)
  • Ink spritzers (pink and green) and sparkle brush pens (deep pink and clear)
  • Stickles glitter glue (Diamond) and PVA pearls (pink)
  • Large decorative square die (Tonic)
How it was done:
  1. The background was created using ink spritzers. The image was stamped with Versamark, embossed with sparkly powder and coloured with sparkle pens. The embossing pen was used to draw in extra hills extending the scene and anchoring the tree.
  2. The image was stamped again onto the vellum, embossed with white powder. The butterflies were cut out, shaped and glued onto the tree.
  3. The image was then framed with the decorative die cut and finished with glitter glue and PVA pearls.
Happy stamping, Anne xxx.

Friday, 25 May 2018

Alice in Wonderland Clock created with Powertex


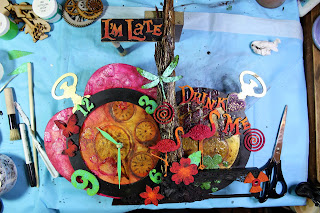
I have had so much fun joining the Alice in Wonderland Tea Party with Powertex UK. I love fantasy themes and wanted to make a working clock full of bright fun colours and sparkle. Hope that you like my Alice Clock. It certainly fills me with cheer and makes me smile.
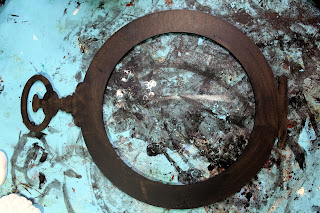
I had an old heart shaped MDF working clock that really needed a revamp. I combined it with the Pocket Watch Kit to create my crazy clock. The kit contains a stand, solid back and frame to make up a 3D pocket watch. Also included are lots of smaller embellishments for decoration – great kit.
The stand was put together using Black Powertex to coat and glue everything together.

The open watch frame was coated with Black Powertex.

The back and outer rim of the solid pocket watch shape were also coated with Black Powertex. The central area was painted with Ivory Powertex ready for adding images. When dry, pocket watch images from a decorative Rice Paper were applied using Easy Coat Mat decoupage medium. The sheet I used does not appear to be in stock at the moment but the Victorian Steampunk sheet is similar. The surface was spritzed with a little Green Bister to knock back the harshness of the Ivory colour. 
I coated my recycled MDF clock with Ivory Powertex on the front, Black on the back. Again Easy Coat was used to add Rice Paper images. You can still see the original painted numbers on my old clock face.
A layer of Crackle Accents (Ranger) was added onto the clock face images to give an aged crackle effect. When dry, more Green Bister was added to empahsise the crackle (the wet colour seeps into the cracks). Texture was then applied using Easy Structure Paste through the Wonderland Stencil. I dabbed over with a little black Powertex to cover some of the bright white colour. Easy Structure Paste was also used as a strong 3D glue to attach the watch to the stand.

Rice paper images were also applied to my recycled heart clock. Layers of kitchen paper were applied around the decoupaged images using ivory Powertex to give added texture. I also added Easy Structure Paste through the stencil to add hearts.
Several of the new Acrylic Inks and Paints were used to add colour to my project (Acrylic Inks in Egg Yolk, Tangerine, Golden Metallic, Viola Metallic and Aqua Metallic; Acrylic Paints in Raspberry Sorbet, Orange Marmalade and Key Lime). The inks are gorgeous fluid transparent colours ideal for painting over other colours or patterned papers. The medium bodied acrylic colours are semi-translucent and are great for heavier colour and layering. I LOVE them.
A piece of tree bark was treated with Transparent Powertex. I have had this piece in my stash for years (so it was fully dried out) just waiting for a suitable project to use it on.
The pocket watch frame was glued in place with Transparent Powertex ensuring that it was well centred. Easy Structure paste was used to glue 3D elements onto the base stand. Bronze Powertex was used to cover and colour the Easy Structure Paste where needed. At this stage I checked that the clock hands would be able to move freely around the clock face (once it’s all glued and dry it’s well and truly glued!).
The small MDF heart (from my recycled clock) was treated with black Powertex. I added some 3D Sand and Balls into the wet Powertex for texture. When dry I coloured with Easy Varnish and Interference Lilac Pearl Pigment. Have you seen these new Pearl Pigment colours? WOWeeee!  I rubbed over a little Pebeo Gilding Wax (gold) to cover the edges and highlight the texture more.

Gilding Wax was also rubbed over the Pocket Watch tops and tree bark. A thick greyboard frame and rectangle was coated in Black Powertex to create a table. A piece of lace and scrap of knitted cotton was also coated in Black Powertex to fill in the base of the ‘tree’ and to create the table cloth. I started placing other MDF elements from the Pocket Watch Kit (but not glued down yet).
More colour was added with the Acrylic Paints. The metal clock hands were coated with Jade Patina (Ranger).
….. and yes my craft stash is encroaching inwards – tee hee.

I continued to build the scene, coating elements with Black or Ivory Powertex then colouring with Acrylic Paints before gluing down with Powertex.  
The MDF sentiments and Flamingoes were from the Alice Collection; the butterflies, dragonfly, numbers and spirals from the Pocket Watch Kit. The sentiment plaque was a greyboard piece from my stash. I added some 3D Sand and Balls to the Flamingo wings for extra texture.
A layer of Glossy Accents (Ranger) was applied over some of the painted elements and fine crystal glitter dropped into the wet surface for added bling and sparkle. The piece was then left overnight, propping it in a horizontal position.
I also added an MDF Heart Flower, Lion, cat and small bird from Mini Hieroglyphs, MDF flowers and leaves plus greyboard flowers (from my stash). The little signposts were made from recycled wooden canvas stretchers and black alcohol marker used to write.
Then I had fun with my dies. Each element was built up using 4 layers of either black or Kraft card and layers glued together with Powertex to make them thick and robust. Coffee Archival Ink (Ranger) was used to stamp the chairs (Sizzix). The cake stand, cupcakes, small cup & saucer, spoon & fork and teapot cut (Intricutz); the larger cup & saucer and top hat (Sheena Douglass); the chandelier (Crafters Companion) were built and glued in place with Easy Structure paste where needed to give added depth. More Glossy Accents and glitter were added over some of the elements.
Finally a little dry brushed colour was added over some of the textured surfaces using Easy Varnish and the Pigment colours (Iridescent Lilac, Violet Valentine, Rich Gold).
I will leave it for around three weeks for everything to fully cure, then finish with Easy Varnish to fully seal everything and give added protection to painted surfaces.

I’ve popped in some close ups for you. Ooooh sparkly flamingos.

I am always running late so this sentiment is perfect for my clock – tee hee.

You can see that crackle texture on the watch faces here.

Lots of layering and sparkle.

I absolutely love my new clock. I hope that you love it too, Anne xxx.


Tuesday, 15 May 2018

Quick and Easy Nature Tree cards created for Chocolate Baroque


Good morning. Here are a couple of quick and easy cards created with the Essence of Nature stamp set from Chocolate baroque.

The first is a small 7 X 13cm card. The background was created with pink and purple ink spritzers. A little sparkle was added with a clear sparkle pen. The tree and sentiment were stamped with Versamark and embossed with sparkle silver embossing powder. A little silver sparkle was also added around the edges.
The second card measures 11.5 X 15cm. The images were stamped with Versamark and embossed with white powder. The background was created by painting green and orange water based inks onto wet card. A watercolour pen was used to draw in some grasses. The edges were roughened with the edge of my scissors.

Wednesday, 9 May 2018

Essence of Nature created with Chocolate Baroque Stamps


Good morning. I have three makes to share with you today using Essence of Nature and The Rose Tree stamp sets from Chocolate Baroque.

I used one of my inky background papers from my stash. This was created by wetting a large sheet of cartridge paper and then painting over the surface with dissolved Brusho powders to make a blended watery background. Dishwasher salt crystals were then dropped onto the surface and the paper left to fully dry before brushing away the salt to reveal the lovely texture effect.
My first is using the lovely tree panel from the Essence of Nature stamp set (and bee from the The Rose Tree set).
The background panel was trimmed to fit the card front (21 X 14.5cm) and images stamped with Versamark Ink and heat embossed with detail white embossing powder. Faux stitching was drawn around the edge with an opaque white pen.
A white card backing panel was trimmed to approx. 9.5 X 15cm. The tree scene and sentiment were stamped onto recycled acetate packaging using black StazOn Ink. Double sided sticky sheet was then applied to the back of the acetate and the image ‘coloured’ using a variety of extra fine and chunky glitters in blue, green and crystal.

I have used the tree panel again on this one but this time to create a textured paper clay embellishment. The clay was rolled out and pressed with the stamp. After drying it was coloured by spritzing water based ink sprays with mica. Pebeo Gilding waxes were then rubbed across the textured surface.
The background was stamped and heat embossed with sparkly gold embossing powder, trimmed and mounted onto a 15cm card blank.

On my third project I went a bit off the wall – tee hee. Again I made some textured paper clay embellishments and thought that they resembled coral – hence a sea themed card was born.
I combined tree and leaf stamps together to make a jelly fish. The images were heat embossed with white powder and extra detail drawn on using pens, plus an embossing pen and white powder. A little white charcoal was used to add some shading to the jellyfish.
I further embellished with lots of sea themed die cuts and added some texture to the foreground with a mix of embossing powders and frontage fragments. Finished with lots of sparkly glitter glue – had to be done.
I hope that you enjoy my makes today. Happy stamping, Anne x.