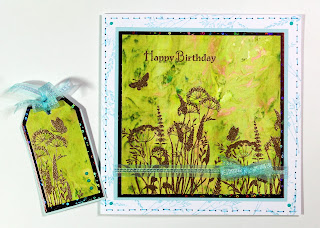
Good morning. Here is another of my projects for the Chocolate Baroque Colour Challenge. I have used the shaving foam technique to create the swirly background for this card and tag set. I stamped the card blank with Distress Ink to create the outer background frame. The main images were stamped using Versamark and heat embossed with copper powder.
Materials:
- Baroque Meadow, Silhouette Grasses, Words to Dazzle & Sparkle stamp sets
- 17.5cm square card blank, pale blue and holographic copper card for layering, white stamping card, and gift tag
- Inkpads: Distress Ink (Tumbled Glass) and Versamark
- WOW heat embossing powder (Copper)
- Tray to fit paper, shaving foam, and water based liquid inks (greens and copper with mica)
- Fine tipped pen (pale blue)
- Piercing tool (pricking tool/bradawl), foam mat and ruler
- Organza ribbon and PVA pearls (pale blue)
How to make it:
- Squirt a layer of shaving foam into a tray. Drop inks onto the surface and swirl over the surface with a cocktail stick. Lay card on top pressing down lightly to transfer ink. Lift off and use the edge of a ruler to lightly scrape across the card and lift away excess foam layer. Tip: Have lots of paper, card and tags etc. ready and do a whole batch at once. You will then have plenty of backgrounds in stock for future projects. Keep dropping on more inks and swirling etc. Eventually the colours will blend into the foam, and the colours will mix and become muddy. Just keep going for as long as you like the results. Muddy brown papers can be nice for cutting out branches or even Steampunk cogs etc. using dies. Another note about this technique: The papers dry smooth and with a slight sheen that is resistant to water so they are best used with stickier or solvent based inks for over stamping.
- Stamp the card blank with the Silhouette grasses and Distress Ink. Pierce a border using a pricking tool with foam mat beneath. Add faux stitching with the fine tipped pen.
- Cut the mats and layers for the tag and card front. Stamp the tag and topper with Versamark Ink and heat emboss with copper powder.
- Glue layers together and add ribbons. Finish with PVA pearls.


No comments:
Post a Comment