Tuesday, 19 March 2019

Heart Shaped Wedding Pillow decorated with Ribbon Ruched Flowers


Good morning. Gina Barrett (Gina-B Silkworks) had some great shows on Hochanda TV on Sunday (17th March 2019). The first show was with the FAB ribbon flower ruching tools. If you missed it they do keep the video up online (https://www.hochanda.com/) for a couple of weeks (go to TV schedule, select Sun 17th Mar – click watch button next to show listing).

These are fantastic tools for quickly marking out ribbon with a variety of ruching patterns. Simply stitch along the marked lines and gather to create gorgeous ruched trims and flowers. Gina has also put up a Flower Comb instructional video on her YouTube Channel so you can see how the Flower Combs work.

The combs can also be used to mark out stitching guide lines for quilting, pleating and smocking designs too.

I have had so much fun creating samples for the show and have lots to share over the next few days.


Heart Shaped  Wedding Pillow decorated with Ribbon Ruched Flowers
I used instructions from Gina’s Ribbonwork Flowers Book plus the Leaf and Bud Comb set, along with the Rococo Flower Comb set, to create the satin ribbon flowers, buds and leaves used to embellish the pillow. 
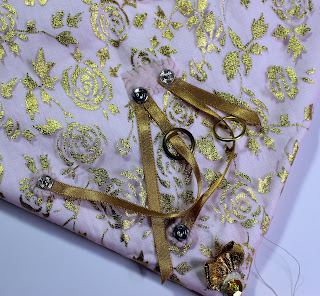
I made this heart shaped pillow using recycled curtain lining and a pale pink gold foiled organza gift bag that I couldn’t bear to throw away. I love to recycle. Even the stuffing was taken from an old bed pillow that had lost its shape. Everything was well laundered and no-one would ever know that this was made mainly from scraps and junk.
First I made a heart template from scrap computer paper taped together to make a sheet approx 12 X 12 inches square. I folded the paper in half and drew a half heart, then opened out. This ensures that the heart is equal on both sides. The heart template measured approx 11.5 inches at it’s widest X 9.5 inches deep. 
I used the template to cut X 2 each of cream cotton curtain lining and organza plus recycled curtain interling to provide extra stability and padding (cotton interlining is like a thin wadding/batting). I stitched around the heart using a 1/2 inch seam attaching a ribbon hanger to the top and leaving an opening in the side for turning through. I left a wide enough gap to pass my fingers through and make stitching on embellishments easier. The seam edges of the opening were folded in and tacked (basted) to hold the layers together and help stop them fraying while working on the next stages.
Next I created a couple of ribbon hangers to hold the wedding rings (brass curtain rings in the pic). I used thin gold satin ribbon and attached using small snap fasteners, so that the rings could be easily attached and removed. 
I used some little pink pads cut from felt to reinforce the fastener attachments. I traced the circle shapes from the Leaves and Buds Comb sets directly onto the felt using a soft pencil, then cut out. Circles are always tricky to cut neatly just by eye. These will be hidden under the floral embellishments so stitching did not have to be perfect. Functionality was more important.
I created an array of overlap and doucet leaves following instructions from the book and Comb 36 (Leaves and Buds set). The green leaves were made from ribbon and the gold leaves from scrap pieces of gold foiled organza (from the recycled gift bag).
Flowers  were made using  gold and cream satin ribbons, wrapping the gathered strips around flower stamens and stitching into a cone shape (Combs 1 and 3 – Rococo Set).
Leaf shapes were also created with pink organza ribbon to create buds. These were stitched in place building out from the pillow centre and disguising the snap fasteners.
Extra ribbons were also stitched in place to create little swags.
I continued building from the centre outward.
I created a hand made tassel to finish off the design. The tassel head was created with rolled paper strips using templates printed from Gina’s Paper Lathe CD. A brilliant pattern resource for making hundreds of different shaped tassel moulds and for rolled paper beads too.
I painted the tassel head with gold acrylic. The tassel was made with short strands of cream Cotton Broder left over from another project (most would of thrown these away but I can never waste anything –tee hee). I loved the effect of the varied lengths. Knotting the thread ends added extra interest. I created the loop hanger using macramé.
The cushion was then stuffed and the opening closed (stitching up by hand).
I hope that you like my wedding pillow made mostly from rubbish.

Off to write up blogs for my other samples. 
Back soon, Anne xxx.


Floral Bangle created with Ribbon Ruching Flower Combs


Good morning. Gina Barrett (Gina-B Silkworks) had some great shows on Hochanda TV on Sunday (17th March 2019). The first show was with the FAB ribbon flower ruching tools. If you missed it they do keep the video up online (https://www.hochanda.com/) for a couple of weeks (go to TV schedule, select Sun 17th Mar – click watch button next to show listing).

These are fantastic tools for quickly marking out ribbon with a variety of ruching patterns. Simply stitch along the marked lines and gather to create gorgeous ruched trims and flowers. Gina has also put up a Flower Comb instructional video on her YouTube Channel so you can see how the Flower Combs work.

The combs can also be used to mark out stitching guide lines for quilting, pleating and smocking designs too.

I have had so much fun creating samples for the show and have lots to share over the next few days.

Woven Floral Bangle with Ribbon Ruched Flower

To create the woven bangle I used the Beadalon Bangle Weaver Tool (Beads Direct), recycled sari silk strips, monofilament and a few beads.
I used the Rococo Flower Comb set (Gina B Silkworks) to create the satin ribbon flower embellishment; ribbons varying in width from 15mm to 3.5cm. The flower centre was finished with microbeads and a pearl cabochon, glued in place with Fevicryl (glue designed to stick beads and gems to fabric).
Off to write up blogs for my other samples. Back soon xxx.

Monday, 11 March 2019

Flower Girl Figurine Garden Sculpture with Powertex


This is my first attempt at a figurine. She took me a long time to finally get finished, having started her over a year ago at my Level 1 Powertex Tutor Training! Now that she is finally done I love my Flower Girl – and I call her ‘Bestower of Beauty’.
She stands approx. 49cm high.

Materials used:
How it was done:
The body was shaped over the wooden pole using the card inner tube stuffed and wrapped with foil and covered with masking tape. The plaster head was taped onto the top.
T shirt yarn was then wound tightly around the torso and down to the base of the pole. I made a bit of a decorative wrap over the torso to create the dress bodice. The whole thing was then given a coat of Bronze Powertex, working it well into the fabric.


Fabrics were then coated with Powertex and draped over the body to create the clothing. I used a knitted fabric (Stockinette) to create the illusion of arms by allowing the knit to curl around on itself to give dimension.
A small amount of Power Cotton was added to make small hair plaits draped over her shoulder, and fine lace added to make a headdress. Another piece of T shirt yarn was used to create a tie belt and helped to hold the skirt securely in place. The crochet skirt was draped down and over the base.
During the training course I started the dry brushing technique, mixing pigments into Easy Varnish, to add some colour and bring out the different textures. I used Bronze Colortricx to colour the face, shoulders and hair, plus to add colour around the base. Blue and green Powercolors were used (mixed with a little white) to dry brush and highlight clothing texture.
I was delighted with what I had achieved but came home with my figurine always intending to add more colour (you know how I LOVE colour) and floral embellishments to turn her into a gorgeous flower girl. Sadly she sat in the corner for around a year before I finally pulled her back onto my work bench!

I began by adding much more colour, intense in places, to colour her clothing using the new colours from The Secret Art Loft. I tried to keep most of this colour to the top layers of texture so as to keep depth in the fabric folds. I also added more colour to her face and lips, plus a little shading over the eye lids.

Flower and leaf embellishments were created using Art Stone mixed with Powertex to make a clay which was pressed into silicone moulds. When dry they were coloured with Secret Art Loft Pigments mixed with Easy Varnish and glued in place with Powertex. I also created a suggestion of arms and hands using Stone Art clay. The bad modelling was disguised by carefully placing the bouquet of flowers in her arms – ha ha.


The flowers were also applied onto her dress and down around the base. More texture was added to the base by sprinkling 3D Sand & Balls into wet Powertex.

I spiralled the flowers down and around the hem of her skirt.

Here you can see lots of textures in her outfit, and pretty coloured flowers in her hair.

Another view showing her back.

She looks beautiful standing in the garden. Although she is weather proof I would definitely have to add extra weight (e.g. a concrete base) or add a small garden spike to the base, as she is very vulnerable to toppling over in the wind. I am going to be keeping her indoors so she will be ok as she is.

However, she does look gorgeous alongside my unicorn! I might change my mind and adapt the base for outdoors – sure that I have a bit of broken paving slab somewhere – that would do the trick.
 I hope that you like my ‘Bestower of Beauty’.
 Bye for now, Anne x.